 |
| 1982 Miyata 610 Restoration - Bicycle After |
 |
| 1982 Miyata 610 Restoration - Bicycle Before |
Yesterday was the start of a 1982 Miyata 610 restoration, today is the start of the blog post. Miyatas are fantastic, beautifully crafted bicycles. They where imported to the United States until the early 1990's when the Yen started it crises, it was just to expensive for Miyata to import them anymore.
The 1982 610 is a sports touring bicycle, in later years the 610 became a total touring Bicycle along with the Miyata 1000. Maybe a better description of the Miyata 610 is that it is pretty close to a Randonneuring type of bicycle.
The 1982 610 is set up with a pretty nice Sun Tour group set with power shift ratcheting shift levers. The crank is a very nice touring triple and descent Dia-Comp G brake calipers. The frame is made with double butted Cro-Mo tubes and is fairly light. The handlebars are very nice Sakae Road Champion Randnner bars, I like them a lot and have that Randonneruring sweep to them.
The 610 will get a complete restoration with a Brooks saddle, new cables and cable housings and new handlebar tape with a throw back feel, the same handlebar tape that is on the Peugeot Vitesses restoration that can be seen by
clicking here. The owner will decide soon on new areo brake levers along with new cross brake levers and a new cartridge bottom bracket, and maybe a new taller stem.
|
| 1982 Miyata 610 Restoration - Bicycle Before |
 |
| 1982 Miyata 610 Restoration - Handlebars Before |
 |
1982 Miyata 610 Restoration
Stem Before |
 |
1982 Miyata 610 Restoration
Brake Levers - Before |
 |
1982 Miyata 610 Restoration
Front Brake Before |
 |
1982 Miyata 610 Restoration
Rear Brake - Before |
 |
1982 Miyata 610 Restoration
Crank - Before |
 |
1982 Miyata 610 Restoration
Rear Derailleur - Before |
 |
| 1982 Miyata 610 Restoration - Rear Wheel Hub - Before |
 |
| 1982 Miyata 610 Restoration - Front Wheel Hub - Before |
 |
1982 Miyata 610 Restoration
Wheel Rim - Before |
 |
1982 Miyata 610 Restoration
Shift Levers - Before |
From there I tore the bicycle down to the frame. The frame is dirty and dull but mostly free of chips and scratches. The bluish silver pearl painted frame should polish out fantastic.
 |
| 1982 Miyata 610 Restoration - Frame Before |
 |
| 1982 Miyata 610 Restoration - Frame Before - Bottom Bracket |
 |
| 1982 Miyata 610 Restoration - Frame Before - Bottom Bracket |
 |
1982 Miyata 610 Restoration
Frame Before - Drop Outs |
 |
1982 Miyata 610 Restoration
Frame Before - Fork |
When I cleaned the frame what I thought was dirt on the seat stay, which was dirt turned out to be a bad scratch underneath the dirt. I mixed a touch up paint that came darn close to the silver blue pearl, I mixed a metallic silver, white and pearl blue and filled the scratch and a few other small chips, the touch up looks very close to the original color. After the touch up paint the frame polished out very nice, I am very pleased with the results.
 |
| 1982 Miyata 610 Restoration - Frame - Polished |
 |
| 1982 Miyata 610 Restoration - Frame - Polished |
 |
1982 Miyata 610 Restoration
Fork Polished |
 |
| 1982 Miyata 610 Restoration - Frame Polished - Bottom Bracket |
 |
| 1982 Miyata 610 Restoration - Touch Up Paint |
The bottom bracket and headset where greased not to long ago but the old grease was not cleaned out first. I cleaned the components in the crock pot, polished the components and packed the bearings in new grease. Both the headset and bottom bracket function very smooth. I went a head with the old bottom bracket while the decision is made on replacing it or not.
 |
1982 Miyata 610 Restoration - Headset & Bottom Bracket
Before |
 |
1982 Miyata 610 Restoration - Headset & Bottom Bracket
Cleaned & Polished |
 |
1982 Miyata 610 Restoration
Headset Bearings Packed in New Grease |
 |
1982 Miyata 610 Restoration
Headset - Complete |
 |
1982 Miyata 610 Restoration - Bottom Bracket Bearings
Packed in New Grease |
 |
| 1982 Miyata 610 Restoration - Bottom Bracket - Complete |
I also went a head with the original stem while the stem decision is being made. The stem polished out very nice and so did the handlebars. I love the randnner handlebars with the sweeps in the flats. The results are quite nice installed on the frame.
 |
| 1982 Miyata 610 Restoration - Handlebars & Stem - Before |
 |
| 1982 Miyata 610 Restoration - Handlebars Polished |
 |
1982 Miyata 610 Restoration - Stem
Polished |
 |
| 1982 Miyata 610 Restoration - Stem & Handlebars - Complete |
 |
1982 Miyata 610 Restoration
Stem & Handlebars - Complete |
 |
| 1982 Miyata 610 Restoration - Bicycle So Far |
The Miyata 610 has a lot of nice components on it, the derailleurs are very nice but the rear derailleur is not my favorite to work on. It is a very nice rear derailleur, its just to complicated for a simple action. Both derailleurs where dirty and had a little corrosion but a good cleaning, polishing and lubricating and they both function and look great.
 |
| 1982 Miyata 610 Restoration - Derailleurs - Before |
 |
| 1982 Miyata 610 Restoration - Rear Derailleur - before |
 |
| 1982 Miyata 610 Restoration - Rear Derailleur - Polished |
 |
| 1982 Miyata 610 Restoration - Rear Derailleur - Installed |
 |
| 1982 Miyata 610 Restoration - Front Derailleur - Before |
 |
| 1982 Miyata 610 Restoration - Front Derailleur - Polished |
 |
| 1982 Miyata 610 Restoration - Front Derailleur - Installed |
The crank set is a triple touring crank made by Custom. It is a very nice crank, I exploded the crank for cleaning and polishing. the crank polished beautifully! It looks fantastic installed!
 |
| 1982 Miyata 610 Restoration - Crank - Before |
 |
| 1982 Miyata 610 Restoration - Crank - Exploded |
 |
| 1982 Miyata 610 Restoration - Crank - Polished |
 |
| 1982 Miyata 610 Restoration - Crank - Complete |
 |
1982 Miyata 610 Restoration
Crank - Installed |
The brake calipers are nice Dia-Comp G, very nice calipers for the time. I disassembled each for cleaning, polishing and lubrication. The calipers turned out fantastic and function fantastic, I am super pleased with the results.
 |
| 1982 Miyata 610 Restoration - Brake Calipers - Before |
 |
| 1982 Miyata 610 Restoration - Rear brake - Exploded |
 |
| 1982 Miyata 610 Restoration - Rear Brake - Polished |
 |
| 1982 Miyata 610 Restoration - Brake Calipers - Before & After |
 |
| 1982 Miyata 610 Restoration - Front Brake - Polished |
 |
| 1982 Miyata 610 Restoration - Brakes - Complete |
 |
1982 Miyata 610 Restoration - Rear Brake
Installed |
 |
1982 Miyata 610 Restoration - Front Brake
Installed |
I cleaned, polished and lubricated the brake levers just in case we are going to use them. We are not, I have areo brake levers on order, they should be here in a day or two. The original brake levers cleaned and polished beautifully though and I installed them for now.
 |
| 1982 Miyata 610 Restoration - Brake Levers - Before |
 |
| 1982 Miyata 610 Restoration - Brake Levers - Polished |
 |
| 1982 Miyata 610 Restoration - Brake Levers - Installed |
At this time I cleaned and polished the seat post and components. As always, I love those fluted seat posts. The seat post polished very nice and I had to install the Brooks saddle also!
 |
1982 Miyata 610 Restoration
Seat Post and Brooks Saddle
Installed |
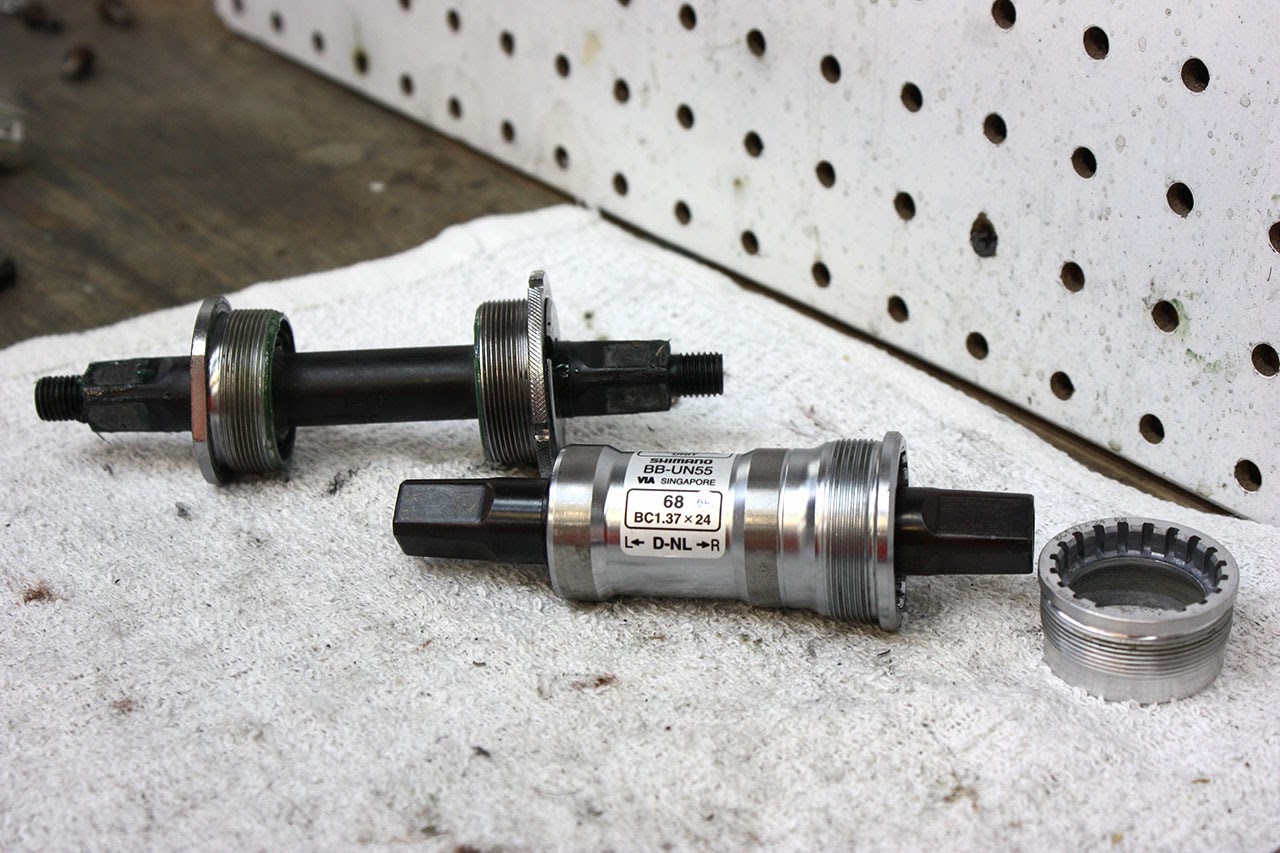
We have decided to go with the new sealed cartridge bottom bracket, I think this is a good choice, it will hold up better and lighter. I also think the new bottom bracket installed looks great next to the frame and crank, a much cleaner look! A 68 mm x 123.5 mm bottom bracket is a perfect match in size
 |
| 1982 Miyata 610 Restoration - New Bottom Bracket |
 |
1982 Miyata 610 Restoration - New Bottom Bracket - Installed
Nice Clean Look! |
For now I installed the cross levers to make sure i had the correct clamp size, I did. these are very nice Soma cross levers. Remember in the photo below the brake levers are the original brake levers, the new areo brake levers are on order.
 |
| 1982 Miyata 610 Restoration - Cross Brake Levers |
I like the shift levers, I rode these levers for a couple years in the past and have always liked their action. They also polished nice but needed a lot of lubrication and working it in and adjustment. they now function very nice. Somehow I think I forgot to take a before photo and I can't unrestore them for a photo ;).
 |
| 1982 Miyata 610 Restoration - Shift Levers - Installed |
I started on the wheels at the end of the day. The wheels are in good shape, new grease was applied sometime but again the old was not cleaned out first. I cleaned out the old grease and polished the wheel hubs. The hubs look fantastic polished. The spokes are in okay shape, I spent some time cleaning and polishing the spokes, they are not perfect but a lot better then before. I love the rims on the Miyata 610, they are wider rims that can take a pretty wide tire like the rondonneuring tires of the past, its a great look and a great ride.
 |
| 1982 Miyata 610 Restoration - Rear Wheel - Before |
 |
| 1982 Miyata 610 Restoration - Rear Wheel Hub - Before |
 |
| 1982 Miyata 610 Restoration - Rear Wheel - Old Grease |
 |
| 1982 Miyata 610 Restoration - Rear Wheel - New Grease |
 |
| 1982 Miyata 610 Restoration - Rear Wheel - Complete |
 |
| 1982 Miyata 610 Restoration - Front Wheel - Before |
 |
| 1982 Miyata 610 Restoration - Front Wheel Hub - Before |
 |
| 1982 Miyata 610 Restoration - Front Wheel - Old Grease |
 |
| 1982 Miyata 610 Restoration - Front Wheel - New Grease |
 |
| 1982 Miyata 610 Restoration - Front Wheel Hub - After |
That is it for now, the Miayat 610 will be on hold until the new brake levers are delivered and maybe a new stem. Check back then, below is a photo of the Miyata 610 as of now, so close to being done.
 |
| 1982 Miyata 610 Restoration - So Close to Done! |
I am not exactly sure where I left of on the Miyata 610 blog post but today Jose and I where able to get together to fit the bike to Jose.
We tried for different stems to get the feel and look just right. We started with a Nitto Talluxe stem which is a very nice stem and raised the handlebars to a very comfortable height but the height was so high it made the bicycle look off.
Second was a very tall stem with a goose neck, is raised the bars even higher then the Nitto did but it also stretched the handlebars out to far, it did look better then the Nitto but still looked off a bit over all.
Besides the original stem the last was a medium height stem which is actually pretty hard to find. It proved to be a good fit comfortable wise while still keeping the proportions correct for the overall look of the bicycle.
 |
| 1982 Miyata 610 Restoration - Stem Options |
 |
| 1982 Miyata 610 Restoration - Tall Nitto Stem |
 |
| 1982 Miyata 610 Restoration - Stall Goose Neck Stem |
 |
| 1982 Miyata 610 Restoration - Chosen Medium Stem |
With the stem installed I installed the new areo handlebars and cross brake levers.
 |
| 1982 Miyata 610 Restoration - Brake and Cross Levers Installed |
With the bike components installed it was time to wire the bike with the new cables and housings and then install the handlebar tape.
 |
| 1982 Miyata 610 Restoration - New Cables, Housings and Handlebar Tape |
 |
| 1982 Miyata 610 Restoration - Bicycle Wired |
At this point the Miyata is official complete.
 |
| 1982 Miyata 610 Restoration - Bicycle Complete |
Jose's Miyata 610 is a truly beautiful bicycle. The look came out fantastic, it has the look of the Rene Herse and Alex Singer bicycles that I dream off. The blue handlebar tape is a perfect match to bring out the blue in the decals. Miyata from this era where known for their quality and that shows in every part of the bicycle. The Modifications will make the Miyata a lot more comfortable for Jose with the cross brake levers and the taller stem.
Below is the final photos.
|
| 1982 Miyata 610 Restoration - Bicycle Complete |
 |
| 1982 Miyata 610 Restoration - Bicycle Complete |
 |
| 1982 Miyata 610 Restoration - Bicycle Complete - Handlebars |
 |
1982 Miyata 610 Restoration
Bicycle Complete - Front Brake |
 |
1982 Miyata 610 Restoration
Bicycle Complete - Stem |
 |
1982 Miyata 610 Restoration
Bicycle Complete - Front Half |
 |
| 1982 Miyata 610 Restoration - Bicycle Complete - Drive Train |
 |
1982 Miyata 610 Restoration
Bicycle Complete - Brooks Saddle |
 |
| 1982 Miyata 610 Restoration - Bicycle Complete |
Thanks for reading,
John Z.


What tool did you use to disassemble the bottom bracket cup in the picture with the caption "1982 Miyata 610 Restoration - Headset & Bottom Bracket
ReplyDeleteCleaned & Polished"? I'm referring to the cup in the top right of the picture with the square notches.
Hello Laddie
DeleteThe tool is at this link.
http://www.amazon.com/gp/aw/d/B000C14P1C/ref=mp_s_a_1_2?qid=1425841925&sr=8-2&pi=AC_SX200_QL40&keywords=park+tool+bottom+bracket+wrench&dpPl=1&dpID=31rOM6IEiuL&ref=plSrch
Thank you
John z
Excellent work, I just acquired the same bike (burgundy) with original tires and bar tape!, will try to do half the job you did.
ReplyDeleteGreat job! How do you get the metal parts so well polished?
ReplyDeleteI've been thinking about doing something like that to my 810. Excellent work. Amazing step by step photos.
ReplyDeleteGood work. I am trying to get inspired to do a similar effort on my 1983 610 which I bought new back in 83. Been riding ever since and it is definitely starting to show some weer and tear. The big question try and repair the parts - wheel, brakes, shifters or replace.
ReplyDelete