|
Steve's Schwinn Twinn Tandem
Finished Bicycle |
 |
| Steve's Schwinn Twinn Tandem - Before |
I have been working on the Schwinn Twinn Tandem as I finish other projects. It is come along quite a bit. The Schwinn Twinn Tandem was made for many years, but I am guessing its from the early 1970's, I will date its exact year later. The bicycle is in ok shape, there is a lot of old sticky grease, the paint is pretty chipped up and the chrome has some rust pitting, but I think will turn out pretty nice.
 |
| Steve's Schwinn Twinn Tandem - Rear Crank - Before |
 |
Steve's Schwinn Twinn Tandem - Rear Coaster Break Hub
Before |
 |
Steve's Schwinn Twinn Tandem - Rear Wheel Rim - Before
Schwinn S-7 Wheel Stamp on Rim |
 |
Steve's Schwinn Twinn Tandem - Before
Front View |
 |
Steve's Schwinn Twinn Tandem -
Bottom Bracket - Before |
I usually come up with a pulley system instead of a stand for working on tandems and recumbents but in the new much smaller shop I have decided to use just my ordinary bike stand. I was a bit worried it would not hold up because the tandem weighs 60+ pounds, but it is holding up fine.
I started by tearing the bicycle down of components. It took a good amount of penetrating oil to remove the seat tubes and stem. Otherwise most everything came apart fine. The frame was pretty greasy and dirty. But in the end cleaned up pretty nice and polished out pretty nice, although there are a lot of chips and scratches I am pretty happy with it.
 |
Steve's Schwinn Twinn Tandem - Components Stripped
Frame Dirty |
 |
Steve's Schwinn Twinn Tandem - Frame Dirty-
Rear Bottom Bracket Area |
 |
Steve's Schwinn Twinn Tandem - Frame
Dirty - Chain Tensioner Area |
 |
Steve's Schwinn Twinn Tandem - Frame Dirty
Dropout Area |
 |
Steve's Schwinn Twinn Tandem - Frame
Polished - Bottom Bracket Area |
 |
Steve's Schwinn Twinn Tandem -
Frame Polished |
I need to take a photo of the whole frame polished. Next I started work on the bottom brackets and rear wheel. I will post photos of the rear wheel tomorrow, I have a lot of photos and I will post them as I edit them through out the day tomorrow.
Below is the start of the bottom brackets. The grease in the bottom brackets has been just awful!! I have come across this grease a few times before, its white and when it gets old it just like a caulk adhesive. It takes for ever to get it out of bearing cages. The components of the bottom brackets and headset are in the crock pot on low in soapy water. The cranks are layered in grease and there is some rust and pitting on the crank arms, the cogs are in really good shape, Schwinn used such a thick chrome that it holds up well in many areas. Grease also preserves the chrome, so a little grease is not a bad thing!
 |
Steve's Schwinn Twinn Tandem - Cranks & Components
Before |
 |
| Steve's Schwinn Twinn Tandem - White Nasty Grease |
 |
Steve's Schwinn Twinn Tandem - Cranks Cleaned
Not Polished |
More to come tomorrow as I edit the photos through the day. Camera is still not quite right, the ring flash is not setting correctly.
The cranks components cleaned up nice and polished out really nice. The cranks also polished out nicely with a combination of the bench buffer and hand polishing. The bearings and cups showed almost now wear at all. The assembly went easy, I am pleased with the results.
 |
Steve's Schwinn Twinn Tandem - Cranks & Components
Polished |
 |
Steve's Schwinn Twinn Tandem - Front Crank
Cup Pressed |
 |
Steve's Schwinn Twinn Tandem - Rear Crank
Cups Being Pressed |
 |
Steve's Schwinn Twinn Tandem - Front
Crank Installed |
 |
Steve's Schwinn Twinn Tandem -
Rear Crank Installed |
 |
| Steve's Schwinn Twinn Tandem - Cranks Installed |
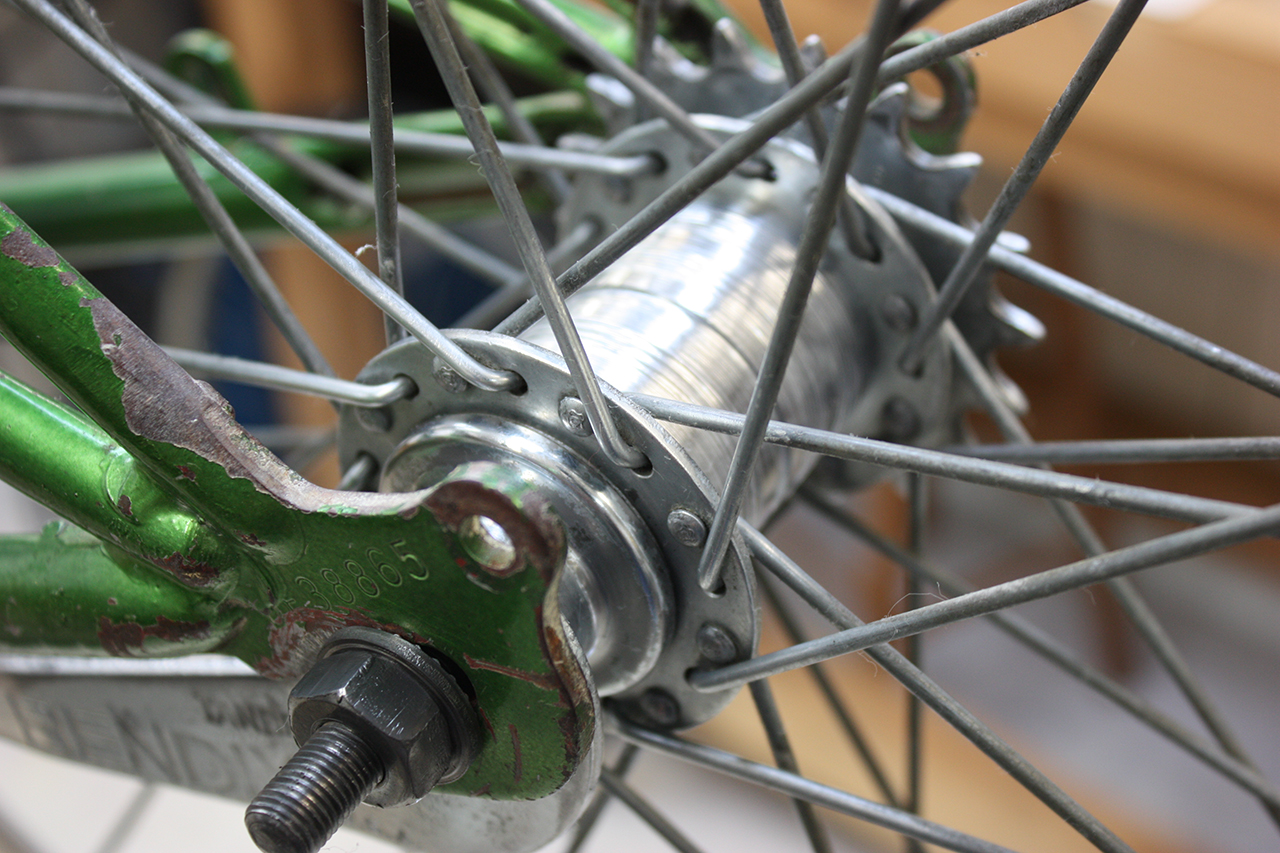
I have started editing the rear wheel photos. The rear Wheel is a coaster brake in descent shape. I disassembled the coaster brake and hub, it took some penetrating oil and some soak time to brake it loose. There is not much wear to the brake components, the oil and grease is pretty bad. The overhaul went pretty smoothly so far, just have a few more steps and it will be complete. I have ordered new tires for the Schwinn Twinn. The rear wheel rim is smaller then the front wheel rim, trying to get as big as possible tires for the Tandem. The rear is limited by a pretty small frame spacing, and the rear is an S-7 Schwinn rim which requires special tires. The front rim is not marked but after some research it seems to be an S-10, this may prove to be a little more difficult matching tires.
 |
Steve's Schwinn Twinn Tandem - Rear Wheel Hub
Brake Side - Before |
 |
Steve's Schwinn Twinn Tandem - Rear Wheel Hub
Cog Side - Before |
 |
Steve's Schwinn Twinn Tandem - Coaster Brake
Exploded View |
 |
Steve's Schwinn Twinn Tandem - Rear Wheel
Hub - Before |
 |
Steve's Schwinn Twinn Tandem - Rear Wheel
Rim - Before |
 |
Steve's Schwinn Twinn Tandem - Rear Wheel
Rim - Cleaned & Polished |
 |
Steve's Schwinn Twinn Tandem - Rear Hub
Cleaned and First Polish |
The rear Coaster Brake and hub went together very nicely. All the parts cleaned up nice and the bearings are in really good shape. Again, Schwinn made such heavy duty bearings that they stay pretty true. New grease and assembly and the wheel turns wonderful and the coaster brake stops good.
 |
Steve's Schwinn Twinn Tandem - Coaster Brake
Components Cleaned and Polished |
 |
Steve's Schwinn Twinn Tandem - Rear Wheel Hub & Brake
Overhauled |
 |
Steve's Schwinn Twinn Tandem - Rear Wheel Hub & Brake
Overhauled |
The rear wheel still needs a little work, I trued it, but it will need to be trued one more time after it stretches and the spokes need some cleaning. Still waiting on the new tires, should be her Monday afternoon or Tuesday morning.
The fork and headset went together pretty easy today. The fork is in descent condition, what I found amazing was the sticker on the fork tube was still somewhat there, you do not see this often. I cleaned and polished the fork while trying to leave the sticker intact, I also used a die to clean up the headset threads.
The headset components showed some wear but are in descent shape, they should hold up nice. I have always liked the bearings in Schwinn headsets, they are heavy duty, but why worry about the weight here when they last along time. The headset polished nice and installed smoothly.
The stem and handlebars had some rust and pitting. The stem polished nicely, no problems along with the stem bolts. The handlebars is where there is some pitting, after polishing on the bench top buffer all the rust was removed, the pitting is ok, not the best, but the handlebars look good. To polish the stem and handlebars correctly you must remove the bars from the stem. The handlebars have the old Schwinn handlebar grips that look nice when cleaned up but also must be removed to remove the handlebars. The problem is the grips are old and brittle and can easily fall apart if not treated with care. To carefully remove the grips I start by using a heat gun on low and heating them up, this warms them and makes them a little softer, I then take a small picking tool and carefully pry back the edge of the grip and spray either a cleaner or WD-40 in between the grip and handlebars. This then allows me to slide the grip off, I only need to remove one. Overall I am very happy with the results of the headset, stem and handlebars. The bike is really starting to come together.
 |
Steve's Schwinn Twinn Tandem - Headset
Components Cleaned & Polished |
 |
Steve's Schwinn Twinn Tandem -
Headset Cups - Pressed |
 |
Steve's Schwinn Twinn Tandem - Headset Bearings
Packed |
 |
Steve's Schwinn Twinn Tandem - Headset
Installed |
 |
Steve's Schwinn Twinn Tandem - Stem & Handlebars
Before |
 |
| Steve's Schwinn Twinn Tandem - Stem - Before |
 |
Steve's Schwinn Twinn Tandem - Stem & Handlebars
Cleaned & Polished |
 |
Steve's Schwinn Twinn Tandem - Stem & Handlebars
Installed |
The rear handle bars are connected to the front seat post. There is a stem that connects the bars to the seat post. There was a lot of rust, pitting and grime on everything and the seat post was pretty beat up. I disassembled everything and placed the parts in the soapy water crock pot on low. After a while things cleaned up and polished nicely. The front seat post was badly rusted and somewhat stuck, it polished out very nice and looks good now.
 |
Steve's Schwinn Twinn Tandem - Front Seat &
Rear Handlebars - Before |
 |
Steve's Schwinn Twinn Tandem - Front Seat &
Rear Handlebars - Disassembled |
 |
| Steve's Schwinn Twinn Tandem - Left Side Polished |
 |
Steve's Schwinn Twinn Tandem -
Seat Post & Rear Handlebars -
Polished |
Work started on the front wheel with disassembly. Took some work, the bearing cones where stuck on the axle, took a good amount of penetrating oil and patience. The bearings where in good shape along with the bearing surfaces considering how dry the grease was. Cleaning the parts went easy in the crock pot and everything polished nicely. The rim had a lot of rust and corrosion, some elbow grease cleaned and polished the rims nice. In the end the wheel looks good and spins great. Still waiting on the tires.
 |
Steve's Schwinn Twinn Tandem - Front Wheel Hub
Before |
 |
Steve's Schwinn Twinn Tandem -
Front Wheel Rim - Before |
 |
Steve's Schwinn Twinn Tandem - Front Wheel Hub
Dirty |
 |
Steve's Schwinn Twinn Tandem - Front Wheel Hub
Components - Before |
 |
Steve's Schwinn Twinn Tandem - Front Wheel Componets
Polished |
 |
Steve's Schwinn Twinn Tandem - Front Wheel Hub
Polished & Installed |
 |
Steve's Schwinn Twinn Tandem -
Front Wheel Rim - Polished |
The bike is pretty far along now. I have the chains soaking and after that its saddles and odds and ends along with the new tires. Should not be long now.
 |
| Steve's Schwinn Twinn Tandem - Bike as of Now |
A lot of little things have been worked on the last couple of days. Stuff like seat post collars, rear seat post, the seats, tension wheel and chains. The chains took along time to clean, they where covered in thick grease and then they where soaked in oil for a long time. In the end the chains came out pretty nice, there is a little wear but not enough to replace, plus replacing is not the easiest to do with the older wider spacing. They can be found, just expensive.
 |
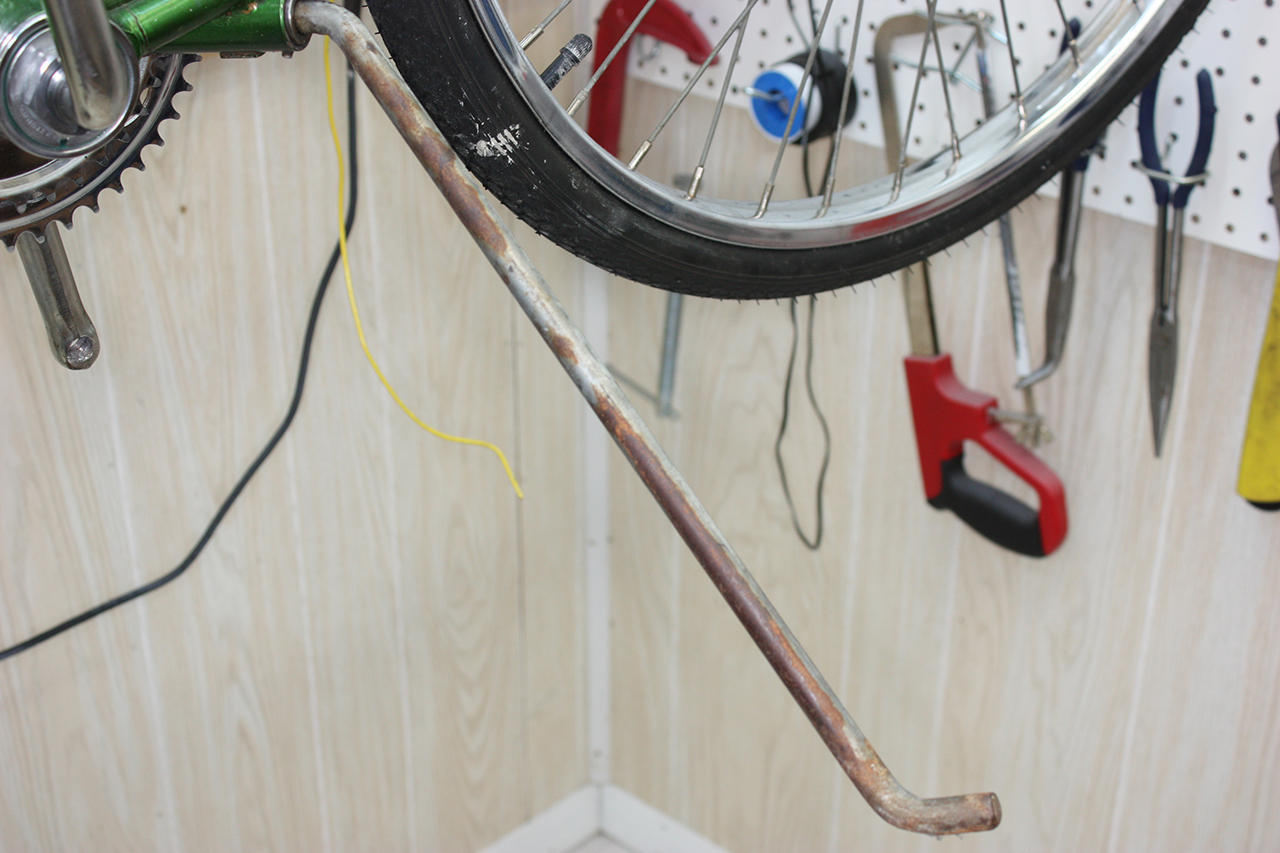
| Steve's Schwinn Twinn Tandem - Kick Stand - Before |
 |
| Steve's Schwinn Twinn Tandem - Kick Stand - After |
 |
| Steve's Schwinn Twinn Tandem - Rear Seat - Before |
 |
| Steve's Schwinn Twinn Tandem - Seat Collars Before |
 |
| Steve's Schwinn Twinn Tandem - Tension Wheel - Before |
 |
| Steve's Schwinn Twinn Tandem - Tension Wheel Cleaned |
 |
| Steve's Schwinn Twinn Tandem - Tension Wheel - Polished |
 |
Steve's Schwinn Twinn Tandem - Tension Wheel & Chain
Installed |
 |
| Steve's Schwinn Twinn Tandem - Rear Chain - Installed |
 |
| Steve's Schwinn Twinn Tandem - Drive Train - Complete |
The drive train is complete and operates smoothly. The new tires showed up today, they are not as wide as originals so I am going to experiment with some wider tires. I will post photos of the seats as they are installed, I am trying to get the seats in better shape, the springs are not as supportive as they once where.
After a few tries and trying to squeeze a few slightly small tires on the rims I have been unable to find wider or balloon tires to fit the old Schwinn rims. From the last update the tandem was about 95% complete. It is now 100% complete. The seats have been cleaned up and installed, I tuned the seats the best the could, but they are worn. They are better then they where and they are original but if they like to ride the bike they may want to replace with new seat and keep the originals in storage.
The chain guard was pretty dirty and dull, some elbow grease and a good amount of hand polishing the guard looks good. (Hand polishing to not remove the decals from the guard as they are already somewhat faded.) Little things that you don't notice looking at a restored bicycle but would notice if they where poorly done is the nuts and bolts that hold the chain guard in place. The bolts where pretty rough, I thought of replacing, but they cleaned and polished out really nice.
The original peddles where in unsavable condition, anything that is close to the originals are hard to come by and very expensive, so they old where replaced with new black peddles.
From that point it was just small things to finish up, put the new, but not as wide tires on and wipe and buff everything out. The bike rides very nice, the coaster break is re-breaking, they take a little breaking in after being overhauled and polished. The chrome looks great, there is pitting, a lite coat of Turtle Wax Chrome polish once a season will keep it from rusting again. The paint looks good, it is pretty rough in a lot of spots. If the bike gets a lot of use and is a favorite maybe someday a repaint would be in order, but the Tandem is definitely is ready for another 40 years of use.
 |
| Steve's Schwinn Twinn Tandem - Finished - Side View |
 |
Steve's Schwinn Twinn Tandem -
Finished - Angle View |
 |
Steve's Schwinn Twinn Tandem - Bicycle Finished
Rear Drive Train View |
 |
Steve's Schwinn Twinn Tandem - Bicycle Finished
Front Drive Train View |
 |
Steve's Schwinn Twinn Tandem - Finished Bicycle
Rear Coaster Brake & Hub |