|
| Raleigh Roadster Three Speed - Bicycle After |
 |
| Raleigh Roadster Three Speed - Bicycle Before |
My sister, brother in-law, nephew and soon to be here nephew are moving here to Gurnee from the Miami area. They will be in the neighborhood and would like a couple of good city bicycles to get around. Three speeds are perfect, they are comfortable, reliable and fun. This is a Classic Raleigh three speed for my sister and later I will post a Schwinn three speed for my brother in-law.
This Raleigh is from the 1970's, one of the three speed Roadster Raleigh made in Taiwan for a while. It is fine bike, and will be even better after a few upgrades. I was looking for a true Nottingham Raleigh from the era, but the DL series are in the $600-$800 range unrestored.
The idea for the Raleigh is to restore it, all new cables, cable housings and brake pads. Maybe new handlebars, the originals might be in too rough of shape, new cork handlebar grips with shellac. The seat is nice, the springs might be a little worn, I will have to see about that as I go. New tire and tube are needed. I am thinking a classic cream tire or gum wall tires.
The Raleigh's paint is in good shape, not many chips or scratches, it is very dull and dirty, but I think will polish nice. The cables and housings are rusted and rotting and not is working order, the brake pads are done. The chrome is in descent shape except for the handlebars, it should polish nice. The three speed hub is in working order but will probably get and overhaul. I am debating on tearing the wheels down for polishing and make it easier to polish and work on the three speed hub, if I do I will replace the spokes. The wheel bearings and bottom bracket bearings will be replaced.
 |
Raleigh Roadster Three Speed - Bicycle Before
Side View |
 |
Raleigh Roadster Three Speed - Bicycle Before
Angle View |
 |
Raleigh Roadster Three Speed - Bicycle Before
Handlebar View |
 |
Raleigh Roadster Three Speed - Bicycle Before
Three Speed Hub |
 |
Raleigh Roadster Three Speed - Bicycle Before
Crank View |
 |
Raleigh Roadster Three Speed - Bicycle Before
Front Wheel Hub |
 |
Raleigh Roadster Three Speed
Bicycle Before - Wheel Rim |
 |
Raleigh Roadster Three Speed
Bicycle Before - Front Brake |
 |
Raleigh Roadster Three Speed
Bicycle Before - Taiwan Decal |
As usual I started tearing the bike down to the frame. The cotter crank, which can be a pain was the easiest I have ever taken a part. One light tap with a hammer and the cotter fell to the ground. Usually it takes multiple heating with a torch and use of a giant c-clamp. Everything else came apart well. Interesting, I found a nest of bugs and eggs found in the bottom bracket.
I cleaned the paint and tried a new multiple step polishing compound on the paint. I am very pleased with the results. The paint looks new with a few minor chips that I will touch up and the decals a little rough.
 |
Raleigh Roadster Three Speed - Frame Stripped of
Components - Dirty |
 |
Raleigh Roadster Three Speed - Frame Dirty
Bottom Bracket |
 |
Raleigh Roadster Three Speed - Frame Dirty
Drop Outs |
 |
Raleigh Roadster Three Speed
Frame Dirty - Head Tube |
 |
Raleigh Roadster Three Speed - Bottom Bracket
A nest of Dead Bugs Found in Here |
 |
Raleigh Roadster Three Speed - Dead Bugs and Eggs
Found Inside Bottom Bracket |
 |
| Raleigh Roadster Three Speed - Frame Polished |
 |
Raleigh Roadster Three Speed - Frame Polished
Bottom Bracket |
 |
Raleigh Roadster Three Speed - Frame Polished
Head Tube View |
 |
Raleigh Roadster Three Speed
Fork - Cleaned & Polished |
While I started work on cleaning and polishing the frame I put the bottom bracket and headset components into the crock pot on low to start the cleaning process. The headset grease was completely dry, the bottom bracket is dirty and greasy.
 |
Raleigh Roadster Three Speed
Bottom Bracket Components
Before |
 |
Raleigh Roadster Three Speed
Headset Components
Before |
 |
Raleigh Roadster Three Speed
Stem / Quill Components
Before |
The bottom bracket was first. It was cleaned in the crock pot and polished on the buffing wheel. The bearings where replaced in the bearing cages. Everything polished nice and looks great against the blue paint. As far as cotter bottom brackets go this one is surprisingly lite. The bottom bracket turns very smooth with the new grease and new bearings.
 |
Raleigh Roadster Three Speed
Bottom Bracket Components
Polished |
 |
| Raleigh Roadster Three Speed - My New Bearings Case |
 |
| Raleigh Roadster Three Speed - Bearings Packed in New Grease |
 |
Raleigh Roadster Three Speed
Fixed Bearing Cup - Installed |
 |
Raleigh Roadster Three Speed
Bottom Bracket - Complete |
The headset and fork where next. The headset cleaned and polished nice, I did not need to replace the bearings, they are in good shape and there is not much ware causing force in the headset. In the end everything polished nice and looks good and turns smooth.
 |
Raleigh Roadster Three Speed
Headset Components - Before |
 |
Raleigh Roadster Three Speed
Headset Components
Cleaned & Polished |
 |
Raleigh Roadster Three Speed
Headset Bearing Cups
Pressed |
 |
| Raleigh Roadster Three Speed - Headset Bearings - Packed |
 |
Raleigh Roadster Three Speed
Headset Bearing Race
Installed |
 |
| Raleigh Roadster Three Speed - Headset & Fork - Complete |
At this time I cleaned and polished the stem / quill. It is badly rusted like the handlebars, I may replace it from my parts collection but I will first try polishing it. It cleaned nice and polished okay, for now I will be using it.
 |
Raleigh Roadster Three Speed
Stem / Quill - Before |
 |
Raleigh Roadster Three Speed
Stem / quill - Polished |
 |
Raleigh Roadster Three Speed
Stem Polished & Installed |
Now I will be working on the wheels. So far I have giving the wheels a first wash with soap and water. They cleaned up better then I was expecting. The spokes are in far better condition then I first thought, I will not need to replace them. The rims have some rust which should be polish nice. Below are the beginning photos, I will post more photos tomorrow as I proceed on the wheels.
 |
Raleigh Roadster Three Speed - Rear Three Speed Wheel
Before |
 |
Raleigh Roadster Three Speed
Rear Three Speed Hub
Before |
 |
Raleigh Roadster Three Speed
Rear Wheel Rim - Before |
 |
Raleigh Roadster Three Speed
Front Wheel - Before |
 |
Raleigh Roadster Three Speed
Front Wheel Hub - Before |
 |
Raleigh Roadster Three Speed
Front Wheel Rim - Before |
After testing function and looking inside the three wheel hub was in good shape, but I did want to clean and grease the wheel bearings and the freewheel bearings. Below is a photo of the wheel bearings and the freewheel bearings. I will keep the few new replacement parts I have for a three speed hub for another, this one does not need them. I will oil the gears through the oil port. The hub chrome and rim of the wheels polished nicely. The front wheel bearings I replaced and reused the bearings cage. Both wheels needed ever spoke tightened and the wheels trued. The wheels run very smooth and straight now and look really nice.
 |
Raleigh Roadster Three Speed - Rear Wheel Bearings
Left Side - Cleaned & Greased |
 |
Raleigh Roadster Three Speed
Freewheel Bearings - Cleaned & Greased |
 |
Raleigh Roadster Three Speed
Rear Wheel Rim - Polished |
 |
| Raleigh Roadster Three Speed - Three Speed Hub - Polished |
 |
Raleigh Roadster Three Speed
Front Wheel - Old Grease |
 |
Raleigh Roadster Three Speed
Front Wheel - New Grease |
 |
Raleigh Roadster Three Speed
Front Wheel Rim - Polished |
 |
Raleigh Roadster Three Speed
Front Wheel - After
Installed |
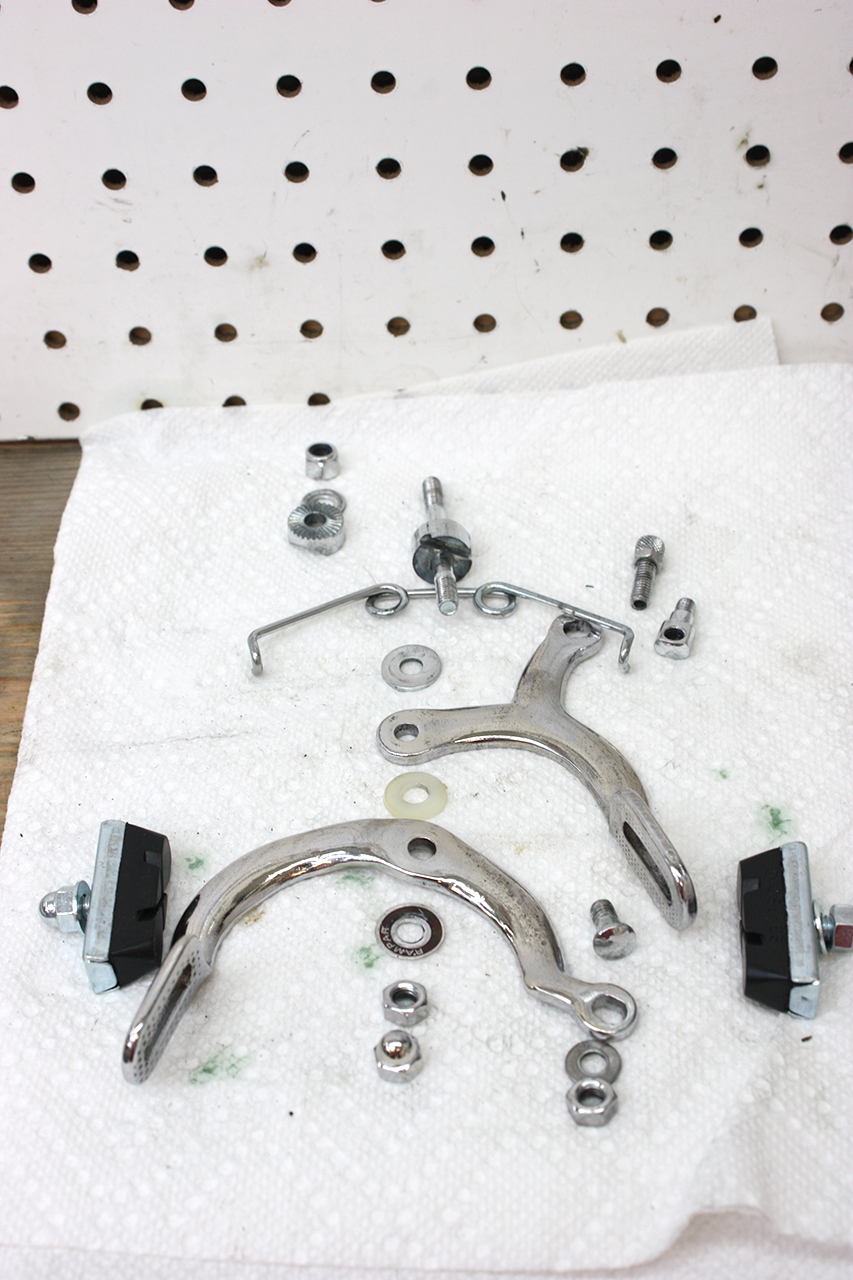
At this time I also started the cleaning process of the brake calipers. the brake calipers are heavy chrome steel so I believe they should polish nice although they have a lot of rust showing. As always I restore one caliper at a time as I leave the other caliper together. This leaves me an example of where the many spacers go.
 |
| Raleigh Roadster Three Speed - Brake Calipers - Before |
 |
Raleigh Roadster Three Speed
Brake Caliper - Disassembled |
The brake calipers did not polish perfect, they look very good, but there is a little pitting in spots. I polished each caliper and then assembled the components, each contact point was greased. New brake pads where installed. The brake calipers look good installed and seem to function well.
 |
Raleigh Roadster Three Speed
Front Brake Caliper
Polished |
 |
| Raleigh Roadster Three Speed - Brake Caliper - Before & After |
 |
Raleigh Roadster Three Speed
Front Brake Caliper - Installed |
 |
Raleigh Roadster Three Speed
Rear Brake Caliper
Polished |
 |
Raleigh Roadster Three Speed
Rear Brake Caliper
Installed |
For the last couple of days I had the crank and crank arms in and out of the crock pot and sonic cleaner. There is some rust pitting in the chrome, the chrome polished out nice but the little bit of pitting bothers me. It bothers me because I see it and am a perfectionist, but most people would not notice it except after looking very closely. In the end the crank looks descent and looks good against the shiny blue paint.
 |
Raleigh Roadster Three Speed
Crank & Crank Arms - Before |
 |
Raleigh Roadster Three Speed
Crank & Crank Arms
Polished & Installed |
I think the new tires, handlebars and cork grips are due in tomorrow, at least I hope, shipping from a supplier has been slow lately. So whats left to do? Install the new tires, install the new handlebars and cork grips, restore the brake levers, install the new 3 speed thumb shift lever, run the brake and shift cables, restore the peddles and restore the seat post and saddle. As a list it seems like a lot, but really not far to go.
More tomorrow.
I am very proud of my work and the results of the Raleigh Roadster so far. i just wanted to post a few photos of how nice the bicycle is looking.
 |
Raleigh Roadster Three Speed
Three Speed Hub
Very Proud of the Results |
 |
Raleigh Roadster Three Speed
Blue Paint Shine & Chrome Shine
Very Proud of Results so Far |
I picked up on the fenders from where I last left off. The fenders are in pretty good shape after getting through all the dirt. The fender struts needed to be straighten and a few dents lightly tapped out. I polished all the mounting hardware and then applied my new idea of a polishing system to the blue paint. the fenders polished wonderfully and are now straight. The fenders look great on the bicycle.
 |
| Raleigh Roadster Three Speed - Rear Fender - Before |
 |
Raleigh Roadster Three Speed - Fender Mounting Hardware
Before & After |
 |
Raleigh Roadster Three Speed - Rear Fender - Polished
Installed |
 |
Raleigh Roadster Three Speed
Rear Fender Shine |
 |
| Raleigh Roadster Three Speed - Front Fender - Complete |
 |
Raleigh Roadster Three Speed - Front Fender Ornament
Before |
 |
Raleigh Roadster Three Speed - Front Fender Ornament
Painted |
Next was the chain guard, again not to bad a shape under all of the dirt. I use the new polishing system i came up with and it looks great. All the mounting hardware was also polished.
 |
| Raleigh Roadster Three Speed - Chain Guard - Before |
 |
| Raleigh Roadster Three Speed - Chain Guard - Complete |
I next collected all the new parts. New Wald handlebars, new 3 speed shift lever, new cork handlebar grips and new tire options, black with gum wall side walls and Schwaulbe cream tires.
 |
| Raleigh Roadster Three Speed - New Parts |
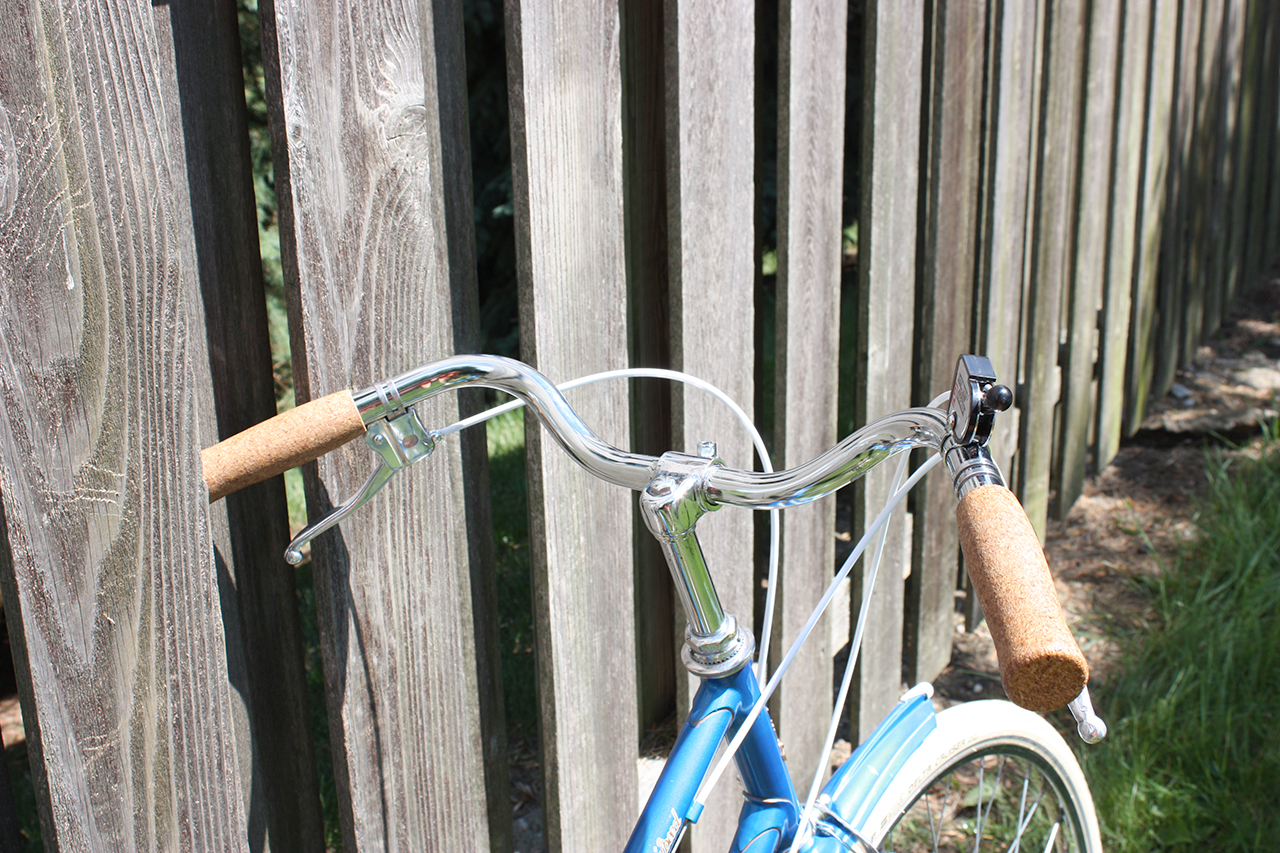
I installed the new handlebars and then the cream tires. I really like the cream against the blue, but the gum wall are available also if my sister wants them instead.
 |
Raleigh Roadster Three Speed - Rear Schwalbe Cream Tire
Installed |
 |
| Raleigh Roadster Three Speed - Front Cream Tire Installed |
Next was the saddle, with some adjustment to the springs the saddle is much better. I cleaned and treated the saddle and polished the mounting hardware and seat post. A little grease and it installed nicely.
 |
| Raleigh Roadster Three Speed - Saddle - Before |
 |
Raleigh Roadster Three Speed - Saddle Complete
Installed |
Next I cleaned and polished miscellaneous parts you don really think about until the restoration is near an end. In the photo below are brake levers, reflectors and cable guides.
 |
| Raleigh Roadster Three Speed - Misc. Parts |
Going fast now, I laid out the cockpit controls on the handlebars and then ran the cables and cable housings.
 |
| Raleigh Roadster Three Speed - Controls Installed |
 |
Raleigh Roadster Three Speed
Cables Installed |
Last are the pedals. These are quality rubber block pedals that can be disassembled. They where dirty and tarnished but after a good polishing and flushing and lubricating they look great and function great.
 |
| Raleigh Roadster Three Speed - Pedals - Before |
 |
| Raleigh Roadster Three Speed - Pedals - Before & After |
 |
| Raleigh Roadster Three Speed - Pedals - After |
Lastly the shellacking of the cork handlebar grips. This protects the cork and allows them to be easily cleaned. Shellac is a natural product produced by insects. It goes on easy and drys in about ten minutes. Just a little blue tape to protect the surrounding areas and its ready to go.
I also did the very little touch up paint the bicycle needed at this point.
 |
| Raleigh Roadster Three Speed - Cork Grips - Shellacked |
The Raleigh 3 Speed Roadster is complete, time for the test ride and adjustments. The bicycle rides very nice, the shift cable needed some adjustment and now shifts flawlessly. I think my sister will be very pleased with the Raleigh 3 speed roadster. I think a perfect bicycle for getting around town, cursing the neighborhood or riding to a restaurant or bar hopping. Final photos below, I am going to take new final photos when the light is better, the light is to bright below.
 |
| Raleigh Roadster Three Speed - Bicycle Finished - Side view |
 |
| Raleigh Roadster Three Speed - Bicycle Finished - Angle View |
 |
Raleigh Roadster Three Speed
Bicycle Finished - Front View |
 |
| Raleigh Roadster Three Speed - Bicycle Finished - Rear View |
 |
Raleigh Roadster Three Speed - Bicycle Finished
Handlebar View |
 |
Raleigh Roadster Three Speed - Bicycle Finished
3 Speed Hub View |
 |
Raleigh Roadster Three Speed
Bicycle Finished - Front Half |