 |
A Three Speed Restoration for T.J. - Bicycle After Restoration
Named Wicked |
I have written many times about my love of three speed bicycles but I am going to say it again, I love three speed bicycles. They are tough as nails, they have a classic look and in the past was a form of independence for many. T.J. is the owner of a the beautiful Schwinn Le Tour that was restored and fixed up last summer,
the Le Tour can be seen by clicking here.
The Le Tour is so beautiful and in such good shape T.J. needs a more all around bike for not perfect weather and commuting. A three speed is the perfect bicycle for that need.
The three speed came to me last week, I do not know much about the three speed at all. The decals are not known to me and I have not found any maker names. What I think just from the shape of the lugs, the stem and handlebars and the light weight decal font on the top tube. However it is not a Sturmey Archer three speed hub and shit lever. The shift lever is very cool though, it is a sleeve that the handlebar grip slides over and you twist the grip to change gears.
The three speed is in pretty good starting shape. The chrome is in good shape and I think the paint is pretty good under the grime and dullness. The three speed will receive a total restoration along with new tires and tubes, handlebar grips, saddle, cables and a rack. I think I might be forgetting something in the new things but that will show up later in the build.
 |
| A Three Speed Restoration for T.J. - Bicycle Before |
 |
| A Three Speed Restoration for T.J. - Bicycle Before - Handlebars |
 |
| A Three Speed Restoration for T.J. - Bicycle Before - Front Brake |
 |
A Three Speed Restoration for T.J. - Bicycle Before
Front Wheel Hub |
 |
| A Three Speed Restoration for T.J. - Bicycle Before - Front Wheel Rim |
 |
A Three Speed Restoration for T.J. - Bicycle Before
Stem |
 |
A Three Speed Restoration for T.J. - Bicycle Before
Headset |
 |
A Three Speed Restoration for T.J. - Bicycle Before
Headset & Fork Crown |
 |
| A Three Speed Restoration for T.J. - Bicycle Before - Top Tube |
 |
| A Three Speed Restoration for T.J. - Bicycle Before - Down Tube |
 |
A Three Speed Restoration for T.J. - Bicycle Before
Front Fender |
 |
A Three Speed Restoration for T.J. - Bicycle Before
Seat Lug |
 |
A Three Speed Restoration for T.J. - Bicycle Before
Crank |
 |
A Three Speed Restoration for T.J. - Bicycle Before
Pedals |
 |
A Three Speed Restoration for T.J. - Bicycle Before
Seat Lug |
 |
A Three Speed Restoration for T.J. - Bicycle Before
Rear Brake |
 |
A Three Speed Restoration for T.J. - Bicycle Before
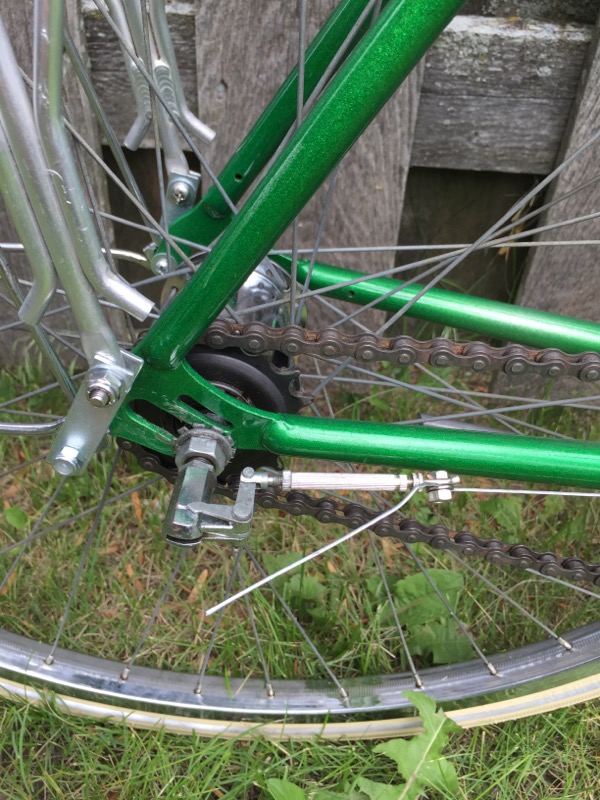
Drop Out |
 |
A Three Speed Restoration for T.J. - Bicycle Before
Rear Wheel Hub |
 |
A Three Speed Restoration for T.J. - Bicycle Before
Rear Wheel Rim |
 |
A Three Speed Restoration for T.J. - Bicycle Before
Rear Fenders |
The three speed disassembled mostly easy except for the pedals. They where frozen in place and would not budge. I started with a military grade penetrating oil and they still would not budge. Next I started heating wrenching which is to heat the crank arm to have the crank arms expand around the pedal threads. I then try wrenching the pedals off. After about five times of heating and wrenching the pedals broke free and a whole lot of sweat!
The frame is not in as good of shape as I was hoping once I got the components off. Some of the dirt was actually rusted scraps that blended into the dirty paint.
 |
| A Three Speed Restoration for T.J. - Frame Before |
 |
A Three Speed Restoration for T.J. - Frame Before
Head Tube |
 |
A Three Speed Restoration for T.J. - Frame Before
Head Tube |
 |
| A Three Speed Restoration for T.J. - Frame Before - Head Lug |
 |
| A Three Speed Restoration for T.J. - Frame Before - Down Tube |
 |
A Three Speed Restoration for T.J. - Frame Before
Seat Lug |
 |
A Three Speed Restoration for T.J. - Frame Before
Seat Tube |
 |
A Three Speed Restoration for T.J. - Frame Before
Bottom Bracket |
 |
A Three Speed Restoration for T.J. - Frame Before
Bottom Bracket |
 |
| A Three Speed Restoration for T.J. - Frame Before - Bottom Bracket |
 |
A Three Speed Restoration for T.J. - Frame Before
Seat Lug |
 |
A Three Speed Restoration for T.J. - Frame Before
Brake Bridge |
 |
| A Three Speed Restoration for T.J. - Frame Before - Chain Stays |
 |
A Three Speed Restoration for T.J. - Frame Before
Drop Outs |
 |
A Three Speed Restoration for T.J. - Frame Before
Fork |
 |
| A Three Speed Restoration for T.J. - Frame Before - Fork Crown |
 |
A Three Speed Restoration for T.J. - Frame Before
Fork Crown |
 |
| A Three Speed Restoration for T.J. - Frame Before - Fork Blades |
 |
| A Three Speed Restoration for T.J. - Frame Before - Fork Drop Outs |
The frame polished very well considering where it started but I am not totally happy with it, the paint has a lot of big scraps. I am however very proud of the way the bottom bracket turned out.
 |
| A Three Speed Restoration for T.J. - Frame Polished |
 |
A Three Speed Restoration for T.J. - Frame Polished
Head Tube |
 |
A Three Speed Restoration for T.J. - Frame Polished
Head Tube |
 |
A Three Speed Restoration for T.J. - Frame Polished
Top Tube |
 |
A Three Speed Restoration for T.J. - Frame Polished
Down Tube |
 |
A Three Speed Restoration for T.J. - Frame Polished
Down Tube |
 |
A Three Speed Restoration for T.J. - Frame Polished
Bottom Bracket |
 |
A Three Speed Restoration for T.J. - Frame Polished
Bottom Bracket |
 |
A Three Speed Restoration for T.J. - Frame Polished
Bottom Bracket |
 |
A Three Speed Restoration for T.J. - Frame Polished
Seat Lug |
 |
A Three Speed Restoration for T.J. - Frame Polished
Seat Lug |
 |
A Three Speed Restoration for T.J. - Frame Polished
Chain Stays |
 |
A Three Speed Restoration for T.J. - Frame Polished
Drop Outs |
 |
A Three Speed Restoration for T.J. - Frame Polished
Fork |
 |
A Three Speed Restoration for T.J. - Frame Polished
Fork Blades |
 |
A Three Speed Restoration for T.J. - Frame Polished
Fork Blade |
 |
A Three Speed Restoration for T.J. - Frame Polished
Fork Crown |
 |
A Three Speed Restoration for T.J. - Frame Polished
Fork Drop Outs |
After looking at the polished frame for a bit the large scars down the fork blades and a few areas on the frame where just to much and standing out too much. So we decided to go with a new powder coat paint.
I stripped the frame of the paint. Since the paint is being removed we decided it would be good to add a few brazings. Water bottle cage mounts will be brazed and top tube rear brake cable brackets on the top tube. The rear brake cable brackets will clean up all that is going on along the top tube. In its current state there are two bolt on mounts for the three speed shift cable and two clips for the rear brake. This will eliminate the rear brake clips making for a cleaner look.
 |
| A Three Speed Restoration for T.J. - Frame Stripped |
 |
A Three Speed Restoration for T.J. - Frame Stripped
Head Tube |
 |
A Three Speed Restoration for T.J. - Frame Stripped
Seat Lug |
 |
A Three Speed Restoration for T.J. - Frame Stripped
Seat Lug |
 |
| A Three Speed Restoration for T.J. - Frame Stripped - Bottom Bracket |
 |
| A Three Speed Restoration for T.J. - Fork Stripped |
 |
A Three Speed Restoration for T.J. - Fork Stripped
Fork Crown |
 |
A Three Speed Restoration for T.J. - Fork Stripped
Fork Blades |
With the frame stripped I marked the locations of the water bottle cage mounts and the top tube cable bracket locations. I use a saddle square and a strip of tape to locate the water bottle cage mounts and the same for the top tube.
With the locations marked I use a punch set to make a mark to start the drill. The holes drill very nicely.
 |
A Three Speed Restoration for T.J. - Water Bottle Cage Mounts
Located |
 |
| A Three Speed Restoration for T.J. - Using Punch Set to Start Drill Bit |
 |
A Three Speed Restoration for T.J. - Water Bottle Cage Mount Holes
Drilled |
 |
A Three Speed Restoration for T.J.
Water Bottle Cage Mounts - Drilled |
 |
A Three Speed Restoration for T.J. - Top Tube Bracket
Locations |
 |
| A Three Speed Restoration for T.J. - Tools I Use |
With the holes drilled and the bracket locations marked I put down a heavy layer of white paste flux. The flux activates at about 1200 degrees. Once the flux is activated I start to add the 50n brazing solder. The brazing went extremely well, just the right amount of brazing solder so very little touch up if at all needed.
 |
A Three Speed Restoration for T.J. - Water Bottle Cage Mounts
Brazed |
 |
A Three Speed Restoration for T.J. - Top Tube Brake Cable Brackets
Brazed |
 |
A Three Speed Restoration for T.J. - Top Tube Cable Brackets
Brazed |
 |
| A Three Speed Restoration for T.J. - Brazing Complete |
With the brazing complete its time to clean up all the cooled flux and then clean up the metal. With the metal cleaned with wire brush wheels I then clean it again with mineral spirits. When I think the frame is cleaned with mineral spirits I then clean it three more times. After the mineral spirits are dried and wiped down I then clean the frame with Acetone and as the same when I think the frame is cleaned with acetone I clean it three more times. This is to assure that the frame is ready for powder coating.
 |
A Three Speed Restoration for T.J. - Brazing Done
Frame Prepared for Powder Coating |
 |
A Three Speed Restoration for T.J. - Brazing Done
Frame Prepared for Powder Coating |
 |
A Three Speed Restoration for T.J. - Brazing Done
Frame Prepared for Powder Coating |
 |
A Three Speed Restoration for T.J. - Brazing Done
Frame Prepared for Powder Coating |
The day has gotten away from me. I hope to have the powder coating complete by the end of the day but I think only the color layer will be complete I will do the clear layer tomorrow.
We chose Illusions green as the color for the three speed. It will have a nice metallic to it and some flake. When the bike is assembled I will probably outline the lugs in cold for a classic touch. From there we will decided if pin stripping is need or something else to fill it out.
I finished the powder coating of the frame and fork. Still a little to go on the fenders, I am thrilled with the results of the green color, it is very deep with very nice metal flake, it reminds me of a 1950-60's gasser for some reason.
 |
| A Three Speed Restoration for T.J. - Frame Powder Coated |
 |
A Three Speed Restoration for T.J. - Frame Powder Coated
Head Tube |
 |
A Three Speed Restoration for T.J. - Frame Powder Coated
Seat Lug |
 |
A Three Speed Restoration for T.J. - Frame Powder Coated
Bottom Bracket |
 |
A Three Speed Restoration for T.J. - Frame Powder Coated
Fork |
The headset and bottom bracket went into the crock pot and after they polished beautifully!
 |
A Three Speed Restoration for T.J. - Headset & Bottom Bracket
Before |
 |
A Three Speed Restoration for T.J. - Headset & Bottom Bracket
Polished |
The stem and handlebars are in pretty good starting shape. The stem looks an awful lot like a Raleigh stem but I found a little Japan mark on it. I like the shape of the handlebars a lot, they are pretty basic 3 speed handlebars but there is a slightly different curve that is nice.
I polished the stem and handlebars and they came out great. I will install the stem and handlebars as soon as the powder coating is complete.
 |
| A Three Speed Restoration for T.J. - Stem & Handlebars - Before |
 |
| A Three Speed Restoration for T.J. - Stem - Before |
 |
| A Three Speed Restoration for T.J. - Stem - Exploded |
 |
A Three Speed Restoration for T.J. - Handlebars & Stem
Polished |
 |
| A Three Speed Restoration for T.J. - Stem - Polished |
 |
| A Three Speed Restoration for T.J. - Stem - Complete |
 |
A Three Speed Restoration for T.J. - Stem & Handlebars
Complete |
I like the brake levers, they are the classic design for the last 100 years but they just work well. I cleaned and polished the brake levers and then went into the parts collection to find a screw for one lever, it was missing. I am very happy with how nice the levers turned out and they will look great with new handlebar grips.
 |
| A Three Speed Restoration for T.J. - Brake Levers - Before |
 |
| A Three Speed Restoration for T.J. - Brake Levers - Complete |
 |
| A Three Speed Restoration for T.J. - Brake Levers - Installed |
The shift lever is very cool, it is a sleeve that fits into a handlebar grips. I really want cork handlebar grips for the three speed but the cork handlebar grips are for a much smaller diameter. The first attempt install cork grips did not go well, I am going to think on it for a while to see if I can make it work.
 |
| A Three Speed Restoration for T.J. - Shift Mechanics - Before |
 |
A Three Speed Restoration for T.J. - Three Speed Lever
Polished |
The brake calipers are classic Raleigh type so I am pretty sure they are Raleigh. I disassembled the calipers and gave everything a deep cleaning. With the pieces cleaned I worked through some grits on the polishing wheels. The calipers turned out very nice after polishing and with new brake pads they should stop good as well. I can't wait to see them against the new powder coating!
 |
| A Three Speed Restoration for T.J. - Brake Calipers - Before |
 |
| A Three Speed Restoration for T.J. - Brake Calipers - Exploded |
 |
| A Three Speed Restoration for T.J. - Brake Calipers - Polished |
 |
| A Three Speed Restoration for T.J. - Brake Calipers - Complete |
I thought the crank was in much better shape then it was, if I knew I would not have fought so hard to removed the sized pedals. I cleaned and polished the crank and was just not happy with the results.
I looked at the crank for a while and then went into my parts department. I could not find anything in a single speed cotter crank but I did come across a double cotter Raleigh crank that came off an early 1970's Raleigh Record.
I removed the large 52 tooth chain ring and moved the smaller ring forward. The crank really polished nice and will make all the difference in the mint restoration. Also the new crank has a chain guard which will be nice.
 |
| A Three Speed Restoration for T.J. - Crank - Before |
 |
| A Three Speed Restoration for T.J. - Replacement Crank - Before |
 |
A Three Speed Restoration for T.J. - Replacement Crank
Polished & Complete |
 |
A Three Speed Restoration for T.J. - Replacement Crank on Left
Original on Right |
I also thought the seat post was in good shape under the grease, it was not so I went into the parts department and was lucky to have one that would fit and polished nice. I will be install the male version of the brown synthetic leather saddle I have been using lately, it has a great look and is comfortable also.
 |
| A Three Speed Restoration for T.J. - Seat Post - Before |
 |
A Three Speed Restoration for T.J. - Replacement Seat Post
New Saddle |
Below is a photo of the mainly brackets and pieces of hardware on the three speed before polishing.
 |
| A Three Speed Restoration for T.J. - Brackets - Before |
Now that the frame's powder coat paint is complete and all the components have been restored and waiting its time to install all of the components.
I started with the headset and I also installed the chrome fork crown cap. I am just stunned by how nice the fork crown cap and headset look against the new green paint, I absolutely love it!!
 |
A Three Speed Restoration for T.J. - Handlebars
Complete |
 |
| A Three Speed Restoration for T.J. - Handlebars - Complete |
Next the brake calipers installed. More chrome against the metal flake green, just gets better!
 |
A Three Speed Restoration for T.J. - Front Brake
Installed |
 |
A Three Speed Restoration for T.J. - Rear Brake
Installed |
 |
A Three Speed Restoration for T.J. - Brake Calipers
Installed |
While the powder coating is going on I started work on the wheels. So far the front wheel is complete. I did a lot of polishing and the polishing turned out very nice. I replaced the ball bearings and kept the original bearing cages.
The wheel rims look worse then they really are. After cleaning and polishing the front wheel rim looks fantastic. I replaced two spokes on the front wheel. I am extremely happy with the front wheel, I am just waiting on the new tires to arrive. I can't wait to see the wheels next to the powder coated frame and fenders. I am so pleased with the three speed so far!
 |
A Three Speed Restoration for T.J. - Front Wheel
Before |
 |
| A Three Speed Restoration for T.J. - Front Wheel Hub - Before |
 |
| A Three Speed Restoration for T.J. - Front Wheel Rim - Before |
 |
| A Three Speed Restoration for T.J. - Front Wheel Hub - Old Grease |
 |
| A Three Speed Restoration for T.J. - Front Wheel Hub - Polished |
 |
A Three Speed Restoration for T.J. - Front Wheel Axle Parts
Complete |
 |
| A Three Speed Restoration for T.J. - Bearings Packed |
 |
A Three Speed Restoration for T.J. - Front Wheel
Complete |
The rear wheel has caused me some problems. I rebuilt the three speed hub twice. The first time I did it did not work. After some problem solving I discovered a paw pin was missing. I have collected many paw pins from old three speed hubs that where beyond repair so that was no problem.
The hub polished beautifully and the rim pretty good. This three speed hub is interesting that it works in the reverse of a Strumey Archer hub. In a Sturmey Archer the gears change with the pulling of the spindle. in this hub it works with a pushing of the spindle, I kind of like this action and the mechanism.
 |
A Three Speed Restoration for T.J. - Rear Wheel
Before |
 |
A Three Speed Restoration for T.J. - Rear Wheel Hub
Before |
 |
A Three Speed Restoration for T.J. - Rear Wheel Hub
Before |
 |
A Three Speed Restoration for T.J. - Rear Wheel Rim
B efore |
 |
A Three Speed Restoration for T.J. - Rear Wheel Hub
Before |
 |
| A Three Speed Restoration for T.J. - Rear Wheel Hub - Before |
 |
A Three Speed Restoration for T.J. - Rear Wheel Hub
Before |
 |
A Three Speed Restoration for T.J. - Rear Wheel Hub Pieces
Before |
 |
A Three Speed Restoration for T.J. - Rear Wheel Hub
Pieces After |
 |
A Three Speed Restoration for T.J. - Rear Wheel Hub
Polished |
 |
A Three Speed Restoration for T.J. - Rear Wheel Bearings
Packed |
 |
| A Three Speed Restoration for T.J. - Wheels - Complete |
Next is to install the new Shwalbe Cream colored Delta Cruiser tires. The cream colored tires are really going to start bringing the three speed together and the color is a very important part of the overall look. Installed the tires are amazing with the look of the bicycle, just amazing!!
 |
A Three Speed Restoration for T.J. - New Schawlbe
Delta Cruiser Tires |
 |
A Three Speed Restoration for T.J. - Tires - Installed
Amazing!! |
Next I installed the new saddle, the saddle really looks good installed! I also installed a 5 mm hex key seat binder bolt. The old bolt was a large hex bolt and just no longer fits the style of the three speed. The new seat binder bolt is clean, sleek and perfect for the build!
I stripped the fenders, I am always amazed that when the paint is chemical removed that all the rust can be seen and it looks like hundreds of rusty blood vessels.
I then removed and prepared the surfaces of the fenders and clean them very very well.
The fenders are currently going through the slow bake.
The fender struts are riveted to the fenders, I drilled the rivets and will replace them with a nut and bolt. The nut and bolt will adjust easier and removing the struts makes it a lot easier to powder coat the fenders.
Is there a better look then those green fender over those cream tires??!!


John it appears that you have a 3 speed from the now defunct Coast to Coast hardware store chain, in the 70s with the bike booms a number of Hardware and even automotive stores sold bikes. I would guess it was actually built by a big bike manufacturer and Coast to Coast slapped their decals on it. Very unique 3 speed shifter - cool.
ReplyDeleteWow - the finished product is amazing!
ReplyDeleteBeautiful work. You may have already figured out, but you have a Shimano 333 hub with a twist-grip shifter. The Shimano hubs were widely used on "more inferior" department store 3-speeds although many survive today. You mention the bell crank assembly that pushes in the shifting rod - I think the bell cranks may be superior to the Sturmey-Archer shifter chain because the bell crank would less likely be damaged if the bike is dropped. Also, the bell crank here looks a bit different from the ones I usually see. I wonder if yours is an older model since it also has an oil cap.
ReplyDelete