Sunday, August 18, 2013

A Rivendell ish - Bobish - Poor Mans version for Myself

This post is continued by clicking here or the link below.

http://johns-recycled-bicycle.blogspot.com/2015/04/my-poor-mans-rivendell-like-build.html


I am a fan of Rivendell style bicycles.   My friend David is also a fan and I owe inspiration of this build to him.  David owns the Red Schwinn Le Tour and the baby blue Schwinn Continental.  When you get past all the hype and propaganda or marketing noise they are wonderful bicycles.  The problem is the $2,500 + price tag and maybe a few more ++++ in there.

The thing is a lot of Rivendell's inspiration came from the Trek 620 and 720 and the early 1980's Japaneses touring and sports touring bicycles.  What Rivendell did was make those bicycles even more versatile by having all the braze ons and allowing for much larger tire clearances and fender clearances.

My goal with this build is to come close to a Rivendell bicycle on my bike mechanics budget.  I think I can do it, its not going to be exactly an every mans build for at some point i will be adding a lot more cable routing stops, cage eyelets, fender mounts, rack mounts and I think maybe cantilever brake studs.  This requires brazing or silver soldering, which not every one would want to tackle.

What is nice is there are a lot of frames from that era around.  And if they have 27 inch wheels there is a lot of tire clearance built in when converting to 700c wheels.  Not as much clearance as a Rivendell but a lot more then normal.

I have had a Schwinn Le Tour 12.2 bike around the shop for about a year and it is a 25 inch / 63 cm frame, my size.  I stole the brake calipers off of it some time ago to use on another project, so better yet.  The Schwinn Le Tour 12.2 is a nice bicycle, this one someone removed the decals.  The 12.2 had alloy rims, better brakes and a Shimano 600 rear derailleur and a Shimano 60 front derailleur, all upgrades from the basic le Tour.  The frame was also lighter and I think the brake calipers where Dai Comp G's maybe??

Rivendell Style Bicycle - Starting Point - Schwinn Le Tour 12.2
The Schwinn Le Tour 12.2 - Highlights
Below is a photo that got me excited when I threw the 700c wheels and gravel grinding tires on it before I stripped it down to the frame.

Rivendell Style Bicycle - New Shoes
I stripped the Le Tour 12.2 off all the components.  I cleaned the frame but did not bother polishing it, after mock up and I decided if I like it and where I want to put the brazings on the frame will need new paint or powder coat.

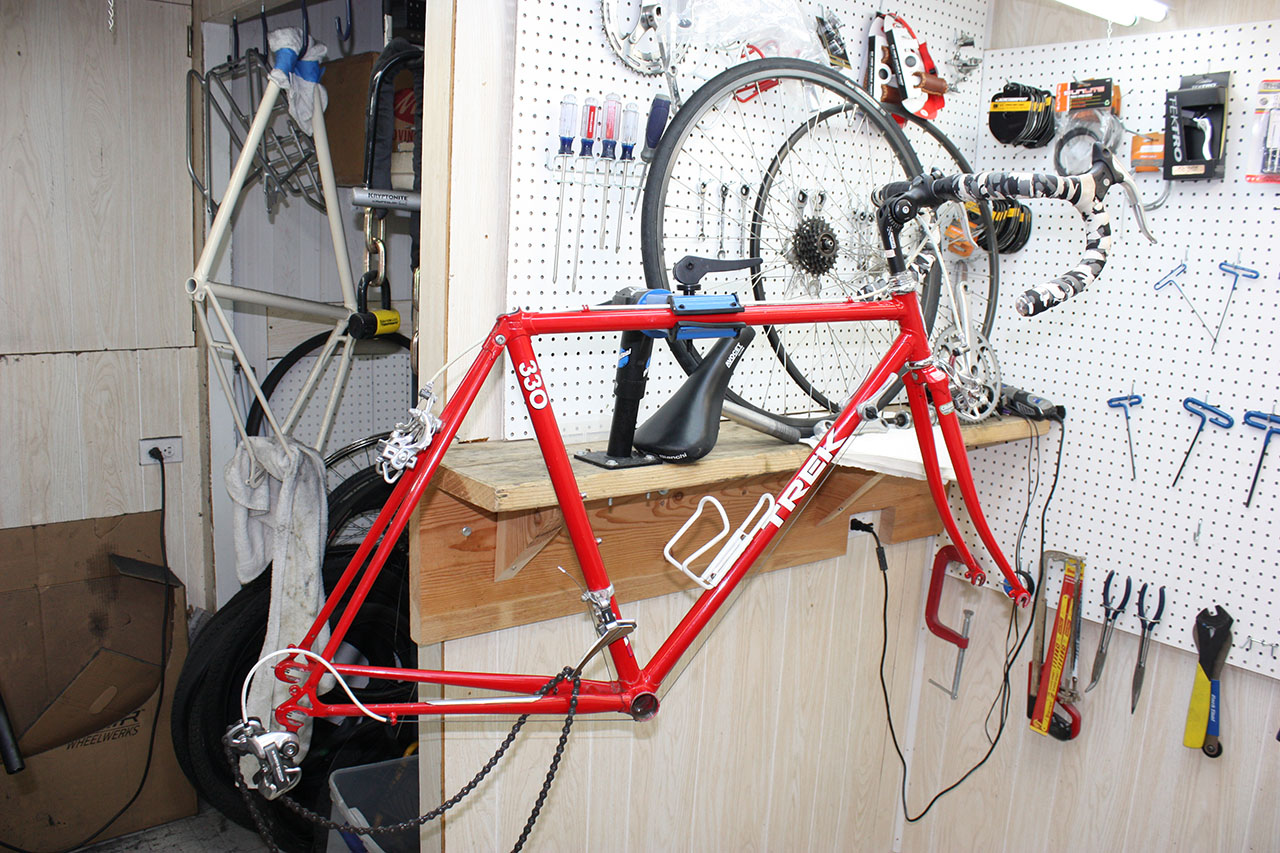
Rivendell Style Bicycle - Frame Stripped of Components
The Schwinn Le Tour 12.2 had a smaller headset and fork steer tube, I want to be able to have the more modern larger diameter stems so I will have to replace the headset and fork.  I tend to mix numbers up so I will look up the numbers on the size of the old and new forks before I put it in the post.

I did not have a fork that would fit the frame so I found a new descent steel fork at a descent price.  I will be adding eyelets and cantilever studs later so it did not need to be real fancy.  I am not completely happy with the tightness of the rake on the fork, I may replace it before its all said and done.  The steer tube is 9 1/2 inches, I will need to remove about 3/8 of an inch to fit properly.

The headset is Velo Orange of course.  My favorite headsets, although i have not had a new Dura Ace headset before.  Have had plenty of Dura Ace headsets from the first generation though, and I love them.

The handlebars for now are Nitto Albatross sway back bars.  I paid up to get these, as far as handlebars go the are pretty expensive, but they also fit bar end shifters.  I am not sure if I will stay with the Nitto Albatross bars, I think I may end up with Nitto drop bars and shellac cloth handlebar tape.

The stem for now is just a generic riser stem.  Depending on looks I might replace the stem with a Nitto Tallux.  But that may be getting into budget problems.

Rivendell Style Bicycle - New Fork
Rivendell Style Bicycle - New Velo-Orange Headset
New Nitto Albatross Handlebars
Rivendell Style Bicycle - Fork - Headset
Stem & Handlebars - Installed
I got some Dura Ace 8 speed Index/Friction bar end shifters some time back for almost nothing at a swap meet.  I plan on using those so I am going with an 8 speed rear.  The wheels are nothing special, they where given to me after an upgrade project for someone else.  They may come to a Total of $100 if bought new, they are what i am using for mock up while i find something else.

The rear derailleur is also nothing special, it is new, but nothing special for now.  the mock up is going to be with nothing special components, I have a lot of ideas and decisions to make after mock up as in what components I want to use.

The cassette is an 8 speed Sram, new.

Rivendell Style Bicycle - Nothing Special - 8 Speed Derailleur
Rivendell Style Bicycle - Rear Mock Up
Notice in photo above.  The frame has a rear derailleur hanger drop out, I think this is important that the frame you start with has this to utilize better modern drive trains.  But I am sure some one could rig something up with out it.  I don't want to.

For mock up I am using Tektro long reach nutted brake calipers.  They will work very well for mock up and until I add the cantilever brake posts.

Rivendell Style Bicycle - Rear Tektro Brake Caliper

The bottom bracket is a good value Shimano UB-55 I believe.

For the mock up and while I decide what type of crank I want to use, and since the Dura Ace front bar end shift lever is friction shift I will be using the original crank from the Le Tour 12.2.  I like the way it looks, but i will not be using it beyond mock up.

Rivendell Style Bicycle - Original Crank for Mock Up
Still Dirty
That it for now.  Below is a photo of the bicycle so far.  A long way to go!!

Rivendell Style Bicycle - Bike as of Now

Update December 6, 2013

Its been a while since I updated the poor mans Rivendell post, I do not get a lot of time to work on personal bicycles.  I totally mocked up the bicycle and was happy with it so far so I tore it down and started with some brazing.  I plan to reroute the cables, so that will require some cable brackets, I also am adding water bottle cages, a fork brazing, eyelets for racks and I think i will braze on some brake studs for cantilever brakes.

I started with the water bottle cage brazing yesterday and that was about all the time I had.  I drilled the holes in the frame, first I center punch a start for the drill bit and then put a few drops of oil on the bit, not totally necessary because the metal is thin and I used a very slow drill speed but every little bit helps when keeping drill bits sharp.  I then clean the areas very well and applied a good amount of flux, heated up the area and applied the silver solder.  The brazing went well, a quick wire brushing to clean them up and later a little more cleaning before paint.  Overall pretty pleased with the results.

Next when I have the time I will do the fork and rack eyelets.

In the photo below of the small braze-on pieces you can see some Cinelli diamond shape eyelet reinforces, I decided not to use them, going for a cleaner look.

Rivendell Style Bicycle
Paint Removed for Brazing

Rivendell Style Bicycle - Water Bottle Cage Braze-ons

Rivendell Style Bicycle
Down Tube Holes Drilled

Rivendell Style Bicycle - Seat Tube Holls Drilled

Rivendell Style Bicycle
Seat Tube Brazing Complete

Rivendell Style Bicycle
Down Tube Brazing Complete

Rivendell Style Bicycle - Water Bottle Cages Brazing Complete

Rivendell Style Bicycle
Water Bottle Cage Brazing
Complete
I have been working on the rear brakes a bit.  I made a jig out of a piece of fairly ridged aluminum.  I cut holes in the aluminum to hold the brake studs in place.  One hole is oblong to allow for adjustment.  The photo I took did not turn out so I will take a photo again when i do the front brakes.

The brazing went fine, I cleaned up the joint with dome emery paper and a wire brush, I am pretty happy with the results.  I like the joints and the looks.


Rivendell Style Bicycle - Brake Studs - Brazed
Rivendell Style Bicycle - Brake Calipers - Tested

Rivendell Style Bicycle - Brake Calipers - Tested

Update April 7, 2014

It has been a while since I have had the time to work on the Poor Mans Rivendell project.  Since it is a bike for me the work always comes second and I have been so busy that I has come a far second.  On Sunday I took a little bit of time to work on it, It is my birthday on Tuesday so I thought I would treat myself and actually right now I do not own a geared bike so I need one, I have some bike camping tips planned and weekend rides in hilly western Wisconsin and really do not want to ride a fully loaded fixed gear bike for it.  Its about enjoying the ride with good friends, not a work out.

I went to braze the front brake stud on to the fork and found that the cantilever brake calipers I really want to use (Pictured Above) will not fit on the fork, just about every other cantilever brakes I have will but I really want these.  The issue seems to be that the brake pads are dual pivot style pads and won't fit.  I want to use these for that reason and the clean minimalist look.

I am not sure what I am going to do yet, find a new fork or use other cantilevers.  For now its on hold so I put some long reach Tektro dual pivot nutted brake calipers.  I really wanted to use some Shimano 600 Tri-Colors that Dave V. gave me as a gift but the reach was not long enough.  I will use them on another personal build some day, they are a much appreciated gift that i will never use on a bike I build to sell.  Thanks Dave V.!!!!

Rivendell Style Bicycle - Shimano 600 Tri- Color
Brake Calipers - A Gift from Dave V!!
Rivendell Style Bicycle - New Tektro
Brake Calipers - Love the swooping line
of the front caliper arm.

Rivendell Style Bicycle - Tektro Rear Caliper
Installed
 I should have started the post with the headset but I wanted to explain the brakes first. And sorry for not as many photos, I will take more but I was trying to fit the work in and didn't want to waste the time on photos.

The headset is a Velo-Orange headset, it is actually the Japan ISO size.  This is my favorite headset, it installed perfectly and looks perfect.  I also cut the fork to fit at this time making sure I planed enough length for a future cable hanger bracket.

I traded a different tall stem to a customer with some cash credit for this Nitto Technomics stem.  It is not as popular or as in demand as the same stem with the Nitto lable stamped in it but I am good with the Technomic lable.  I also installed the Nitto Albatross handlebars at this time.  The whole set up is perfect in my eyes!


Rivendell Style Bicycle - Headset Cups
Installed

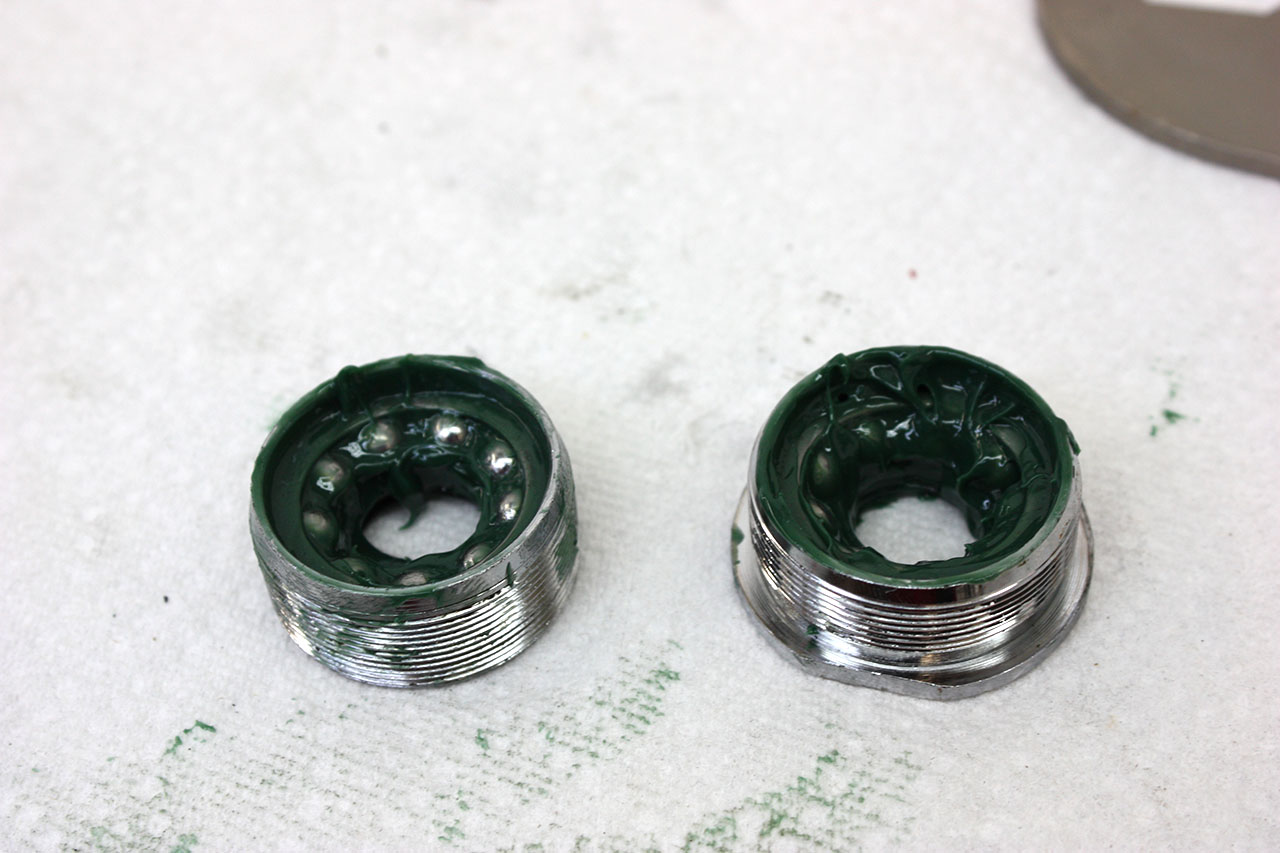
Rivendell Style Bicycle - Bearings Packed

Rivendell Style Bicycle - Nitto Technomics Stem

Rivendell Style Bicycle - New Nitto Albatross Handlebars

Rivendell Style Bicycle -  Headset
Complete - Stem Installed

Rivendell Style Bicycle - Handlebars - Installed
Lets see, what was next, hard to remember with out all the photos.  The derailleurs where next.  I replaced the rear derailleur that was shown up in the post with a Shimano 105 8 speed derailleur that was a gift from Bill. (See Bill's Trek 2300 Update)  I really like this derailleur and it was a much appreciated gift so it will not go on a bike build that I will sell.  Thanks Bill!!.  I have a nice 8 speed cassette installed with middle of the range gearing.  I also installed the Dura Ace bar end 8 speed shift levers I have been saving for sometime.  I will take a photo of those later.

Rivendell Style Bicycle - "Old" New Derailleur
Not Going to Use Now

Rivendell Style Bicycle - Shimano 105 Derailleur
A Gift From Bill, Thanks Bill!!

I was actually looking for a a Shimano 600 8 speed crank for the Poor Mans Rivendell Project and even thought of going with the original Le Tour crank but over the winter I found my favorite crank, a Sugino BT.  I polished it sometime over the winter and it looks fantastic.  I also installed a favorite early 80's Sun Tour front derailleur that I have been keeping on my good parts shelf for years, I still need to take a photo of it.

New pedals will be installed, just put these on for mock up because the pedals I ordered have not come yet.


Rivendell Style Bicycle - Sugino BT Crank

Rivendell Style Bicycle
Crank - Installed
Almost forgot this photo.  It is a bottom bracket I have had for years on my personal parts shelf, I do not know why it was there but it will work for now.  I am think eventually I will replace it with a really nice Velo-Orange bottom bracket.

Rivendell Style Bicycle - Bottom Bracket

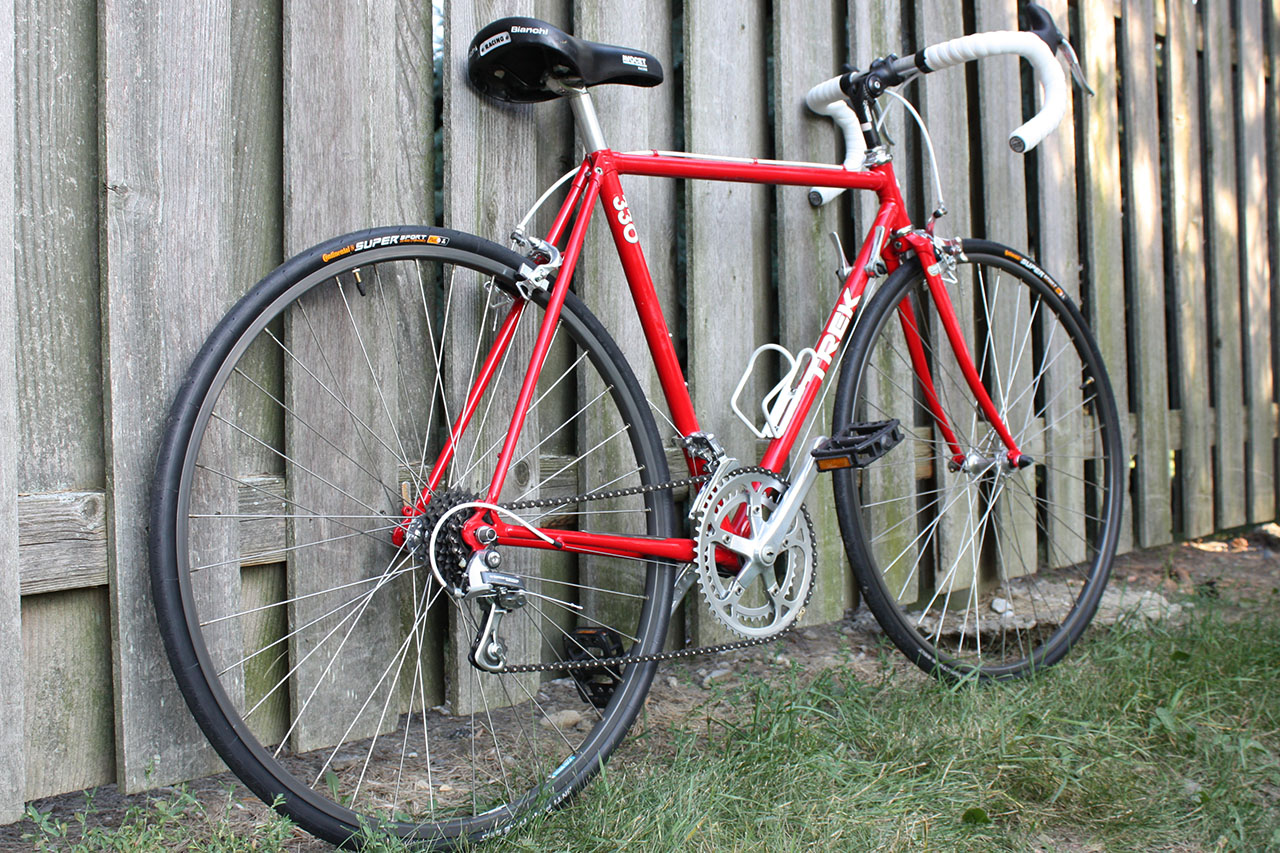
That is all the photos I have for now.  I will take a lot more of all the components later.  The photo below shows the bicycle wired and the seat post, saddle, and Rivendell cork handlebar grips installed.  I still need to get a longer chain.  I have a beautiful Velo-Orange Roandonneur front rack coming and want to have it in hand to measure where i want to put the front fork braze ons on.  I also have very nice Velo-Orange fenders coming and a Rivendell saddle bag along with a Brooks saddle.  For now the bicycle is mocked up and ready for a ride.
Rivendell Style Bicycle - Bicycle Mocked up and Ready for
a Ride.
 I road the bike only shortly this morning and am absolutely thrilled.  It is a huge bike as you can see!!! It is the first bike that has every truly fit me and my 6'-4" frame.  I actually had to lower the seat a bit.  Its actually to low in the photo below, needs to go up an inch,

It road just wonderful, so smooth and easy.  I can't wait to get all the other accessories in!  I still need to figure out that fork and of course all the other details and painting and just about everything.  I am going to ride it hard tomorrow!!

I also still want to build up some new wheels, I have the rims I want, still got to choose and find some hubs.

I can't wait to take it camping!!

I have blathered on long enough about it, check back soon!!


Rivendell Style Bicycle - Bicycle Mocked Up
and Test Road

Rivendell Style Bicycle - Bicycle Mocked Up
and Test Road

This post is continued by clicking here or the link below.

http://johns-recycled-bicycle.blogspot.com/2015/04/my-poor-mans-rivendell-like-build.html

Tuesday, July 23, 2013

Jose's Trek 330 Restoration

Trek 330 - After

Trek 330 - Bicycle before
This is Jose's 1988 Trek 330 restoration.  I have always wanted a Trek 330 in red or blue with the white lettering for myself but never found one in my size and price.  The Trek 330 is in good shape, it came mostly disassembled and missing the rear wheel.  Jose was able to find some wheels of a Trek 400 from a few years newer which will go great with the Trek 330.

The plan for the Trek 330 is pretty simple, a restoration with new tires and new handlebar tape, the Trek 330 is already pretty modern with index shifting, areo brake levers and the 700c wheels.  The Trek 330 should be a fast bicycle and look great with white Gel cork handlebar tape and white cable housings.

Trek 330 - Starting Point - Bicycle Before
Trek 330 - Bicycle Before - Front View
Trek 330 - Components and Wheels from a Trek 400
Trek 330 - Bicycle Before - Rear Derailleur
Trek 330 - Rear Brake - Before
Trek 330 - Bicycle Before - Adjustable Stem
Trek 330 - Bicycle Before - 330 Decal

I put the headset and bottom bracket components into the crock pot right away to clean and got to work cleaning and polishing the frame.  The frame is in good shape and cleaned easy.  My new polishing system made the frame absolutely pop, the polishing system did remove some old touch up paint that was a bad match.  A new match will be much better.  I will post more photos tomorrow.

Trek 330 - Headset and Bottom Bracket - Before
It been extremely busy around the shop lately so the blog being time consuming I have not updated it recently.  I have gotten some good work done on the Trek 330.  The headset and bottom bracket cleaned and polished very nice, I replaced the bottom bracket bearings but reused the bearing cages.  Both the headset and bottom bracket function very smoothly.

Trek 330 - Headset & Bottom Bracket - Cleaned & Polished
Trek 330 - Bottom Bracket Bearings - Packed
Trek 330 - Bottom Bracket
Fixed Cup - Installed
Trek 330 - Bottom Bracket - Complete
Trek 330 - Headset Bearings - Packed
Trek 330 - Headset Bearing Cups
Pressed
Trek 330 - Headset Bearing Cups
Trek 330 - Headset - Complete
The wheels are off of a newer Trek 400, the wheels are in good shape, they are dirty and the aluminum needs polishing.  I rebuilt the wheels and replaced the bearings, the hubs polished very nice.  The rims are a bronze color, I just hand polished the rims to remove some of the dullness.  The rear wheel was missing the quick release skewer so I am using an old temporary skewer until the new one gets here.  The wheels turned out very nice, they spin fast and smooth, I am pleased with the results, its going to be a fast bicycle.

Trek 330 - Front Wheel Hub - Before
Trek 330 - Front Wheel Rim - Before
Trek 330 - Front Wheel Hub - Old Grease
Trek 330 - Rear Wheel - Freewheel - Before
Trek 330 - Rear Wheel Hub - Before
Trek 330 - Rear Wheel Complete - Very Pleased
Trek 330 - Front Wheel - Complete
Trek 330 - Wheels Complete
The stem that is on the Trek 330 is an adjustable stem, it will be nice to dial in the ride height.  The handlebars are pretty badly gouged, who put the adjustable stem on did not know how to remove the handle bars from the old quill stem.  The handlebar tape is going to be replaced, which is a good thing because the old camo tape crumbled to nothing as I worked on it.  I will post a few photos of the handlebars and stems but that is all the time for posting right now.  There is a lot more done, just need to post it.

Trek 330 - Handlebars & Stem - Before
Trek 330 - Adjustable Stem
Trek 330 - Handlebars - Gouged
I did my best to polish the handlebars, the bad gouging is there but the handlebars do look better then before.  The brake levers where missing the brake lever hoods, I am working on finding replacements that will fit, so far no luck, but I will find them.  The brake elvers did clean up nice and polish nice though.

Trek 330 - Handlebars Polished
Trek 330 - Brake Levers - Polished
Trek 330 - Handlebars - Installed
Trek 330 - Brake Levers - Installed
Next is the brake calipers and derailleurs.  The brake calipers are in pretty good shape.  The decal did wipe right off with soap and water and a rag.  That seems to happen to decals from that era.  I disassembled the brake calipers one at a time as always so I have one to reference.  I like the brake calipers, I believe they are the last high end model before they went to dual pivot.  The brake calipers turned out very nice, I am pleased. I then installed the new brake pads and the calipers to the frame.

Trek 330 - Calipers & Derailleurs - Before
Trek 330 - Brake Caliper - Exploded View
Trek 330 - Brake Caliper - Polished
Trek 330 - Brake caliper - Before & After
Trek 330 - Front Brake - Installed
Trek 330 - Rear Brake - Installed
The derailleurs are in good shape, dirty, but good shape.  I cleaned both and polished the front derailleur.  I removed the jockey wheels and on the rear derailleur and overhauled those.  Both derailleurs look good and after lubricating function smooth.

Trek 330 - Front Derailleur - Before
Trek 330 - Front Derailleur - Installed
Trek 330 - Rear Derailleur - Before
Trek 330 - Rear Derailleur - Polished
Trek 330 - Rear Derailleur - Installed
The crank is a nice Sugino crank, it is dirty and dull but not much wear.  I disassembled the crank and cleaned everything.  The crank arms have a different texture, kind off like factory forging marks, or an orange peel texture.  I polished it the best I could, It looks a lot better, but did not polish to as high of a shine as others.  I then reassembled the crank and installed it, it looks great against the red.

Trek 330 - Crank - Before
Trek 330 - Crank - Disassembled
Trek 330 - Crank - Polished
Trek 330 - Crank - Reassembled
Trek 330 - Crank Polished & Installed
Last thing for the updating of the post for tonight is the seat post.  The seat post is a nice micro adjust, it just took some cleaning and polishing.

Trek 330 -  Seat Post - Before
Trek 330 - Seat post - Installed
I love Fast Back Seat Post Lugs!
A photo of the bike to this point of the post.

Trek 330 - Bike to this Point
The Trek 330 is 99.9% done.  I had to order pedals for it, I thought I had 3 pairs on hand but I am thinking a friend pouched them.  I have been a little slow on the blog lately, it is still extremely busy around the shop so the blog gets pushed back a little.  I am also hoping to have a few more posts done tonight.

I last left of with all the major components restored and installed.  Next came the tires, cables and cable housings.  The tires are Continental 700 x 25 mm super Sports. The tires are very nice and very fast.  New tubes where also installed at this time.

Trek 330 - New Continental Tires
Trek 330 - Front Tire Installed
Trek 330 - Rear Tire Installed
I cleaned and lubricated the 7 speed freewheel at this time and installed a new chain.  The bike came in pieces and the chain that was with it was a big fat mountain bike chain, it did not work at all with the index shifting. The freewheel cleaned wonderfully and runs very smooth after a little reconditioning.

The cables and white housings look great with the bright red frame and the white Trek decals.  it is really becoming a beautiful bike.

Trek 330 - Freewheel Installed
Trek 330 - Cables & Housings - Installed
Later I shortened the cables & housings
after testing the adjustable stem.

The bike was missing brake lever hoods.  It shouldn't have been so hard to find hoods that would fit but it took three tries.  I just could not get the hoods over the high peak and low swail of the body.  I finally found some Shimano brake lever hoods that if I rubbed enough Armour All in side I could get them installed.

White cork handlebar tape is going on the Trek 330.  It will look great with the red and white decals.  As always with light colored handlebar tape I clean and whip down the shop first and wear some very clean disposable latex gloves, don't want to get the white dirty!

Very very happy with the results of the Shimano brake lever hoods and the white cork handlebar tape, looks incredible.

Trek 330 - New Shimano Brake Lever hoods
Trek 330 - New Brake Lever Hoods Installed
Trek 330 - Right Side Handlebar Tape Installed
Trek 330 - Handlebar Tape - Complete

There was just a few last things to do.  I finished the touch up painting.  There was not much to do, the paint is in great shape.  the red is not an exact match but very very close.  I installed the Bianchi saddle that came with it, I believe Jose has a Brooks saddle for it.  I also installed temporary pedals so I could do the test riding.

Trek 330 - Bike Ready for Test Ride

I am very happy with the Trek 330, like I said before I have always wanted one in red or blue.  The bike rides wonderful and very very fast!!!  The rear index shifting shift well for the down tube generation of index shifting.  The bicycle looks better then new, the Continental Super Sport tires are great.  I am looking forward to seeing it with a Brooks Saddle.  Overall a fantastic bike.

Trek 330 - Bicycle complete - Side view
Trek 330 - Bicycle complete - Angle view
Trek 330 - Bicycle complete - Front view
Trek 330 - Bicycle complete -
Handlebar view
Trek 330 - Bicycle complete - Drive Train view
Trek 330 - Bicycle complete - Rear view
Trek 330 - Bicycle complete - Messing with Photoshop