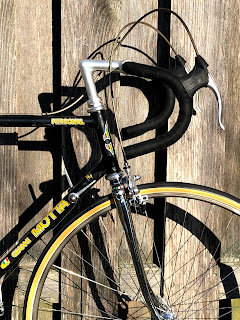
Man this is cool! This is Ron's Gianni Motta Personal, it is in for what probably is more a preservation than a restoration. Ron is the original owner. (Correction: Ron is the second owner of the black Motta, he is the original owner of the white Motta photoed below.) I have never worked on one before, I have only seen one other in person and it was red and yellow, I like the mat black a lot!
The Motta arrived disassembled so I will not have a before photo of the bike assembled. The frame is in pretty good shape, just the usual use wear. The chrome has a few thin spots typical to thin Italian chrome but not bad at all. The Motta will also receive all new cables, cable housings, handlebar tape and new tubular tube. I can't wait to see the Motta complete and hopefully the snow will be gone or at least dry rods so I can try it out!
The frame is in pretty good starting shape, a few spots here and there from use. The frame is mat black so it will not be polished but will be deeply cleaned very gently to keep the looks and the decals. Below our the before photos.
 |
| Ron's Motta Preservation - Bicycle Before |
 |
Ron's Motta Preservation - Bicycle Before
Head Tube |
 |
Ron's Motta Preservation - Bicycle Before
Head Tube |
 |
Ron's Motta Preservation - Bicycle Before
Top Tube |
 |
Ron's Motta Preservation - Bicycle Before
Head Lug |
 |
Ron's Motta Preservation - Bicycle Before
Down Tube |
 |
Ron's Motta Preservation - Bicycle Before
Down Tube |
 |
Ron's Motta Preservation - Bicycle Before
Seat Lug |
 |
Ron's Motta Preservation - Bicycle Before
Seat Tube |
 |
Ron's Motta Preservation - Bicycle Before
Bottom Bracket |
 |
Ron's Motta Preservation - Bicycle Before
Bottom Bracket |
 |
Ron's Motta Preservation - Bicycle Before
Bottom Bracket |
 |
Ron's Motta Preservation - Bicycle Before
Seat Lug |
 |
Ron's Motta Preservation - Bicycle Before
Seat Stays |
 |
Ron's Motta Preservation - Bicycle Before
Rear Brake Bridge |
 |
Ron's Motta Preservation - Bicycle Before
Chain Stays |
 |
Ron's Motta Preservation - Bicycle Before
Stays |
 |
Ron's Motta Preservation - Bicycle Before
Drop Outs |
 |
Ron's Motta Preservation - Bicycle Before
Fork |
 |
Ron's Motta Preservation - Bicycle Before
Fork Crown |
 |
Ron's Motta Preservation - Bicycle Before
Fork Crown |
Over the years I have come up with a paste I make that does a beautiful job cleaning paint and does it very gently.
 |
| Ron's Motta Preservation - Cleaning Paste |
I don't know where the overall photo of the frame went after the cleaning and protecting of the paint and I already pressed the headset cups before I remembered to take the photos. The frame turned out amazing. The paint cleaned beautifully and the decals really pop now, the photos and fluorescent lights just don't do it justice. I am thrilled with the results. I also am happy with how the frame chrome polished!
 |
Ron's Motta Preservation - Frame Cleaned
Head Tube |
 |
Ron's Motta Preservation - Frame Cleaned
Head Tube |
 |
Ron's Motta Preservation - Frame Cleaned
Top Tube |
 |
Ron's Motta Preservation - Frame Cleaned
Down Tube |
 |
Ron's Motta Preservation - Frame Cleaned
Down Tube |
 |
Ron's Motta Preservation - Frame Cleaned
Seat Lug |
 |
Ron's Motta Preservation - Frame Cleaned
Seat Tube |
 |
Ron's Motta Preservation - Frame Cleaned
Seat Tube |
 |
Ron's Motta Preservation - Frame Cleaned
Bottom Bracket |
 |
Ron's Motta Preservation - Frame Cleaned
Bottom Bracket |
 |
Ron's Motta Preservation - Frame Cleaned
Bottom Bracket |
 |
Ron's Motta Preservation - Frame Cleaned
Seat Lug |
 |
Ron's Motta Preservation - Frame Cleaned
Seat Stays |
 |
Ron's Motta Preservation - Frame Cleaned
Drop Outs |
 |
Ron's Motta Preservation - Frame Cleaned
Chain Stays |
 |
Ron's Motta Preservation - Frame Cleaned
Fork |
 |
Ron's Motta Preservation - Frame Cleaned
Fork Crown |
All the components are going to be cleaned and then everything polished by hand. A little more work then using the polishing wheels but its going to be worth it. The goal of hand polishing is to keep the components looking as close to factory original as can be. This isn't always possible depending on how far gone components are but the Motta it still should not be a problem.
Working by hand the headset and bottom bracket really turned out nice! They both look great installed next to that cleaned paint.
 |
Ron's Motta Preservation - Bottom Bracket
Before |
 |
| Ron's Motta Preservation - Headset Before |
 |
| Ron's Motta Preservation - Bottom Bracket & Headset Polished |
I am very proud of the work that went into the stem and handlebars. Both has rough surfaces and some tarnish on the lacquer that seals the polish of the aluminum. Working by hand I gave both a good cleaning and then worked with a paste I make special for aluminum components with lacquer finishes. Both the handlebars and stem look just beautiful!! I am really proud of the work that went into them. I am especially happy the way the "C" badge on the stem turned out, I was able to get the yellowing out of the white paint/plastic. One thing I was very careful with is the cam pad that holds the stem to the handlebars had a crack in it close to one edge. The crack should not be a problem where it is because its to one side and there is still lot of good surface area.
 |
Ron's Motta Preservation - Stem & Handlebars
Before |
 |
| Ron's Motta Preservation - Stem & Handlebars Before |
 |
| Ron's Motta Preservation - Stem Before |
 |
| Ron's Motta Preservation - Stem Before |
 |
| Ron's Motta Preservation - Stem & Handlebars |
 |
| Ron's Motta Preservation - Handlebars Before |
 |
| Ron's Motta Preservation - Stem Before |
 |
| Ron's Motta Preservation - Stem Expolded |
 |
| Ron's Motta Preservation - Slight Crank |
 |
| Ron's Motta Preservation - Stem Polished |
 |
| Ron's Motta Preservation - Stem Complete |
 |
| Ron's Motta Preservation - Stem Complete |
 |
| Ron's Motta Preservation - Handlebars Polished |
 |
| Ron's Motta Preservation - Handlebars Polished |
 |
Ron's Motta Preservation - Stem & Handlebars
Complete |
 |
Ron's Motta Preservation - Stem & Handlebars Complete
Proud of the results of the badge, no more yellow! |
 |
| Ron's Motta Preservation - Stem & Handlebars Complete |
The crank is the beautiful Campagnolo classic design. Its hard to fine a better looking crank. It was very dirty so I cleaned it and sent it through the sonic cleaner. After it was cleaned I worked through polishing grits by hand. The crank has some normal wear but it sure looks good!
 |
| Ron's Motta Preservation - Crank Before |
 |
| Ron's Motta Preservation - Crank Hand Polished & Ready |
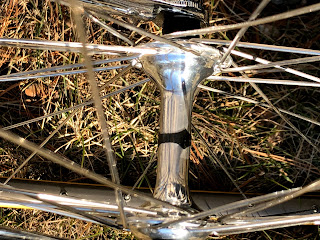
Next I installed the headset and bottom bracket. I am thrilled how the cleaned and hand polished headset looks with the frame! I worked with a Dremel extension to prepare the bottom bracket cup I could not remove. With bearings in fresh grease the headset and bottom bracket spin beautifully!! Like Campagnolo headsets and bottom brackets should spin!
 |
| Ron's Motta Preservation - Pressing Headset Cups |
 |
| Ron's Motta Preservation - Headset Cups Pressed |
 |
| Ron's Motta Preservation - Headset Complete |
 |
| Ron's Motta Preservation - Headset Complete |
 |
| Ron's Motta Preservation - Bottom Bracket Complete |
 |
| Ron's Motta Preservation - Bottom Bracket Complete |
 |
| Ron's Motta Preservation - Headset & Bottom Bracket Complete |
Next the stem and handlebars where installed. I love how the stem looks with the headset! I can't wait to see the handlebars with new handlebar tape!
 |
| Ron's Motta Preservation - Stem & Handlebars Installed |
 |
| Ron's Motta Preservation - Stem & Handlebars Installed |
 |
Ron's Motta Preservation - Stem & Handlebars
Installed |
 |
| Ron's Motta Preservation - Stem & Handlebars Installed |
It is really hard to beat the styling of a Campagnolo crank. Installed the crank just pops with the mat black frame as a back drop!
 |
| Ron's Motta Preservation - Crank Installed |
 |
| Ron's Motta Preservation - Crank Installed |
I cleaned and lubricated the brake calipers and then worked through polishing grits by hand. The brake calipers did not turn out perfect but man they sure are close to perfect! And the brake calipers function perfect! I am amazed with the photo of the front caliper installed with the headset, chrome fork and head tube in the back ground, just amazing!
 |
| Ron's Motta Preservation - Brake Calipers Before |
 |
| Ron's Motta Preservation - Brake Calipers Polished |
 |
Ron's Motta Preservation - Front Brake Caliper
Installed |
 |
Ron's Motta Preservation - Front Brake Caliper
Installed |
 |
Ron's Motta Preservation - Front Brake Caliper
Installed |
 |
Ron's Motta Preservation - Rear Brake Caliper
Installed |
 |
Ron's Motta Preservation - Rear Brake Calipers
Installed |
 |
| Ron's Motta Preservation - Brake Calipers Installed |
The front and rear derailleurs are my favorite derailleurs made from an era. I love the black accents and the alloy and chrome. And its hard to beat that Campagnolo script on the rear derailleur framed by the black and silver. I broke down both derailleurs and worked by hand to clean and polish the pieces. Assembled the derailleurs turned out beautifully! I couldn't be happier with the results and how they looked installed!
 |
| Ron's Motta Preservation - Front Derailleur Before |
 |
| Ron's Motta Preservation - Front Derailleur Before |
 |
| Ron's Motta Preservation - Front Derailleur Polished |
 |
| Ron's Motta Preservation - Front Derailleur Polished |
 |
| Ron's Motta Preservation - Front Derailleur Installed |
 |
| Ron's Motta Preservation - Front Derailleur Installed |
 |
| Ron's Motta Preservation - Rear Derailleur Before |
 |
| Ron's Motta Preservation - Rear Derailleur Before |
 |
| Ron's Motta Preservation - Rear Derailleur Before |
 |
| Ron's Motta Preservation - Rear Derailleur Exploded |
 |
| Ron's Motta Preservation - Rear Derailleur Polished |
 |
| Ron's Motta Preservation - Rear Derailleur Complete |
 |
| Ron's Motta Preservation - Rear Derailleur Complete |
 |
| Ron's Motta Preservation - Rear Derailleur Complete |
 |
| Ron's Motta Preservation - Rear Derailleur Complete |
 |
Ron's Motta Preservation - Rear Derailleur
Installed |
 |
| Ron's Motta Preservation - Derailleurs Installed |
The brake levers didn't need much work at all. I gave them a good cleaning and lubricating and installed the new brake elver hoods. I think Ron said he has original style hoods or had them coming but I did not write that down in my build notebook so I am not sure. Installed the brake elvers look good, they will look even better with the new handlebar tape.
 |
| Ron's Motta Preservation - Brake Levers Before |
 |
| Ron's Motta Preservation - Brake Levers Before |
 |
| Ron's Motta Preservation - New Brake Lever Hoods |
 |
| Ron's Motta Preservation - Brake Levers Hoods Installed |
 |
| Ron's Motta Preservation - Brake Levers Installed |
 |
Ron's Motta Preservation - Brake Levers
Installed |
 |
| Ron's Motta Preservation - Brake Levers Installed |
Classic Campagnolo shift levers. The chrome on the tension nut and plate is very rough, thin Italian chrome. I did the best I could to make that chrome better, its still pretty rough but at least better then it was. Replacement pieces can be found down the road if wanted. The rest of the pieces turned out nice with hand polishing. Installed they look great!
 |
| Ron's Motta Preservation - Shift Levers Before |
 |
| Ron's Motta Preservation - Shift Levers Ready |
 |
| Ron's Motta Preservation - Shift Levers Installed |
Check back for more photos soon.












Hi love your restorations. Could you elaborate on how you clean/polish/restore some of these parts? In particular what is your procedure in polishing aluminum parts like handlebars, quillstems, cranks. In addition, what do you do with chrome parts like headsets?
ReplyDelete