Geoff's International is in very good starting shape. It will get a restoration or maybe more of an overhaul with new bearings, cables and cable housings. The hard thing I always have with very nice vintage bicycles is how to handle the restoration. I could easily take all the components apart and polish everything to a high mirror finish but that would loose the originality and character of a bike that is more valuable with out going crazy with the polisher. It takes a lot more time and energy but I do a lot of hand polishing to try to keep as much of the original factory finish or at least the character as I can keeping more value in the bike. I am also going to work by hand on the stem, brake levers and handlebars because of the beautiful Brooks honey handlebar tape already in place.
I meant to mention the International will be receiving new decals also.
I can't wait to rid the international, it is my favorite riding bike also!
 |
| Geoff's 1973 Raleigh International Restoration - Bicycle Before |
 |
| Geoff's 1973 Raleigh International Restoration - Bicycle Before Stem |
 |
| Geoff's 1973 Raleigh International Restoration - Bicycle Before Head Tube |
 |
| Geoff's 1973 Raleigh International Restoration - Bicycle Before Front Brake |
 |
| Geoff's 1973 Raleigh International Restoration - Bicycle Before Fork Corwn |
 |
| Geoff's 1973 Raleigh International Restoration - Bicycle Before Front Wheel Hub |
 |
| Geoff's 1973 Raleigh International Restoration - Bicycle Before Front Wheel Hub |
 |
| Geoff's 1973 Raleigh International Restoration - Bicycle Before Front Wheel Rim |
 |
| Geoff's 1973 Raleigh International Restoration - Bicycle Before Top Tube |
 |
| Geoff's 1973 Raleigh International Restoration - Bicycle Before Shift Levers |
 |
| Geoff's 1973 Raleigh International Restoration - Bicycle Before Down Tube |
 |
| Geoff's 1973 Raleigh International Restoration - Bicycle Before Down Tube |
 |
| Geoff's 1973 Raleigh International Restoration - Bicycle Before Seat Lug |
 |
| Geoff's 1973 Raleigh International Restoration - Bicycle Before Crank |
 |
| Geoff's 1973 Raleigh International Restoration - Bicycle Before Front Derailleur |
 |
| Geoff's 1973 Raleigh International Restoration - Bicycle Before Pedal |
 |
| Geoff's 1973 Raleigh International Restoration - Bicycle Before Brooks Saddle |
 |
| Geoff's 1973 Raleigh International Restoration - Bicycle Before Rear Brake Caliper |
 |
| Geoff's 1973 Raleigh International Restoration - Bicycle Before Chain Stay |
 |
| Geoff's 1973 Raleigh International Restoration - Bicycle Before Rear Derailleur |
 |
| Geoff's 1973 Raleigh International Restoration - Bicycle Before Rear Wheel Hub |
I broke the International down and during the disassembly process I realized that the International has Campy side pull brakes. Originally it had Wheinman center pull brakes. Its a very nice upgrade with the Campy side pull brake. The rear brake cable brackets on the top tube are also not original as the center pull brakes had the cable stops on the side of the frame that are still there. The cable brackets are there for the side pull brakes. I think a very cool upgrade.
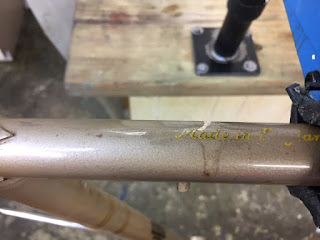
The frame with the components stripped the frame is in descent starting shape, looks a little rougher once you take everything off but over all not to bad. I think it will polish very nicely.
 |
| Geoff's 1973 Raleigh International Restoration - Frame Before |
 |
| Geoff's 1973 Raleigh International Restoration - Frame Before Head Tube |
 |
| Geoff's 1973 Raleigh International Restoration - Frame Before Head Tube |
 |
| Geoff's 1973 Raleigh International Restoration - Frame Before Head Tube |
 |
| Geoff's 1973 Raleigh International Restoration - Frame Before Top Tube |
 |
| Geoff's 1973 Raleigh International Restoration - Frame Before Down Tube |
 |
| Geoff's 1973 Raleigh International Restoration - Frame Before Down Tube |
 |
| Geoff's 1973 Raleigh International Restoration - Frame Before Top Tube |
 |
| Geoff's 1973 Raleigh International Restoration - Frame Before Seat Lug |
 |
| Geoff's 1973 Raleigh International Restoration - Frame Before Seat Tube |
 |
| Geoff's 1973 Raleigh International Restoration - Frame Before Bottom Bracket |
 |
| Geoff's 1973 Raleigh International Restoration - Frame Before Down Tube |
 |
| Geoff's 1973 Raleigh International Restoration - Frame Before Bottom Bracket |
 |
| Geoff's 1973 Raleigh International Restoration - Frame Before Bottom Bracket |
 |
| Geoff's 1973 Raleigh International Restoration - Frame Before Seat Lug |
 |
| Geoff's 1973 Raleigh International Restoration - Frame Before Seat Stays & Cable Hanger |
 |
| Geoff's 1973 Raleigh International Restoration - Frame Before Chain Stays |
 |
| Geoff's 1973 Raleigh International Restoration - Frame Before Drop Outs |
 |
| Geoff's 1973 Raleigh International Restoration - Frame Before Fork |
 |
| Geoff's 1973 Raleigh International Restoration - Frame Before Fork Crown |
 |
| Geoff's 1973 Raleigh International Restoration - Frame Before Fork Crown |
 |
| Geoff's 1973 Raleigh International Restoration - Frame Before Fork Blade |
 |
| Geoff's 1973 Raleigh International Restoration - Frame Before Fork Blades |
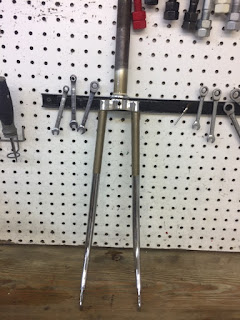
I cleaned and polished the frame. I have not removed the old decals yet since it always takes a while for the decal people to get me the decals so I didn't want to strip all the decals and then have problems with the decal people. Cleaned and polished the frame really looks good! The color doesn't photograph how it looks in person. The champagne color has a deep luster I was not expecting. A lot of the blemishes polished away, a very spots here and there are not perfect but that expected in a 40+ year old paint. Overall I am thrilled with the results of the polishing of the frame! I love the chrome lugs and stays!! The photos below still have the original decals minus the old faded bicycle shop decals on the down tube. It will look even better with the new decals!!
 |
| Geoff's 1973 Raleigh International Restoration - Frame Polished |
 |
| Geoff's 1973 Raleigh International Restoration - Frame Polished Head Tube |
 |
| Geoff's 1973 Raleigh International Restoration - Frame Polished Head Tube |
 |
| Geoff's 1973 Raleigh International Restoration - Frame Polished Top Tube |
 |
| Geoff's 1973 Raleigh International Restoration - Frame Polished Head Tube Lug |
 |
| Geoff's 1973 Raleigh International Restoration - Frame Polished Down Tube |
 |
| Geoff's 1973 Raleigh International Restoration - Frame Polished Seat Lug |
 |
| Geoff's 1973 Raleigh International Restoration - Frame Polished Seat Tube |
 |
| Geoff's 1973 Raleigh International Restoration - Frame Polished Bottom Bracket |
 |
| Geoff's 1973 Raleigh International Restoration - Frame Polished Bottom Bracket |
 |
| Geoff's 1973 Raleigh International Restoration - Frame Polished Bottom Bracket |
 |
| Geoff's 1973 Raleigh International Restoration - Frame Polished Seat Lug |
 |
| Geoff's 1973 Raleigh International Restoration - Frame Polished Seat Stays |
 |
| Geoff's 1973 Raleigh International Restoration - Frame Polished Chain Stays |
 |
| Geoff's 1973 Raleigh International Restoration - Frame Polished Drop Outs |
 |
| Geoff's 1973 Raleigh International Restoration - Frame Polished Fork |
 |
| Geoff's 1973 Raleigh International Restoration - Frame Polished Fork Crown |
 |
| Geoff's 1973 Raleigh International Restoration - Frame Polished Fork Crown |
 |
| Geoff's 1973 Raleigh International Restoration - Frame Polished Fork Corwn |
 |
| Geoff's 1973 Raleigh International Restoration - Frame Polished Fork Blade |
 |
| Geoff's 1973 Raleigh International Restoration - Frame Polished Fork Blades |
 |
| Geoff's 1973 Raleigh International Restoration - Frame Polished Fork |
The headset greasy is so very sticky but once I cleaned it all out in the crock pot I got to working with the polishing wheels. The headset polished beautifully and looks just fantastic with the chrome lugs. With new grease and bearings it spins perfect!!
The bottom bracket was replaced with a modern cartridge bottom bracket. The bracket still felt smooth so a little cleaning and in it goes. Modern cartridge bottom brackets can not be serviced, you just ride them until there is a problem and replace them. I kind of like the old way where you can rebuild the old bottom brackets.
 |
| Geoff's 1973 Raleigh International Restoration - Headset & Bottom Bracket Before |
 |
| Geoff's 1973 Raleigh International Restoration - Headset Polished |
 |
| Geoff's 1973 Raleigh International Restoration Pressing Headset Cups |
 |
| Geoff's 1973 Raleigh International Restoration Headset Cups Pressed |
 |
| Geoff's 1973 Raleigh International Restoration - Headset Bearings Packed |
 |
| Geoff's 1973 Raleigh International Restoration Headset Complete |
 |
| Geoff's 1973 Raleigh International Restoration Headset Complete |
 |
| Geoff's 1973 Raleigh International Restoration - Headset Complete |
 |
| Geoff's 1973 Raleigh International Restoration Bottom Bracket Cleaned |
 |
| Geoff's 1973 Raleigh International Restoration Bottom Bracket Installed |
 |
| Geoff's 1973 Raleigh International Restoration - Bottom Bracket Installed |
Campagnola cranks are my favorite cranks in this world style wise. They are so refined and classic looking and that is coming from a Dura Ace guy!. I love this stuff! This is where all the time hand polishing is invested. The crank still has some of the factory finish so it is so worth hand polishing. I broke the crank down and cleaned everything in the crock pot and sonic cleaners. With the pieces cleaned I did a good deal of hand polishing. I think the crank turned out spectacular and installed looks even better!! The only pieces polished on the power wheels where the crank bolt dust caps, I just had to to get them looking right.
 |
| Geoff's 1973 Raleigh International Restoration - Crank Before |
 |
| Geoff's 1973 Raleigh International Restoration - Crank Exploded View |
 |
| Geoff's 1973 Raleigh International Restoration - Crank Polished |
 |
| Geoff's 1973 Raleigh International Restoration - Crank Complete |
 |
| Geoff's 1973 Raleigh International Restoration Crank Installed |
 |
| Geoff's 1973 Raleigh International Restoration - Crank Complete |
Some more photos as things progress. The brake calipers where next. I hand polished the caliper arms and polished everything else on the polishing wheels. The droopy Campy calipers are one of the most beautiful calipers and they work well too. I am very pleased with how the calipers turned out.
 |
| Geoff's 1973 Raleigh International Restoration - Brake Calipers Before |
 |
| Geoff's 1973 Raleigh International Restoration - Brake Calipers Exploded View |
 |
| Geoff's 1973 Raleigh International Restoration Brake Calipers Polished |
 |
| Geoff's 1973 Raleigh International Restoration - Brake Calipers Complete |
 |
| Geoff's 1973 Raleigh International Restoration Front Caliper Installed |
 |
| Geoff's 1973 Raleigh International Restoration Rear Brake Caliper Installed |
 |
| Geoff's 1973 Raleigh International Restoration - Brake Calipers Complete |
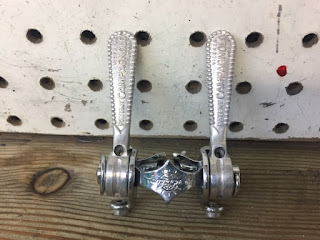
I worked on the shift levers and cable guide next. The shift lever levers I polished by hand to keep the original look, all the other pieces where polished on the polishing wheels. Everything polished beautifully! Can't beat how the levers look installed! I love this stuff!!
 |
| Geoff's 1973 Raleigh International Restoration - Shift Levers Before |
 |
| Geoff's 1973 Raleigh International Restoration - Shift Levers Complete |
 |
| Geoff's 1973 Raleigh International Restoration - Shift Levers Complete |
 |
| Geoff's 1973 Raleigh International Restoration - Shift Levers Installed |
The front derailleur was polished by hand except for the small hardware and chrome cage. The front derailleur also turned out very nice!
I am stunned how nice the rear derailleur turned out. It looks like brand new, like right from the factory.
 |
| Geoff's 1973 Raleigh International Restoration - Derailleurs Before |
 |
| Geoff's 1973 Raleigh International Restoration - Rear Derailleur Before |
 |
| Geoff's 1973 Raleigh International Restoration - Rear Derailleur Exploded View |
 |
| Geoff's 1973 Raleigh International Restoration Rear Derailleur Polished |
 |
| Geoff's 1973 Raleigh International Restoration - Rear Derailleur Complete |
 |
| Geoff's 1973 Raleigh International Restoration Rear Derailleur Installed |
 |
| Geoff's 1973 Raleigh International Restoration - Rear Derailleur Complete |
 |
| Geoff's 1973 Raleigh International Restoration - Front Derailleur Before |
 |
| Geoff's 1973 Raleigh International Restoration - Front Derailleur Polished |
 |
| Geoff's 1973 Raleigh International Restoration - Front Derailleur Complete |
 |
| Geoff's 1973 Raleigh International Restoration - Front Derailleur Installed |
 |
| Geoff's 1973 Raleigh International Restoration - Derailleurs Complete |
 |
| Geoff's 1973 Raleigh International Restoration - Brackets Before |
 |
| Geoff's 1973 Raleigh International Restoration - Top Tube Bracket Complete |
 |
| Geoff's 1973 Raleigh International Restoration - Bottom Bracket Cable Guide Complete |
Hi John, please finish this post, I'm really enjoying it!
ReplyDeleteYeah bookmaking this wasn’t a risky decision outstanding post! . collision repair in raleigh
ReplyDelete