 |
| 1973 Schwinn Speedster 3 Speed Restoration & Upgrade Bicycle After Restoration |
I have a problem, I currently have 5 personal bikes, which is way over the limit of two I give myself. There are a couple of reasons I have always kept my personal bike limit at two. One is I don't have space around the shop to dedicate to bikes that will mainly hang there. Another reason is I think it is a capable challenge to meet to meet all your needs in two bikes. Another reason is bikes are meant to ride not to hang on a hook.
The last and big reason is I have a media blaster that is to small to meet all my needs when fitting a frame into it. I have drawn plans to build a media blasting cabinet to meet my needs, now I am getting to the point to start building it. I need the space for that cabinet.
I have thought long and hard for near 3 months on which bikes I will keep for my two and which no matter how much I love them just overlap my two. As of now I have narrowed it down to three and the Schwinn Speedster is one of the two to go. (Man it kind of hurts typing that last sentence.)
With that all laid out I guess it is time to finish the restoration of the Speedster. When I got the Speedster I wanted to update it some. I have had some really nice Tektro Dual Pivot long reach calipers around the shop for a couple of years and driving home with the Speedster I was thinking of seeing if they would fit the Speedster. They fit very nice! With the brake upgrade the Speedster is also getting a total restoration, along with all new cables and cable housings, all new bearings, new tires and tire tubes, new handlebar grips and a new saddle. For part one of the restoration it has my personal B67 saddle on it, it will not have that saddle for part two of the restorations, that is my saddle I have put all the miles in to breaking it in to me, no one will get that saddle from me. Needles to say, the Speedster is getting a new saddle.
The restoration is kind of in two parts, the first part is the work I did for me to get the Speedster up and running for with some upgrades. Part 2 of the restoration is completing the final restoration.
When I first got the Speedster it looked very very rough but right away the roughness started to peal away. I love this bike, I hope it finds a good home where it gets plenty of miles.
That strange rack on the back is actually for a baby or child seat, that will be recycled quickly.
 |
| 1973 Schwinn Speedster 3 Speed Restoration & Upgrade Bicycle Before |
 |
| 1973 Schwinn Speedster 3 Speed Restoration & Upgrade Bicycle Before |
 |
| 1973 Schwinn Speedster 3 Speed Restoration & Upgrade Bicycle Before - Handlebars |
 |
| 1973 Schwinn Speedster 3 Speed Restoration & Upgrade Bicycle Before - Head Tube |
 |
| 1973 Schwinn Speedster 3 Speed Restoration & Upgrade Bicycle Before - Front Brake |
 |
| 1973 Schwinn Speedster 3 Speed Restoration & Upgrade Bicycle Before - Front Wheel Hub |
 |
| 1973 Schwinn Speedster 3 Speed Restoration & Upgrade Bicycle Before - Brake & Shift Lever |
 |
| 1973 Schwinn Speedster 3 Speed Restoration & Upgrade Bicycle Before - Stem & Handlebars |
 |
| 1973 Schwinn Speedster 3 Speed Restoration & Upgrade Bicycle Before - Head Tube |
 |
| 1973 Schwinn Speedster 3 Speed Restoration & Upgrade Bicycle Before - Front Wheel Hub |
 |
| 1973 Schwinn Speedster 3 Speed Restoration & Upgrade Bicycle Before - Front Wheel Rim |
 |
| 1973 Schwinn Speedster 3 Speed Restoration & Upgrade Bicycle Before - Headset |
 |
| 1973 Schwinn Speedster 3 Speed Restoration & Upgrade Bicycle Before - Down Tube - Bad Photo |
 |
| 1973 Schwinn Speedster 3 Speed Restoration & Upgrade Bicycle Before - Saddle |
 |
| 1973 Schwinn Speedster 3 Speed Restoration & Upgrade Bicycle Before - Chicago Decal |
 |
| 1973 Schwinn Speedster 3 Speed Restoration & Upgrade Bicycle Before - Bottom Bracket |
 |
| 1973 Schwinn Speedster 3 Speed Restoration & Upgrade Bicycle Before - Drive Train |
 |
| 1973 Schwinn Speedster 3 Speed Restoration & Upgrade Bicycle Before - Crank |
 |
| 1973 Schwinn Speedster 3 Speed Restoration & Upgrade Bicycle Before - Crank |
 |
| 1973 Schwinn Speedster 3 Speed Restoration & Upgrade Bicycle Before - Chain Guard |
 |
| 1973 Schwinn Speedster 3 Speed Restoration & Upgrade Bicycle Before - Saddle |
 |
| 1973 Schwinn Speedster 3 Speed Restoration & Upgrade Bicycle Before - Rear Brake |
 |
| 1973 Schwinn Speedster 3 Speed Restoration & Upgrade Bicycle Before - Rear Wheel Hub |
 |
| 1973 Schwinn Speedster 3 Speed Restoration & Upgrade Bicycle Before - Rear Wheel Hub |
First thing I did was test fit the Tektro long reach dual pivot brake calipers. If they did not fit then the plans for the Speedster would have been scraped. They fit well!
 |
| 1973 Schwinn Speedster 3 Speed Restoration & Upgrade Bicycle Before - Test Fit Front Brake Caliper |
 |
| 1973 Schwinn Speedster 3 Speed Restoration & Upgrade Bicycle Before - Test Fir Rear Brake Caliper |
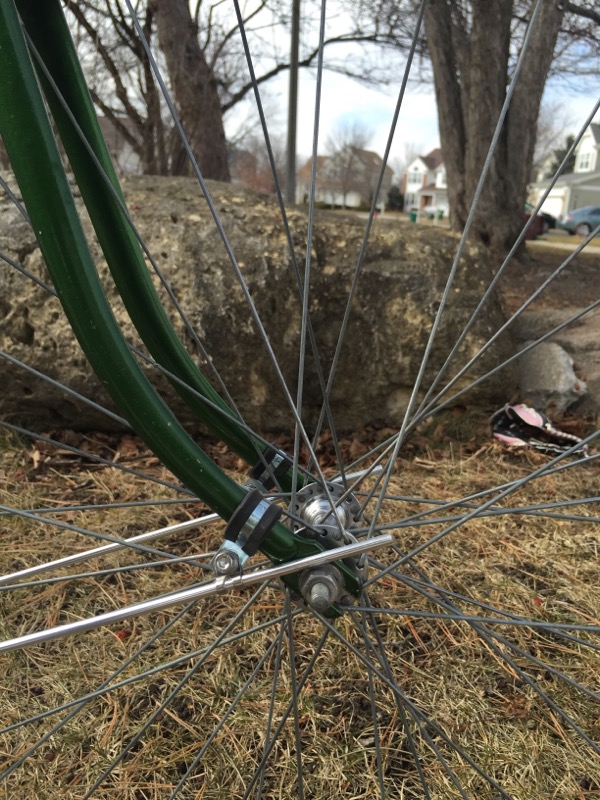
First thing I did was restore the wheels. If i was making it ride-able for me that is the first place to start. The wheels where very rough on the surface. The rear wheel hub was covered in rock hard dry grease. Inside the 3 speed hub was not much better but all the piece for the 3 speed hub where there and did not show much ware. The bearings in the hubs where shot so they where replaced. Everything else took a great deal of cleaning and polishing. The rims had some rust but it turned out to be only very light surface rust.
I cleaned and polished all the pieces, the hubs and rims polished beautifully! Probably better then new shine. I packed new bearings in the front wheel hub with new grease and installed the new tire and tube. The front wheel spins super easy and smooth.
The 3 speed hub took a total rebuild, I had to replace to small springs. With the hub leaned, lubricated and rebuilt it function perfectly. It is very rare that a three speed hub can't be rebuilt to working perfectly.
Installed the wheels and tires look amazing even with the rest of the bike not restored. I love this bike!
 |
| 1973 Schwinn Speedster 3 Speed Restoration & Upgrade Front Wheel - Before |
 |
| 1973 Schwinn Speedster 3 Speed Restoration & Upgrade Front Wheel Hub - Before |
 |
| 1973 Schwinn Speedster 3 Speed Restoration & Upgrade Front Wheel Rim - Before |
 |
| 1973 Schwinn Speedster 3 Speed Restoration & Upgrade Front Wheel Hub - Old Grease |
 |
| 1973 Schwinn Speedster 3 Speed Restoration & Upgrade Front Wheel Hub - Polished |
 |
| 1973 Schwinn Speedster 3 Speed Restoration & Upgrade Front Wheel Rim - Polished |
 |
| 1973 Schwinn Speedster 3 Speed Restoration & Upgrade Front Axle Pieces Ready |
 |
| 1973 Schwinn Speedster 3 Speed Restoration & Upgrade Front Wheel Hub - New Bearings Packed |
 |
| 1973 Schwinn Speedster 3 Speed Restoration & Upgrade New Gum Wall Tires |
 |
| 1973 Schwinn Speedster 3 Speed Restoration & Upgrade Front Wheel Complete |
 |
| 1973 Schwinn Speedster 3 Speed Restoration & Upgrade Front Wheel Complete |
 |
| 1973 Schwinn Speedster 3 Speed Restoration & Upgrade Front Wheel Complete |
 |
| 1973 Schwinn Speedster 3 Speed Restoration & Upgrade Rear Wheel - Before |
 |
| 1973 Schwinn Speedster 3 Speed Restoration & Upgrade Rear Wheel hub - Before |
 |
| 1973 Schwinn Speedster 3 Speed Restoration & Upgrade Rear Wheel Hub - Before - Nasty! |
 |
| 1973 Schwinn Speedster 3 Speed Restoration & Upgrade Rear Wheel Hub - Rebuilding Process |
 |
| 1973 Schwinn Speedster 3 Speed Restoration & Upgrade Rear Wheel Hub - Before |
 |
| 1973 Schwinn Speedster 3 Speed Restoration & Upgrade Rear Wheel Hub - Rebuild Process |
 |
| 1973 Schwinn Speedster 3 Speed Restoration & Upgrade Rear Wheel Hub - Rebuild Process |
 |
| 1973 Schwinn Speedster 3 Speed Restoration & Upgrade Rear Wheel Hub - Rebuild Process |
 |
| 1973 Schwinn Speedster 3 Speed Restoration & Upgrade Rear Wheel hub - New Bearings Packed |
 |
| 1973 Schwinn Speedster 3 Speed Restoration & Upgrade Rear Wheel Hub - Complete |
 |
| 1973 Schwinn Speedster 3 Speed Restoration & Upgrade Rear Wheel Hub - Complete |
 |
| 1973 Schwinn Speedster 3 Speed Restoration & Upgrade Rear Wheel - Complete |
 |
| 1973 Schwinn Speedster 3 Speed Restoration & Upgrade Rear Wheel Complete |
 |
| 1973 Schwinn Speedster 3 Speed Restoration & Upgrade Wheels Complete |
With the wheels complete I wired the new brake calipers with new cables and cable housings. I also installed a new shift cable with new cable housings.
 |
| 1973 Schwinn Speedster 3 Speed Restoration & Upgrade Front Dual Pivot Caliper - Wired |
 |
| 1973 Schwinn Speedster 3 Speed Restoration & Upgrade Bicycle Wired |
 |
| 1973 Schwinn Speedster 3 Speed Restoration & Upgrade Rear Brake Caliper - Wired |
 |
| 1973 Schwinn Speedster 3 Speed Restoration & Upgrade Bicycle Wired |
 |
| 1973 Schwinn Speedster 3 Speed Restoration & Upgrade Test Ride - Awful Dead Saddle |
So I ran and got my Brooks B67 and installed it. In that time the sun went away. First thing I did on the next test ride is adjust the saddle from the photo below!! Wow, how could I have thought that was correct in the photo below??
 |
| 1973 Schwinn Speedster 3 Speed Restoration & Upgrade Brooks B67 Installed |
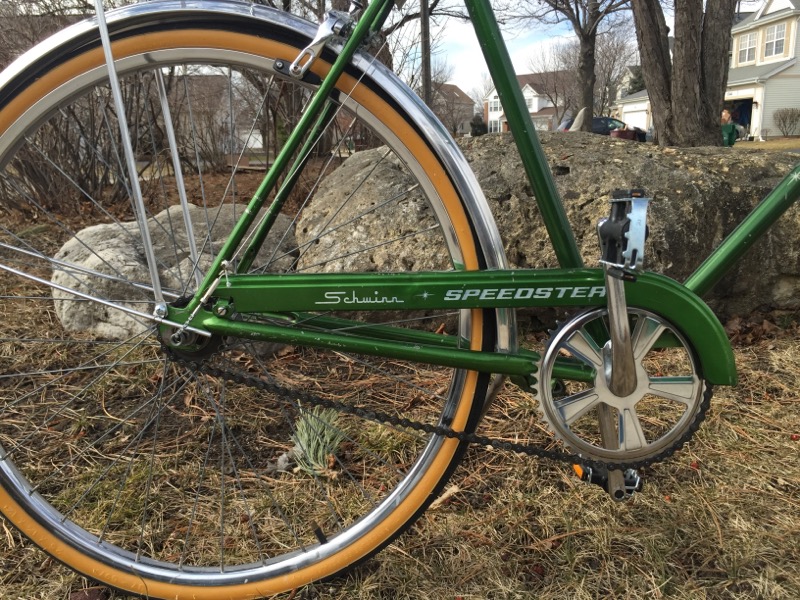
From the last addle adjustment on the Speester road amazing. Very very comfortable and like a Cadillac! I roughly put around 330 miles on the Speedster until winter glancing at my GPS app. It did get all grocery store trips, errands around town and many evening cruises and a few all day Saturday rides. Man I like this bike! As I said it does not accelerate fast at all but once you get it up to speed it just glides like the wind! The long reach dual pivot brake calipers make a world of difference over the original brakes. Much much better stopping power and even a little better then the original calipers in wet conditions. I was very very happy with the Speedster just the way it is with the intention of finishing the rest of the bikes restoration when I got a little time to work on my own bikes. Now it is time to finish the restoration and find the Speedster a good home.
 |
| 1973 Schwinn Speedster 3 Speed Restoration & Upgrade Start of the Restoration Part 2 |
I broke the frame don of its components. I wiped down the frame a few times after riding it so it was not as dirty or rough as the beginning but it still looked rough. There is a lot of dirt still on the frame, a few scratches and chips and a lot of dullness. I was really hoping the Campus Green paint still had life in it.
I gave the frame a good deep cleaning and started with the polishing grits. Almost instantly the Campus Green paint started to pop. I was thrilled! The paint just got better with every finer grit. An application of a sealer wax and a good buffing and the frame is amazing! I did put clear touch up paint over the scratches before waxing. I learned a while back that with Campus Green if the paint chips are not bad to just leave them with a little clear protection. Mixing a matching touch up paint is hard for this green and just looks awful! Over all I am super pleased with the results of the frame polishing!
I love taking an old frame where the paint is way to far gone and doing the work to powder coat it or paint it and bring it back to perfect new. But I also believe if the paint is not to far gone everything should be done to keep it and not worry about paint chips and scratches here and there. When the bike is completely restored and polished to a beautiful finish all those chips kind of fade away. Especially if the bike is going to be rode. Te bike earned those chips and scratches, it has history, it has character. I think this Campus Green Schwinn is the perfect example, it looks great! Sure someday after tens and tens of thousands more miles it will need new paint, but not yet!
 |
| 1973 Schwinn Speedster 3 Speed Restoration & Upgrade Frame Before |
 |
| 1973 Schwinn Speedster 3 Speed Restoration & Upgrade Frame Before - Head Tube |
 |
| 1973 Schwinn Speedster 3 Speed Restoration & Upgrade Frame Before - Head Tube |
 |
| 1973 Schwinn Speedster 3 Speed Restoration & Upgrade Frame Before - Head Tube |
 |
| 1973 Schwinn Speedster 3 Speed Restoration & Upgrade Frame Before - Top Tube |
 |
| 1973 Schwinn Speedster 3 Speed Restoration & Upgrade Frame Before - Down Tube |
 |
| 1973 Schwinn Speedster 3 Speed Restoration & Upgrade Frame Before - Seat Area |
 |
| 1973 Schwinn Speedster 3 Speed Restoration & Upgrade Frame Before - Chicago Decal |
 |
| 1973 Schwinn Speedster 3 Speed Restoration & Upgrade Frame Before - Bottom Bracket |
 |
| 1973 Schwinn Speedster 3 Speed Restoration & Upgrade Frame Before - Bottom Bracket |
 |
| 1973 Schwinn Speedster 3 Speed Restoration & Upgrade Frame Before - Bottom Bracket |
 |
| 1973 Schwinn Speedster 3 Speed Restoration & Upgrade Frame Before - Seat Area |
 |
| 1973 Schwinn Speedster 3 Speed Restoration & Upgrade Frame Before - Seat Stays |
 |
| 1973 Schwinn Speedster 3 Speed Restoration & Upgrade Frame Before - Chain Stays |
 |
| 1973 Schwinn Speedster 3 Speed Restoration & Upgrade Frame Before - Drop Outs |
 |
| 1973 Schwinn Speedster 3 Speed Restoration & Upgrade Frame Before - Fork |
 |
| 1973 Schwinn Speedster 3 Speed Restoration & Upgrade Frame Before - Fork Crown |
 |
| 1973 Schwinn Speedster 3 Speed Restoration & Upgrade Frame Before - Fork Crown |
 |
| 1973 Schwinn Speedster 3 Speed Restoration & Upgrade Frame Before - Fork Blades |
 |
| 1973 Schwinn Speedster 3 Speed Restoration & Upgrade Frame Before - Fork Drop Outs |
 |
| 1973 Schwinn Speedster 3 Speed Restoration & Upgrade Frame Polished |
 |
| 1973 Schwinn Speedster 3 Speed Restoration & Upgrade Frame Polished - Head Tube |
 |
| 1973 Schwinn Speedster 3 Speed Restoration & Upgrade Frame Polished - Head Tube |
 |
| 1973 Schwinn Speedster 3 Speed Restoration & Upgrade Frame Polished - Head Tube |
 |
| 1973 Schwinn Speedster 3 Speed Restoration & Upgrade Frame Polished - Head Tube |
 |
| 1973 Schwinn Speedster 3 Speed Restoration & Upgrade Frame Polished - Down Tube |
 |
| 1973 Schwinn Speedster 3 Speed Restoration & Upgrade Frame Polished - Seat Area - Shop decal half removed then. |
 |
| 1973 Schwinn Speedster 3 Speed Restoration & Upgrade Frame Polished - Chicago Decal |
 |
| 1973 Schwinn Speedster 3 Speed Restoration & Upgrade Frame Polished - Bottom Bracket |
 |
| 1973 Schwinn Speedster 3 Speed Restoration & Upgrade Frame Polished - Bottom Bracket |
 |
| 1973 Schwinn Speedster 3 Speed Restoration & Upgrade Frame Polished - Bottom Bracket |
 |
| 1973 Schwinn Speedster 3 Speed Restoration & Upgrade Frame Polished - Seat Area |
 |
| 1973 Schwinn Speedster 3 Speed Restoration & Upgrade Frame Polished - Seat Stays |
 |
| 1973 Schwinn Speedster 3 Speed Restoration & Upgrade Frame Polished - Chain Stays |
 |
| 1973 Schwinn Speedster 3 Speed Restoration & Upgrade Frame Polished - Drop Outs |
 |
| 1973 Schwinn Speedster 3 Speed Restoration & Upgrade Frame Polished - Fork |
 |
| 1973 Schwinn Speedster 3 Speed Restoration & Upgrade Frame Polished - Fork Crown |
 |
| 1973 Schwinn Speedster 3 Speed Restoration & Upgrade Frame Polished - Fork Crown |
 |
| 1973 Schwinn Speedster 3 Speed Restoration & Upgrade Frame Polished - Fork Blades |
 |
| 1973 Schwinn Speedster 3 Speed Restoration & Upgrade Frame Polished - Fork Drop Outs |
With the frame paint just popping it was time to get the chain guard to match. The chain guard paint is in fantastic shape for a chain guard. Usually a chain guard takes a beating. There is one major issue though, there is a big giant dent right in the middle. I got my nylon sheet metal hammers out and cushions. I slowly and deliberately started pounding out the dent. I wanted to go very carefully knowing I would not remove the dent perfectly but my goal was not to damage or have the paint chip and fall off. The dent came back a long way and the paint did not break off. There is just a little left along the ridge lines near the top, I don't have the skill to form those ridge lines with out damaging the paint.
With the dent removed I gave the chain guard a good cleaning and worked through the polishing grits. The chain guard really turn out nice, it has a deeper shine then even the photos can show. I am very happy with the results.
 |
| 1973 Schwinn Speedster 3 Speed Restoration & Upgrade Chain Guard - Before |
 |
| 1973 Schwinn Speedster 3 Speed Restoration & Upgrade Chain Guard - Before |
 |
| 1973 Schwinn Speedster 3 Speed Restoration & Upgrade Chain Guard - Before |
 |
| 1973 Schwinn Speedster 3 Speed Restoration & Upgrade Chain Guard - Before |
 |
| 1973 Schwinn Speedster 3 Speed Restoration & Upgrade Chain Guard - Before - The Dent! |
 |
| 1973 Schwinn Speedster 3 Speed Restoration & Upgrade Chain Guard - Before |
 |
| 1973 Schwinn Speedster 3 Speed Restoration & Upgrade Chain Guard - Polished |
 |
| 1973 Schwinn Speedster 3 Speed Restoration & Upgrade Chain Guard - Polished |
 |
| 1973 Schwinn Speedster 3 Speed Restoration & Upgrade Chain Guard - Polished |
 |
| 1973 Schwinn Speedster 3 Speed Restoration & Upgrade Chain Guard - Polished |
 |
| 1973 Schwinn Speedster 3 Speed Restoration & Upgrade Chain Guard - Polished - The Dent Somewhat Better! |
The headset was in descent starting shape other then being very gritty and dried out grease. I put all the pieces in the crock pot for cleaning and then worked through the polishing wheels. With new bearings and new grease the headset spins very smooth. Schwinn headsets rarely don't spin super smooth after restoration they are so heavy duty. Whats even better is how good the headset looks installed with the polished green paint.
 |
| 1973 Schwinn Speedster 3 Speed Restoration & Upgrade Headset Before |
 |
| 1973 Schwinn Speedster 3 Speed Restoration & Upgrade Headset - Polished |
 |
| 1973 Schwinn Speedster 3 Speed Restoration & Upgrade Pressing Headset Cups |
 |
| 1973 Schwinn Speedster 3 Speed Restoration & Upgrade Headset Cups - Pressed |
 |
| 1973 Schwinn Speedster 3 Speed Restoration & Upgrade Headset Bearings - Packed |
 |
| 1973 Schwinn Speedster 3 Speed Restoration & Upgrade Headset - Complete |
 |
| 1973 Schwinn Speedster 3 Speed Restoration & Upgrade Headset - Complete |
 |
| 1973 Schwinn Speedster 3 Speed Restoration & Upgrade Headset - Complete |
With the pieces cleaned I worked through the polishing wheels. The stem and handlebars turned out fantastic! I couldn't be happier with the results!
 |
| 1973 Schwinn Speedster 3 Speed Restoration & Upgrade Stem & Handlebars - Before |
 |
| 1973 Schwinn Speedster 3 Speed Restoration & Upgrade Stem & Handlebars - Before |
 |
| 1973 Schwinn Speedster 3 Speed Restoration & Upgrade Handlebars - Before |
 |
| 1973 Schwinn Speedster 3 Speed Restoration & Upgrade Handlebars - Before |
 |
| 1973 Schwinn Speedster 3 Speed Restoration & Upgrade Stem - Before |
 |
| 1973 Schwinn Speedster 3 Speed Restoration & Upgrade Stem - Exploded |
 |
| 1973 Schwinn Speedster 3 Speed Restoration & Upgrade Stem & Handlebars - Polished |
 |
| 1973 Schwinn Speedster 3 Speed Restoration & Upgrade Handlebars - Polished |
 |
| 1973 Schwinn Speedster 3 Speed Restoration & Upgrade Stem - Polished |
 |
| 1973 Schwinn Speedster 3 Speed Restoration & Upgrade Stem - Complete |
 |
| 1973 Schwinn Speedster 3 Speed Restoration & Upgrade Stem & Handlebars - Installed |
 |
| 1973 Schwinn Speedster 3 Speed Restoration & Upgrade Stem & Handlebars - Installed |
 |
| 1973 Schwinn Speedster 3 Speed Restoration & Upgrade Stem & Handlebars - Installed |
 |
| 1973 Schwinn Speedster 3 Speed Restoration & Upgrade Tektro Dual Pivot Calipers - Cleaned |
 |
| 1973 Schwinn Speedster 3 Speed Restoration & Upgrade Front Brake Caliper - Installed |
 |
| 1973 Schwinn Speedster 3 Speed Restoration & Upgrade Rear Brake Caliper - Installed |
Next is the crank and bottom bracket. Very nasty old grease but sometime in the crock pot fixed that. With the pieces cleaned it was to the polishing wheels. The bottom bracket polished very nice. I packed the bearings in new grease and assembled the crank. It spins super smooth!
The crank was very gritty but the chrome was in good shape, just dull. I cleaned everything and did the polishing by hand. A one piece crank is just to dangerous to use the polishing wheels, it gets caught in the wheel easy and will shoot back at you. When you get a chain ring wedge in your shoulder with a few of the teeth bottoming out in your muscle you tend to not mind the hand polishing. Wicked cool scar though!
 |
| 1973 Schwinn Speedster 3 Speed Restoration & Upgrade Bottom Bracket - Before |
 |
| 1973 Schwinn Speedster 3 Speed Restoration & Upgrade Crank - Before |
 |
| 1973 Schwinn Speedster 3 Speed Restoration & Upgrade Crank - Before |
 |
| 1973 Schwinn Speedster 3 Speed Restoration & Upgrade Crank - Polished |
 |
| 1973 Schwinn Speedster 3 Speed Restoration & Upgrade Bottom Bracket - Polished |
 |
| 1973 Schwinn Speedster 3 Speed Restoration & Upgrade Pressing Bottom bracket Bearing Cups |
 |
| 1973 Schwinn Speedster 3 Speed Restoration & Upgrade Bottom Bracket Cups - Pressed |
 |
| 1973 Schwinn Speedster 3 Speed Restoration & Upgrade Crank - Complete |
 |
| 1973 Schwinn Speedster 3 Speed Restoration & Upgrade Bottom Bracket - Complete |
 |
| 1973 Schwinn Speedster 3 Speed Restoration & Upgrade Crank - Complete |
With the crank complete I started work on the 3 speed shift lever and the brake levers. The brake levers cleaned very nice and polished beautifully. This style is my favorite style of brake lever for city handlebars, it just works well and looks great polished, why change what works!
I soaked and flushed the shift lever to get all the old grease and all the grit out of it. With it cleaned I moved on to the polishing and then lubricated it very well. Installed the 3 speed shift lever looks great and functions perfect. I am thrilled how nice the clear plastic cover with the writing looks.
 |
| 1973 Schwinn Speedster 3 Speed Restoration & Upgrade Brake Levers - Before |
 |
| 1973 Schwinn Speedster 3 Speed Restoration & Upgrade 3 Speed Shift Lever - Before |
 |
| 1973 Schwinn Speedster 3 Speed Restoration & Upgrade 3 Speed Shift Lever - Exploded |
 |
| 1973 Schwinn Speedster 3 Speed Restoration & Upgrade Brake Levers - Polished |
 |
| 1973 Schwinn Speedster 3 Speed Restoration & Upgrade 3 Speed Shift Lever - Polished |
 |
| 1973 Schwinn Speedster 3 Speed Restoration & Upgrade 3 Speed Shift Lever - Complete |
 |
| 1973 Schwinn Speedster 3 Speed Restoration & Upgrade Brake Levers & Shift Lever - Installed |
 |
| 1973 Schwinn Speedster 3 Speed Restoration & Upgrade Brake & Shift Lever - Installed |
Next was the seat post and seat post binder collar. Everything was little rough to start, the factory finish was worn out. I polished everything and it all looks great. Even better installed with the polished green paint.
 |
| 1973 Schwinn Speedster 3 Speed Restoration & Upgrade Seat Post & Binder Collar - Before |
 |
| 1973 Schwinn Speedster 3 Speed Restoration & Upgrade Seat Post 7 Binder Collar - Polished |
 |
| 1973 Schwinn Speedster 3 Speed Restoration & Upgrade Seat Post - Installed |
 |
| 1973 Schwinn Speedster 3 Speed Restoration & Upgrade Seat Post - Installed |
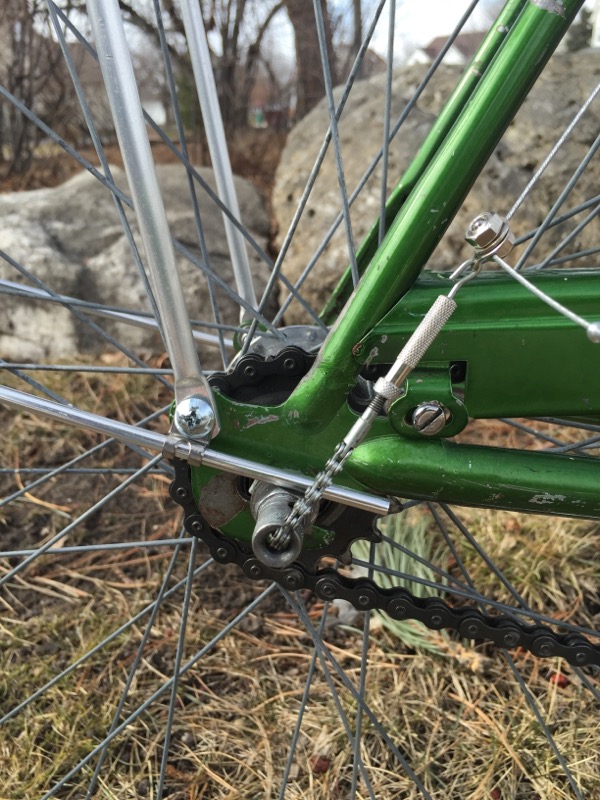
Next is the 3 speed cable bracket and wheel. Both where is descent starting shape. A good cleaning and some polishing on the wheels and they look great. New grease has the wheel working very smooth. Things like these bracket I think are the most important part of a restoration, when they are restored to the highest level they take the restoration to a new level. When they are not restored or even half restored they bring the whole restoration down a bunch of levels.
 |
| 1973 Schwinn Speedster 3 Speed Restoration & Upgrade Shift Cable Brackets - Before |
 |
| 1973 Schwinn Speedster 3 Speed Restoration & Upgrade Shift Cable Bracket - Before |
 |
| 1973 Schwinn Speedster 3 Speed Restoration & Upgrade Shift Cable Bracket - Complete |
 |
| 1973 Schwinn Speedster 3 Speed Restoration & Upgrade Shift Cable Wheel - Complete |
Next I installed the chain and chain guard. Schwinn chains from this era are so tough they rarely ware much. I could cleaning and a week soaking in oil and they are back to life. The polished chain guard really transforms the Speedster restoration. I love this stuff!
 |
| 1973 Schwinn Speedster 3 Speed Restoration & Upgrade Chain - Installed |
 |
| 1973 Schwinn Speedster 3 Speed Restoration & Upgrade Chain Guard - Installed |
Another part of a restoration that makes all the difference is the small hardware and nuts and bolts. The screw for the chain guard is an example, you would probably not notice it if it was not restored and dull but when it is it pops!
 |
| 1973 Schwinn Speedster 3 Speed Restoration & Upgrade Chain Guard - Hardware |
 |
| 1973 Schwinn Speedster 3 Speed Restoration & Upgrade Chain Guard - Installed |
I have used this saddle many times in the past, I thought it really topped off the Wicked 3 Speed Restoration from the spring. I also got the matching ergonomic handlebar grips to match. Installed they look amazing!! Perfect for the Speedster! I would recommenced a Brooks to the next owner but they can do that if they want to spend the money, no need to dd a Brooks to the price of the Speedster if the next owner does not want a Brooks.
 |
| 1973 Schwinn Speedster 3 Speed Restoration & Upgrade New Saddle & Handlebar Grips |
 |
| 1973 Schwinn Speedster 3 Speed Restoration & Upgrade Handlebar Grips - Installed |
 |
| 1973 Schwinn Speedster 3 Speed Restoration & Upgrade Handlebar Grips - Installed |
 |
| 1973 Schwinn Speedster 3 Speed Restoration & Upgrade Handlebar Grips - Installed |
 |
| 1973 Schwinn Speedster 3 Speed Restoration & Upgrade Saddle - Installed - Amazing! |
 |
| 1973 Schwinn Speedster 3 Speed Restoration & Upgrade Bicycle Almost Complete |
I installed some new pedals but forgot to take photos. It is raining and sleeting and nasty out here today to take the Speedster for some test rides and final photos. Tomorrow it is suppose to turn to 4-6 inches of snow so maybe not tomorrow either. I also had an idea this morning to add something to the Breeze that I think will look good, if I try it it will involve leather show laces.
Check back soon!
Since I last updated the Schwinn Speedster post and before the Speedster was completely done I sold the bike to Don who comes from the place I was born in, Escanaba, Michigan in Upper Michigan. To complete the Speedster we are adding a rear rack and Velo Orange fenders.
I moved the photos from my camera memory to the PC and can't seem to find the photos of the fender and rear rack progress. I tried the 26 inch fenders from Velo Orange and they did not fit at all. Next I tried fenders I have had around the shop for a while and they fit okay but not good enough. A few more tries and I found the Velo Orange Zeppelin in the 700c/27 inch by 50 mm size fit perfect. Didn't make great sense to me but what ever works.
I then installed the rear rack, a much better fit then the child seat bracket that was on there before.
We have had some very nice and unusual days lately but that is what happens in an El Nino winter around here. Over the weekend I was able to ride the Speedster a lot and get everything tuned in just in time for the 8 inches of snow they say are coming tonight.
I original built the Speedster up for me and this set up is very close to how I would have built it up. The Speedster rides extremely well, very smooth and responsive. Glides like a Cadillac. The rear hub is very smooth and shifts great which I already knew because I rebuilt it and rode it for a while. The riding position is also very comfortable, the handlebars are high enough and have a great sway to them and the geometry of the frame is already very relaxed. I love this bike!
One thing I didn't really think of when riding the bike is the long reach dual pivot brakes. I din't think about them because they worked very very well. The old brakes worked awful and you thought about braking and stoping. I am very happy with the brake caliper experiment.
The best part of the Speedster is it looks. I love the Campus Green paint polished out and then add in the brown saddle and grips along with the stainless fenders and it doesn't get much more classic then this. This is the way Schwinn should have built up the Speedster.
In the final photos below I have not trimmed the fender struts yet. I was waiting to do that until everything was perfect.
The Schwinn Speedster was a lot of fun! Thank you for looking.
John Z.
Since I last updated the Schwinn Speedster post and before the Speedster was completely done I sold the bike to Don who comes from the place I was born in, Escanaba, Michigan in Upper Michigan. To complete the Speedster we are adding a rear rack and Velo Orange fenders.
I moved the photos from my camera memory to the PC and can't seem to find the photos of the fender and rear rack progress. I tried the 26 inch fenders from Velo Orange and they did not fit at all. Next I tried fenders I have had around the shop for a while and they fit okay but not good enough. A few more tries and I found the Velo Orange Zeppelin in the 700c/27 inch by 50 mm size fit perfect. Didn't make great sense to me but what ever works.
I then installed the rear rack, a much better fit then the child seat bracket that was on there before.
We have had some very nice and unusual days lately but that is what happens in an El Nino winter around here. Over the weekend I was able to ride the Speedster a lot and get everything tuned in just in time for the 8 inches of snow they say are coming tonight.
I original built the Speedster up for me and this set up is very close to how I would have built it up. The Speedster rides extremely well, very smooth and responsive. Glides like a Cadillac. The rear hub is very smooth and shifts great which I already knew because I rebuilt it and rode it for a while. The riding position is also very comfortable, the handlebars are high enough and have a great sway to them and the geometry of the frame is already very relaxed. I love this bike!
One thing I didn't really think of when riding the bike is the long reach dual pivot brakes. I din't think about them because they worked very very well. The old brakes worked awful and you thought about braking and stoping. I am very happy with the brake caliper experiment.
The best part of the Speedster is it looks. I love the Campus Green paint polished out and then add in the brown saddle and grips along with the stainless fenders and it doesn't get much more classic then this. This is the way Schwinn should have built up the Speedster.
In the final photos below I have not trimmed the fender struts yet. I was waiting to do that until everything was perfect.
|
| 1973 Schwinn Speedster 3 Speed Restoration & Upgrade Bicycle Complete |
 |
| 1973 Schwinn Speedster 3 Speed Restoration & Upgrade Bicycle Complete |
 |
| 1973 Schwinn Speedster 3 Speed Restoration & Upgrade Bicycle Complete - Handlebars |
 |
| 1973 Schwinn Speedster 3 Speed Restoration & Upgrade Bicycle Complete - Head Tube |
 |
| 1973 Schwinn Speedster 3 Speed Restoration & Upgrade Bicycle Complete - Front Dual Pivot Brake |
 |
| 1973 Schwinn Speedster 3 Speed Restoration & Upgrade Bicycle Complete - Front Wheel Hub |
 |
| 1973 Schwinn Speedster 3 Speed Restoration & Upgrade Bicycle Complete - Front Wheel Rim |
 |
| 1973 Schwinn Speedster 3 Speed Restoration & Upgrade Bicycle Complete - Handlebars |
 |
| 1973 Schwinn Speedster 3 Speed Restoration & Upgrade Bicycle Complete - Stem |
 |
| 1973 Schwinn Speedster 3 Speed Restoration & Upgrade Bicycle Complete - Head Tube |
 |
| 1973 Schwinn Speedster 3 Speed Restoration & Upgrade Bicycle Complete - Front Wheel Hub |
 |
| 1973 Schwinn Speedster 3 Speed Restoration & Upgrade Bicycle Complete - Front Half |
 |
| 1973 Schwinn Speedster 3 Speed Restoration & Upgrade Bicycle Complete - Saddle |
 |
| 1973 Schwinn Speedster 3 Speed Restoration & Upgrade Bicycle Complete - Chicago Decal |
 |
| 1973 Schwinn Speedster 3 Speed Restoration & Upgrade Bicycle Complete - Drive Train |
 |
| 1973 Schwinn Speedster 3 Speed Restoration & Upgrade Bicycle Complete - Crank |
 |
| 1973 Schwinn Speedster 3 Speed Restoration & Upgrade Bicycle Complete - Saddle |
 |
| 1973 Schwinn Speedster 3 Speed Restoration & Upgrade Bicycle Complete - Rear Dual Pivot Brake |
 |
| 1973 Schwinn Speedster 3 Speed Restoration & Upgrade Bicycle Complete - Rear Wheel Hub |
 |
| 1973 Schwinn Speedster 3 Speed Restoration & Upgrade Bicycle Complete - Rear Wheel Rim |
 |
| 1973 Schwinn Speedster 3 Speed Restoration & Upgrade Bicycle Complete - Rear Fender |
 |
| 1973 Schwinn Speedster 3 Speed Restoration & Upgrade Bicycle Complete |
John Z.
Such a beautiful bike now. Amazing job!
ReplyDeleteGreat post! I am looking to restore the same model of Speedster. Is there a particular brand of polishing cream that you can recommend?
ReplyDeleteGreat transition before and after. Fun to watch the process through picture documentation. Thanks for doing that. Great job!
ReplyDeleteWhats up john,
ReplyDeleteQuick question about those tektro brakes. I took a screenshot of yours and ordered them on amazon. I have a 73 speedster. When i tried to mount them the bolt was too short and couldnt fit on the frame of the bike(both the front and rear). Did u have to modify your brakes to get them to fit?
Nice job!
ReplyDelete