 |
| Peter J's Schwinn Continental Restoration Bicycle After |
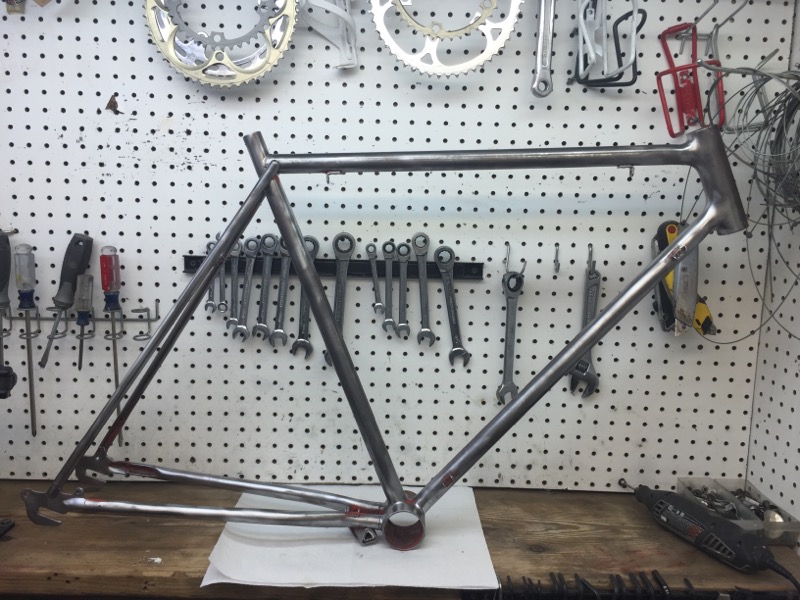
This is Peter's Schwinn Continental shipped to me in a couple boxes all the way from Maine! Peter is the original owner of the Schwinn Continental. It is in for a new paint job along with a total restoration. I love that Peter is the original owner of the Continental and still has it after all this time and still puts miles on it. Can't be a better story then that.
At on time in it's life the Continental got a new paint job. A pretty cool paint job for the time but is now showing the miles. We are going to put the Continental back to as close as possible to the original Schwinn Sunset Orange color.
The components are in okay starting shape and I think they will all come back beautifully! The Continental will get all new cables, bearings, brake pads and tires and tubes. I can not wait to see the results, the Sunset orange is one of my all time favorite colors!
 |
| Peter J's Schwinn Continental Restoration - Bicycle Before |
 |
| Peter J's Schwinn Continental Restoration - Bicycle Before Head Tube |
 |
| Peter J's Schwinn Continental Restoration - Bicycle Before Head Tube |
 |
| Peter J's Schwinn Continental Restoration - Bicycle Before Top Tube |
 |
| Peter J's Schwinn Continental Restoration - Bicycle Before Seat Area |
 |
| Peter J's Schwinn Continental Restoration - Bicycle Before Down Tube |
 |
| Peter J's Schwinn Continental Restoration - Bicycle Before Seat Tube |
 |
| Peter J's Schwinn Continental Restoration - Bicycle Before Crank |
 |
| Peter J's Schwinn Continental Restoration - Bicycle Before Bottom Bracket |
 |
| Peter J's Schwinn Continental Restoration - Bicycle Before Bottom Bracket |
 |
| Peter J's Schwinn Continental Restoration - Bicycle Before Seat Stays |
 |
| Peter J's Schwinn Continental Restoration - Bicycle Before Drop Outs |
 |
| Peter J's Schwinn Continental Restoration - Bicycle Before Fork |
 |
| Peter J's Schwinn Continental Restoration - Bicycle Before Fork Crown |
 |
| Peter J's Schwinn Continental Restoration - Bicycle Before Fork |
 |
| Peter J's Schwinn Continental Restoration - Bicycle Before Fork Blades |
 |
| Peter J's Schwinn Continental Restoration - Bicycle Before Fork Drop Outs |
I finished breaking sown the bicycle. In a few of the photos below you can see the Sunset orange peeking out that I will use to match the powder to.
 |
| Peter J's Schwinn Continental Restoration - Frame Before |
 |
| Peter J's Schwinn Continental Restoration - Frame Before Head Tube |
 |
| Peter J's Schwinn Continental Restoration - Frame Before Top Tube |
 |
| Peter J's Schwinn Continental Restoration - Frame Before Top Tube - Orange Peeking Out |
 |
| Peter J's Schwinn Continental Restoration - Frame Before Seat Area |
 |
| Peter J's Schwinn Continental Restoration - Frame Before Seat Tube |
 |
| Peter J's Schwinn Continental Restoration - Frame Before Bottom Bracket |
 |
| Peter J's Schwinn Continental Restoration - Frame Before Bottom Bracket |
 |
| Peter J's Schwinn Continental Restoration - Frame Before Bottom Bracket |
 |
| Peter J's Schwinn Continental Restoration - Frame Before Seat Stays |
 |
| Peter J's Schwinn Continental Restoration - Frame Before Chain Stays |
 |
| Peter J's Schwinn Continental Restoration - Frame Before Drop Outs |
 |
| Peter J's Schwinn Continental Restoration - Frame Before Fork |
 |
| Peter J's Schwinn Continental Restoration - Frame Before Fork |
The photos below are of the frame just after paint stripping and before frame prep for powder coating. Check out the photo below of the bottom bracket with Peter's initials carved in. So Cool!!
 |
| Peter J's Schwinn Continental Restoration - Paint Stripping Complete |
 |
| Peter J's Schwinn Continental Restoration - Paint Stripping Complete |
 |
| Peter J's Schwinn Continental Restoration - Paint Stripping Complete |
 |
| Peter J's Schwinn Continental Restoration - Paint Stripping Complete |
 |
| Peter J's Schwinn Continental Restoration - Paint Stripping Complete - Initials!! |
 |
| Peter J's Schwinn Continental Restoration - Paint Stripping Complete |
 |
| Peter J's Schwinn Continental Restoration - Paint Stripping Complete |
 |
| Peter J's Schwinn Continental Restoration - Paint Stripping Complete |
 |
| Peter J's Schwinn Continental Restoration - Paint Stripping Complete |
I need to find where the photos went of the frame prepared for powder coating.
The powder coating has been a slow process. I ran into the same problem I had on a recent Raleigh Sports and the only times I have come across this problem. When I heat the frame a sludge drips out. It is not just a little bit but it makes a puddle on the bottom of the heat booth. It is so strange and such a lot. I don't think it is just dirt build up over the years because it is way to much for the amount of dirt that could possibly get into an assembled bicycle.
I have worked through getting all the sludge out. I cleaned and flushed it many times and then backed the frame twice at the powder coat temperature but no powder to burn everything off. After powder coating I am going to spray the inside of the frame with frame saver.
Missing photos to come. Check back in a few days for the powder coating to be complete.
Since it took so long to get the paint correct the post for the Continental is a little out of order. I am going to post some of the photos of the polished components
I started work on the handlebars, stem and brake levers first. I have always really liked these style Schwinn handlebars, they are kind of like Randonneur handlebars. The flares at the top are nice and the way the drop outs flare out you can really lock your arms in the drop outs.
The handlebars cleaned up nice and polished really nice. The stem cleaned nice and then took a good amount of work to polish. The work to polish the stem was worth every bit, the stem polished just beautifully! I love the Schwinn "S" logo stem.
The brake levers cleaned and lubricated very well. With the levers cleaned I worked through the polishing grits. The brake levers polished beautifully, I always like polishing these brake levers, they come back so nice and so far.
Overall I am very happy with the results of the brake levers, stem and handlebars. I can't wait to see them installed with the new paint!
 |
| Peter J's Schwinn Continental Restoration Handlebars & Stem - Before |
 |
| Peter J's Schwinn Continental Restoration Handlebars - Before |
 |
| Peter J's Schwinn Continental Restoration Stem - Before |
 |
| Peter J's Schwinn Continental Restoration Stem - Exploded |
 |
| Peter J's Schwinn Continental Restoration Stem & Handlebars - Polished |
 |
| Peter J's Schwinn Continental Restoration Handlebars - Polished |
 |
| Peter J's Schwinn Continental Restoration Stem - Polished |
 |
| Peter J's Schwinn Continental Restoration Stem - Complete |
 |
| Peter J's Schwinn Continental Restoration Stem & Handlebars - Installed? |
 |
| Peter J's Schwinn Continental Restoration Brake Levers - Before |
 |
| Peter J's Schwinn Continental Restoration Brake Levers - Before |
 |
| Peter J's Schwinn Continental Restoration Brake Levers - Before |
 |
| Peter J's Schwinn Continental Restoration Brake Levers - Polished |
 |
| Peter J's Schwinn Continental Restoration Brake Levers - Installed |
With all the pieces polished I assembled the calipers lubricating all the pivot points. I really like the center pull brakes, they restore so nice and they actually brake very well. I still have the cables that stretch across the tops of the calipers soaking in rust remover, they should be ready for installing the calipers to the frame, which I can't wait to see. Those bright calipers against the orange should be amazing!
 |
| Peter J's Schwinn Continental Restoration Brake Calipers - Before |
 |
| Peter J's Schwinn Continental Restoration Brake Calipers - Exploded |
 |
| Peter J's Schwinn Continental Restoration Brake Calipers - Polished |
 |
| Peter J's Schwinn Continental Restoration Brake Calipers - Complete |
The Schwinn rear derailleur that is on the Continental and Super Sport is not my favorite to restore. It is a very complicated derailleur which makes no sense that it works and is pretty much bullet proof. It takes a great deal of hand cleaning and hand polishing. I broke down the derailleur and cleaned all the hard grease and grime. With the parts clean I polished everything I could on the polishing wheels and then started working by hand. I am very happy with the way the rear derailleur turned out. Lubricated it functions perfect and it looks good too. Even all the hard to reach areas by hand turned out really nice. And some of the brass color came out in the cast piece that the cable attaches to and work to the under side. I think the derailleur will look even better with the new paint.
 |
| Peter J's Schwinn Continental Restoration Rear Derailleur - Before |
 |
| Peter J's Schwinn Continental Restoration Rear Derailleur - Before |
 |
| Peter J's Schwinn Continental Restoration Rear Derailleur - Before |
 |
| Peter J's Schwinn Continental Restoration Rear Derailleur - exploded |
 |
| Peter J's Schwinn Continental Restoration Rear Derailleur - Polished |
 |
| Peter J's Schwinn Continental Restoration Rear Derailleur - Complete |
 |
| Peter J's Schwinn Continental Restoration Rear Derailleur - Complete |
The front derailleur is designed a lot like the rear derailleur but is a little easier to restore. I cleaned all the pieces and polished all the pieces. The pieces polished really nice. I then flushed and lubricated all the pivot points and assembled the front derailleur. The derailleur came out really nice and should just pop on the painted seat tube. I love this stuff!!
 |
| Peter J's Schwinn Continental Restoration Front Derailleur - Before |
 |
| Peter J's Schwinn Continental Restoration Front Derailleur - Before |
 |
| Peter J's Schwinn Continental Restoration Front Derailleur - Exploded |
 |
| Peter J's Schwinn Continental Restoration Front Derailleur - Polished |
 |
| Peter J's Schwinn Continental Restoration Front Derailleur - Complete |
 |
| Peter J's Schwinn Continental Restoration Front Derailleur - Complete |
I kind of ran out of ideas on how to remove the sludge or off gassing oil inside the frame. I thought I had it all out and applied the orange color and it turned out very nice. When I applied the clear coat it yellowed in all the areas near the openings of the frame. My last shot was to soak the frame in a heavy none water based degreaser for four or five days. It worked!!
The powder coat orange finally and did turn out so amazing. Everything is so smooth other then the normal few rough spots in a Schwinn Fillet braze frame and the few small nicks (Maybe the word.) that is normal to Schwinn tubing. I love this orange!! But then I am a sucker for an orange bike! You know what they say about an orange bike? It's the fastest!
It took a lot of frustration but it was worth every bit. The frame looks amazing!! The bottom bracket area looks so good painted. All the little braze-ons look amazing with the new paint. The rear drop outs look like glass!! I love this stuff!!
I am currently redoing the fork. I did the fork first but while the frame was soaking I changed the shade of orange by two shades. Soon the fork will be done too!!
 |
| Peter J's Schwinn Continental Restoration Frame Painted |
 |
| Peter J's Schwinn Continental Restoration Frame Painted - Head Tube |
 |
| Peter J's Schwinn Continental Restoration Frame Painted - Head Tube |
 |
| Peter J's Schwinn Continental Restoration Frame Painted - Seat Area |
 |
| Peter J's Schwinn Continental Restoration Frame Painted - Bottom Bracket |
 |
| Peter J's Schwinn Continental Restoration Frame Painted - Rear |
 |
| Peter J's Schwinn Continental Restoration Frame Painted - Drop Outs |
While waiting on the fork I just had to see the head badge cleaned and installed against that orange. The head badge cleaned very nice. Installed the head badge is amazing. Such a classic beautifully look!! To a graphic artist there a few sights nicer then the black lettering, all that white panel back ground and that bright orange!! I love it!! I love it all!!
 |
| Peter J's Schwinn Continental Restoration Frame Painted - Head Badge - Before - Screws in the green tape. |
 |
| Peter J's Schwinn Continental Restoration Frame Painted - Head Badge - Cleaned & Ready |
 |
| Peter J's Schwinn Continental Restoration Frame Painted - Head Badge - Installed Money Shot!!! LOVE IT!! |
Because I changed the shade of orange a few steps between painting the fork and then the frame I had to repaint the fork. The fork turned out so very nice. The orange is so vivid and fresh. I love it.
The fork crown chrome cap was dull and dirty. I gave it a good cleaning and then hand polished it. I hand polished it because these caps are thing and delicate with out the fork inside it to give it strength. They can collapse on the polishing wheels. Man, that chrome fork crown cap just pops and brings everything together. I love this stuff!!
 |
| Peter J's Schwinn Continental Restoration Fork - Painted |
 |
| Peter J's Schwinn Continental Restoration Fork Painted - Fork Crown |
 |
| Peter J's Schwinn Continental Restoration Fork Painted - Fork Crown |
 |
| Peter J's Schwinn Continental Restoration Fork Painted - Fork Blades |
 |
| Peter J's Schwinn Continental Restoration Fork Painted - Fork Drop Outs |
 |
| Peter J's Schwinn Continental Restoration Fork Crown Chrome Cap - Before |
 |
| Peter J's Schwinn Continental Restoration Fork Crown Chrome Cap - Before |
 |
| Peter J's Schwinn Continental Restoration Fork Crown Chrome Cap - Polished |
 |
| Peter J's Schwinn Continental Restoration Fork Crown Chrome Cap - Installed |
 |
| Peter J's Schwinn Continental Restoration Fork Crown Chrome Cap - Installed |
 |
| Peter J's Schwinn Continental Restoration Fork Crown Chrome Cap - Installed |
From here the write up order and the actual build is a little out of sync. You will see some components already installed that have not been written up yet. This is because I did work that I could while the fork was being painted a second time and a lot of things where being polished while I was having the trouble with the sludge leaking out of the frame. I decided to write things up that would attempt to bring the most continuity to the build.
The headset is one of my favorites. Schwinn made a great headset, I know its a little heavy but it is heavy duty and function so nice. It also restores very nice because of that heavy duty construction. It is also one of my favorite shaped headsets but you don't see it on a continental with the shift elvers covering it up.
I cleaned the headset and did all the polishing. The headset polished beautifully. Installed it looks amazing with the new orange paint. It doesn't get much better then the new paint and all that Schwinn chrome! Amazing!
 |
| Peter J's Schwinn Continental Restoration Headset - Before |
 |
| Peter J's Schwinn Continental Restoration Headset - Polished |
 |
| Peter J's Schwinn Continental Restoration Pressing Headset Cups |
 |
| Peter J's Schwinn Continental Restoration Headset - Complete |
 |
| Peter J's Schwinn Continental Restoration Headset - Complete |
 |
| Peter J's Schwinn Continental Restoration Headset - Complete |
The Schwinn Big Stick shift levers before are photoed up above. I some how forgot to take a photo of the levers exploded but I had to completely break down the shift levers and replace two of the small thin washer shims. I also had to drill out the old shift cable ends. Replacement cables sometime in the past where the wrong size ends and where hammered in. They where frozen in now.
The shift levers work great now with the replacement shims and all the points lubricated. They look even better polished and installed.
 |
| Peter J's Schwinn Continental Restoration Shift Levers Polished & Complete |
 |
| Peter J's Schwinn Continental Restoration Shift Levers Polished & Complete |
 |
| Peter J's Schwinn Continental Restoration Shift Levers - Installed |
The stem, handlebar and brake lever unit where polished and completed above. It was time to install the unit. They handlebars and stem look amazing installed. I am extremely jealous of the Continental, Orange is my favorite color for a bicycle and you know what they say about and orange bike? Orange bikes are the fastest!
 |
| Peter J's Schwinn Continental Restoration Handlebar -Stem & Brake Levers - Installed |
 |
| Peter J's Schwinn Continental Restoration Handlebars - Stem & Brake Levers - Installed |
 |
| Peter J's Schwinn Continental Restoration Front Brake Caliper - Installed |
 |
| Peter J's Schwinn Continental Restoration Rear Brake Caliper - Installed |
The rear derailleur is stunning installed. The frame drop outs look amazing and with the restored derailleur installed brings it to a whole new level.
 |
| Peter J's Schwinn Continental Restoration Rear Derailleur - Installed |
Below is a photo of the seat post and seat binder collar polished, The seat post had a lot of rust and staining but polished very nice. the Seat binder collar and cable hanger polished just perfect. I love this stuff.
 |
| Peter J's Schwinn Continental Restoration Seat Post - Seat Binder Collar - Cable Hanger - Polished |
These are the little things that really make a restoration and excite me. The rear derailleur cable stop on a Schwinn is chrome and screws on. I polished the stop and installed it. The polished stop and screw look perfect against that orange paint!
 |
| Peter J's Schwinn Continental Restoration Derailleur Cable Stop & Screw - Polished |
 |
| Peter J's Schwinn Continental Restoration Rear Derailleur Cable Stop & Screw - Installed |
 |
| Peter J's Schwinn Continental Restoration Crank - Before |
 |
| Peter J's Schwinn Continental Restoration Crank - Before |
 |
| Peter J's Schwinn Continental Restoration Bottom Bracket - Before |
 |
| Peter J's Schwinn Continental Restoration Crank & Bottom Bracket - Polished |
 |
| Peter J's Schwinn Continental Restoration Pressing Bottom Bracket Cups |
 |
| Peter J's Schwinn Continental Restoration Crank & Bottom Bracket - Installed |
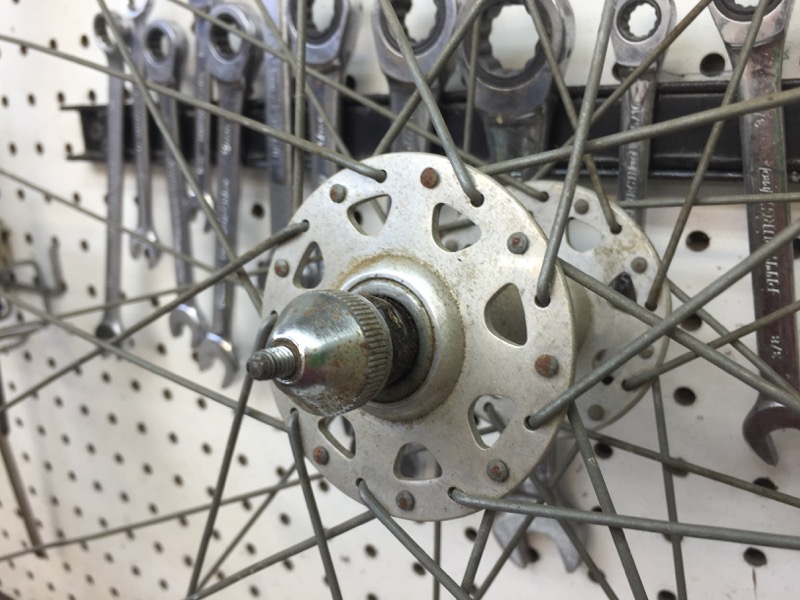
The wheels are a little rough. The chrome has some nice areas and a few bad areas. The hubs are dirty dull and the grease is nasty. I broke the wheels down and started the cleaning and polishing. The wheel hubs polished so very nice. The rim chrome actually cleaned very nice and polished well. The rear wheel rim almost polished perfect, the front wheel rim has some rough areas but overall not to bad.
I rebuilt the wheel hubs and packed everything in new grease. I installed the new tires. Right now the tires are not fitting very well. They are not exactly Schwinn S-6 tire size and they have some bad spots from being folded up for shipping. I have been massaging the tires a little at a time and they are starting to come around.
I don't have a good photo of the wheels complete because of the way I built the bike up but there is one below of the wheels complete and installed at some point along the build. The wheels spin fantastic and restored pretty darn nice, overall I am extremely happy with the wheels.
 |
| Peter J's Schwinn Continental Restoration Front Wheel - Before |
 |
| Peter J's Schwinn Continental Restoration Front Wheel Hub - Before |
 |
| Peter J's Schwinn Continental Restoration Front Wheel Hub - Before |
 |
| Peter J's Schwinn Continental Restoration Front Wheel Rim - Before |
 |
| Peter J's Schwinn Continental Restoration Front Wheel Hub - Old Grease |
 |
| Peter J's Schwinn Continental Restoration Front Wheel Hub - Polished |
 |
| Peter J's Schwinn Continental Restoration Front Wheel Rim - Polished - Rough Area |
 |
| Peter J's Schwinn Continental Restoration Axle Pieces - Ready |
 |
| Peter J's Schwinn Continental Restoration New Kenda Tires |
 |
| Peter J's Schwinn Continental Restoration Rear Wheel - Before |
 |
| Peter J's Schwinn Continental Restoration Rear Wheel Hub - Before |
 |
| Peter J's Schwinn Continental Restoration Rear Wheel Hub - Before |
 |
| Peter J's Schwinn Continental Restoration Rear Wheel Rim - Before |
 |
| Peter J's Schwinn Continental Restoration Rear Wheel Hub - Old Grease |
 |
| Peter J's Schwinn Continental Restoration Rear Wheel Hub - Polished |
 |
| Peter J's Schwinn Continental Restoration Rear Wheel Rim - Polished |
|
| Peter J's Schwinn Continental Restoration Wheels - Complete |
At this point I decided to wire the Continental. Peter sent along a Schwinn cable set. I used the cable from the set and some of the cable housing and then I used some Jagwire cable housing because a good deal of the Schwinn cable housings had kinks in it. I really like the black cable housings and the orange paint. So cool!
 |
| Peter J's Schwinn Continental Restoration Cable Set |
 |
| Peter J's Schwinn Continental Restoration Bicycle Wired |
 |
| Peter J's Schwinn Continental Restoration Bicycle Wired |
 |
| Peter J's Schwinn Continental Restoration Bicycle Wired |
 |
| Peter J's Schwinn Continental Restoration Bicycle Wired |
The Continental is almost complete Right now I have the seat collar soaking for rust removal. The seat collar has a lot of rust but I think I can get it to come back pretty nice. I also have the kickstand first soaking in paint remover and then now in my homemade rust remover solution.
 |
| Peter J's Schwinn Continental Restoration Seat Collar - Before Rust Soaking |
 |
| Peter J's Schwinn Continental Restoration Kickstand - Before |
 |
| Peter J's Schwinn Continental Restoration Kickstand - Before |
Check back soon! I hope to have the Continental done very soon.
The black paint stripped from the kickstand very easy, the polishing however took a good deal of work and time. There where some very rough spots on the kickstand. I worked through the many grits of polish. In the end I think the kick stand polished very nice, there are a few small rough spots but not bad at all. I am very happy with the kickstand and it looks great installed.
 |
| Peter J's Schwinn Continental Restoration Kick Stand Polished |
 |
| Peter J's Schwinn Continental Restoration Kick Stand Polished - Bad Area |
 |
| Peter J's Schwinn Continental Restoration Kick Stand Bracket - Ready |
 |
| Peter J's Schwinn Continental Restoration Kickstand - Complete |
 |
| Peter J's Schwinn Continental Restoration Kickstand - Complete |
I tired all mu tricks on the crank chain guard with out good results. I am glad I had a replacement chain guard in the parts collection. That is why I strip parts from every far gone bicycles I can, even if it is just one piece, one bolt or one nut, you never know what you will need down the road. The replacement chain guard polished very nice and with the crank complete and installed it looks just amazing with the orange paint. I love this stuff!!
 |
| Peter J's Schwinn Continental Restoration Replacement Chain Guard & Original Chain Guard |
 |
| Peter J's Schwinn Continental Restoration Replacement Chain Guard - Polished |
 |
| Peter J's Schwinn Continental Restoration Crank - Complete |
 |
| Peter J's Schwinn Continental Restoration Chain Guard - Complete |
Above is a photo of the seat coupling before, it was rough. I soaked it for almost a week and a half then cleaned it up, it turned out good. I also sprayed it with a rust preventive but probably one a season it might need some metal protector.
The original saddle was dirty and had some very light rust but overall was is good shape. I gave it a good cleaning and applied some vinyl treatment. The saddle looks great installed.
 |
| Peter J's Schwinn Continental Restoration Seat Coupling - After |
 |
| Peter J's Schwinn Continental Restoration Saddle - Before |
 |
| Peter J's Schwinn Continental Restoration Saddle - Before |
 |
| Peter J's Schwinn Continental Restoration Saddle - After |
 |
| Peter J's Schwinn Continental Restoration Saddle - After |
The the rear wheel pie plate looks rough but what is nice is that Schwinn put a very thick coat of chrome on the pie plates. I gave it a good cleaning and a hand polishing because it is very difficult to polishing on the polishing wheels. The pie plate turned out great.
The freewheel was very dirty, very greasy and gritty and a little rough when it spun. I gave the freewheel a deep cleaning and many flushings With the freewheel glean I gave it a good lubricating. The freewheel spins great now.
 |
| Peter J's Schwinn Continental Restoration Pie Plate - Before |
 |
| Peter J's Schwinn Continental Restoration Pie Plate - Polished |
 |
| Peter J's Schwinn Continental Restoration Freewheel - Before |
 |
| Peter J's Schwinn Continental Restoration Freewheel - Before |
 |
| Peter J's Schwinn Continental Restoration Freewheel - Before |
 |
| Peter J's Schwinn Continental Restoration Freewheel - After |
 |
| Peter J's Schwinn Continental Restoration Freewheel - After |
 |
| Peter J's Schwinn Continental Restoration Continental Almost Complete |
 |
| Peter J's Schwinn Continental Restoration New Decals |
 |
| Peter J's Schwinn Continental Restoration Star Burst Fork Decal - I love this stuff!! |
 |
| Peter J's Schwinn Continental Restoration Star Burst Fork Decal |
 |
| Peter J's Schwinn Continental Restoration Schwinn Chicago Decal - Awesome!! |
 |
| Peter J's Schwinn Continental Restoration Schwinn Continental Decal - Wow!! |
 |
| Peter J's Schwinn Continental Restoration Schwinn Continental Decal - Also a WOW!! |
 |
| Peter J's Schwinn Continental Restoration Decals - Complete |
The best synthetic leather handlebar tape by far is Ritchey handlebar tape. That is if you can find it. Very hard to find at times. It is made by Tom Ritchey's company, or at least I think it is made by him. This handlebar tape looks and feels just as good as Brooks leather tape, it holds up way better and costs a lot less. I have used it on some builds in the past. Tom is one of the first few frame builders to build what we now know as the mountain bike.
The black handlebar tape in leather is the perfect look for the Continental and the orange paint. I love it!
 |
| Peter J's Schwinn Continental Restoration New Synthetic Leather Handlebar Tape |
 |
| Peter J's Schwinn Continental Restoration Installing Handlebar Tape - Half Complete |
 |
| Peter J's Schwinn Continental Restoration Handlebar Tape - Complete |
 |
| Peter J's Schwinn Continental Restoration Handlebar Tape - Complete |
That completes the Schwinn Continental. I gave the Continental another test ride, a very careful test ride with all the ice still on the roads. I tuned out a few things, adjust cables and the brakes and now it shifts and brakes great. The tires where folded very tight for shipping and they still have a little twist in them. I massage them again and adjusted them one more time. The tires are getting a lot better. They should be perfect after a few more miles of riding. I did install some very ugly block pedals to ride and took them off for final photos because they where such an eye soar.
 |
| Peter J's Schwinn Continental Restoration Bicycle - Complete |
I took two sets of final photos. One set indoors and one set outdoors. For me anyways it is very hard to get good photos with all the white snow but I really wanted to see the orange pop in the sun light.
The Continental looks fantastic, I am very proud of the work that went into it. The orange is beautifully. I am going to order more orange for a Miyata Ridge Runner I have been slowly working on. Just love the orange and the white decals!! But then I am a sucker for an orange bike! The black cables and black leather handlebar tape go so well with everything. I wish I remembered to lower the saddle for the photos for a more correct proportion. I had it up that high for me for the test ride.
My favorite part of the Continental is the head badge against the orange paint. The head badge cleaned beautifully but is not perfect, it shows a little history next to the new paint. Plus the white black and orange is just cool.
 |
| Peter J's Schwinn Continental Restoration Bicycle Complete |
 |
| Peter J's Schwinn Continental Restoration Bicycle Complete |
 |
| Peter J's Schwinn Continental Restoration Bicycle Complete - Handlebars |
 |
| Peter J's Schwinn Continental Restoration Bicycle Complete - Stem & Handlebars |
 |
| Peter J's Schwinn Continental Restoration Bicycle Complete - Head Badge |
 |
| Peter J's Schwinn Continental Restoration Bicycle Complete - Front Brake |
 |
| Peter J's Schwinn Continental Restoration Bicycle Complete - Head Tube |
 |
| Peter J's Schwinn Continental Restoration Bicycle Complete - Star Burst Decal |
 |
| Peter J's Schwinn Continental Restoration Bicycle Complete - Front Wheel Hub |
 |
| Peter J's Schwinn Continental Restoration Bicycle Complete - Front Wheel Rim - That was a rough part. |
 |
| Peter J's Schwinn Continental Restoration Bicycle Complete - Stem & Shift Levers |
 |
| Peter J's Schwinn Continental Restoration Bicycle Complete - Handlebars |
 |
| Peter J's Schwinn Continental Restoration Bicycle Complete - Down Tube Decal |
 |
| Peter J's Schwinn Continental Restoration Bicycle Complete - Cable Stop - I just like the look of this. |
 |
| Peter J's Schwinn Continental Restoration Bicycle Complete - Front Half |
 |
| Peter J's Schwinn Continental Restoration Bicycle Complete - Saddle |
 |
| Peter J's Schwinn Continental Restoration Bicycle Complete - Chicago Decal |
 |
| Peter J's Schwinn Continental Restoration Bicycle Complete - Drive Train |
 |
| Peter J's Schwinn Continental Restoration Bicycle Complete - Crank |
 |
| Peter J's Schwinn Continental Restoration Bicycle Complete - Front Derailleur |
 |
| Peter J's Schwinn Continental Restoration Bicycle Complete - Front Derailleur |
 |
| Peter J's Schwinn Continental Restoration Bicycle Complete - Bottom Bracket |
 |
| Peter J's Schwinn Continental Restoration Bicycle Complete - Cable Hanger |
 |
| Peter J's Schwinn Continental Restoration Bicycle Complete - Rear Brake |
 |
| Peter J's Schwinn Continental Restoration Bicycle Complete - Rear Derailleur |
 |
| Peter J's Schwinn Continental Restoration Bicycle Complete - Rear Wheel Hub |
 |
| Peter J's Schwinn Continental Restoration Bicycle Complete - Rear Wheel Rim |
|
| Peter J's Schwinn Continental Restoration Bicycle Complete |
 |
| Peter J's Schwinn Continental Restoration Bicycle Complete |
 |
| Peter J's Schwinn Continental Restoration Bicycle Complete - Handlebars |
 |
| Peter J's Schwinn Continental Restoration Bicycle Complete - Head Tube |
 |
| Peter J's Schwinn Continental Restoration Bicycle Complete - Front Brake And my Beagle Haley! |
 |
| Peter J's Schwinn Continental Restoration Bicycle Complete - Fork |
 |
| Peter J's Schwinn Continental Restoration Bicycle Complete - Front Wheel Hub |
 |
| Peter J's Schwinn Continental Restoration Bicycle Complete - Front Wheel Rim |
 |
| Peter J's Schwinn Continental Restoration Bicycle Complete - Stem & Shift Levers |
 |
| Peter J's Schwinn Continental Restoration Bicycle Complete - Handlebars |
 |
| Peter J's Schwinn Continental Restoration Bicycle Complete - Down Tube |
 |
| Peter J's Schwinn Continental Restoration Bicycle Complete - Saddle |
 |
| Peter J's Schwinn Continental Restoration Bicycle Complete - Chicago Decal |
 |
| Peter J's Schwinn Continental Restoration Bicycle Complete - Drive Train |
 |
| Peter J's Schwinn Continental Restoration Bicycle Complete - Crank |
 |
| Peter J's Schwinn Continental Restoration Bicycle Complete - Front Derailleur |
 |
| Peter J's Schwinn Continental Restoration Bicycle Complete - Front Derailleur |
 |
| Peter J's Schwinn Continental Restoration Bicycle Complete - Bottom Bracket |
 |
| Peter J's Schwinn Continental Restoration Bicycle Complete - Rear Brake Caliper |
 |
| Peter J's Schwinn Continental Restoration Bicycle Complete - Rear Derailleur |
 |
| Peter J's Schwinn Continental Restoration Bicycle Complete - Rear Wheel Hub |
 |
| Peter J's Schwinn Continental Restoration Bicycle Complete - Rear Wheel Rim |
 |
| Peter J's Schwinn Continental Restoration Bicycle Complete |
Hey fellow riders, it's Peter from Maine. When I decided to restore my old Continental, it didn't take much reading here to know I had found the right guy for the job. John is a real pro at this and I love how passionate he is about it. I can't wait to see and ride the finished product! Thanks, John!
ReplyDeleteGreat job John! That is one beautiful Continental!
ReplyDelete