 |
| Craig's 1970's Raleigh Sprite Restoration - Bicycle After Restoration |
I love the Raleigh Sprite, its a great all around bicycle, it is very comfortable and still pretty quick. The Raleigh Sprite allows for racks and tire clearance and is great for riding all day or heading around town. I love it! ( Did I say I love it already??) Some day I would like to line up all the colors of the Raleigh Sprite for a photo and maybe even start a Raleigh Sprite club and go ride the Forest Preserves around here.
This is Craig's Raleigh Sprite that has come in for a Restoration. I have only seen the red color in person once and really like the red look. The Red Raleigh Sprite will receive a total restoration along with new cables, new cable housings and a new saddle, Craig has a black Brooks B67 for the Sprite which is the perfect choice. The tires are already almost new and the tubes seem to be in good shape so those will not be changed. The original handlebar grips will go well with the Black Brooks. It feels like I am forgetting a new something for the Sprite but I don't think I am.
The Red Sprite is in pretty good shape, there doesn't seem to be any or very few paint ships at the least. The paint is very dull and dirty and has a very rough textured but that should polish out beautifully. The decals are in great shape other then the High Tensile Steel decal which is always worn away on Raleigh's. The Chrome work does have some surface rust but doesn't look to bad and should clean and polish very nicely. I really can't wait to see the Sprite complete!
 |
| Craig's 1970's Raleigh Sprite Restoration - Bicycle Before |
 |
| Craig's 1970's Raleigh Sprite Restoration - Bicycle Before Handlebars |
 |
| Craig's 1970's Raleigh Sprite Restoration - Bicycle Before Stem |
 |
| Craig's 1970's Raleigh Sprite Restoration - Bicycle Before Head Tube |
 |
| Craig's 1970's Raleigh Sprite Restoration - Bicycle Before Front Brake |
 |
| Craig's 1970's Raleigh Sprite Restoration - Bicycle Before Front Wheel Hub |
 |
| Craig's 1970's Raleigh Sprite Restoration - Bicycle Before Front Wheel Rim |
 |
| Craig's 1970's Raleigh Sprite Restoration - Bicycle Before Stem |
 |
| Craig's 1970's Raleigh Sprite Restoration - Bicycle Before Head Tube |
 |
| Craig's 1970's Raleigh Sprite Restoration - Bicycle Before Front Wheel |
 |
| Craig's 1970's Raleigh Sprite Restoration - Bicycle Before Front Fender |
 |
| Craig's 1970's Raleigh Sprite Restoration - Bicycle Before Cable Bracket |
 |
| Craig's 1970's Raleigh Sprite Restoration - Bicycle Before Sprite Top Tube Decal |
 |
| Craig's 1970's Raleigh Sprite Restoration - Bicycle Before Down Tube Decal |
 |
| Craig's 1970's Raleigh Sprite Restoration - Bicycle Before Sadlle |
 |
| Craig's 1970's Raleigh Sprite Restoration - Bicycle Before Seat Tube Decal |
 |
| Craig's 1970's Raleigh Sprite Restoration - Bicycle Before Bottom Bracket |
 |
| Craig's 1970's Raleigh Sprite Restoration - Bicycle Before Crank |
 |
| Craig's 1970's Raleigh Sprite Restoration - Bicycle Before Front Derailleur |
 |
| Craig's 1970's Raleigh Sprite Restoration - Bicycle Before Seat Lug |
 |
| Craig's 1970's Raleigh Sprite Restoration - Bicycle Before Rear Brake |
 |
| Craig's 1970's Raleigh Sprite Restoration - Bicycle Before Rear Derailleur |
 |
| Craig's 1970's Raleigh Sprite Restoration - Bicycle Before Rear Wheel Hub |
 |
| Craig's 1970's Raleigh Sprite Restoration - Bicycle Before Rear Fender |
I have not had a bicycle fight me like this in a long time for dis assembly, nothing want to disassemble easy. Hopeful the hard part is over now. The stem and handlebars did not want to separate, the headset did not want to loosen, the bottom bracket refused to break free and the worst off all the crank cotter pins did not want to budge. I was able to remove the handlebars, headset and bottom bracket after some time, (The bottom bracket after the crank.) The crank cotter pins turned into a nightmare, I have not been having luck with cotter pins lately. I eventually had to drill one cotter pin and the other pin freed after a few cycles of hot and cold. I hate drilling cotter pins but if I drill very close to one side of the pin it releases the tension and I can usually pound out the pin. But overall I have not had a bicycle fight me lie that in a very long time, I think it was the second hardest ever to a Peugeot Mixte from about five years ago before I understood websites. It made no sense to me why it would fight because the Sprite is not in bad shape but in the end everything is free!
With the components removed I can get a good look at that red paint, I think its going to an amazing red with polishing! I can't wait to see the results!!
 |
| Craig's 1970's Raleigh Sprite Restoration - Frame Before |
 |
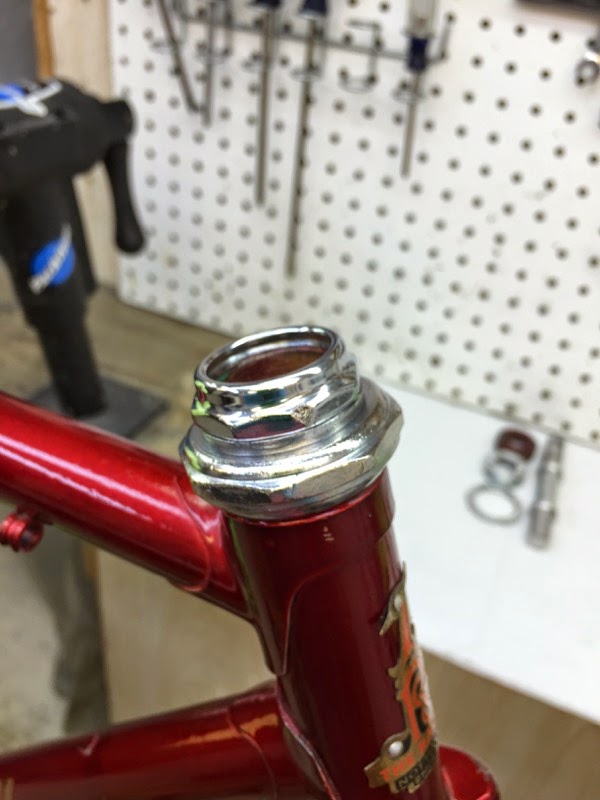
| Craig's 1970's Raleigh Sprite Restoration - Frame Before Head Tube |
 |
| Craig's 1970's Raleigh Sprite Restoration - Frame Before Head Tube |
 |
| Craig's 1970's Raleigh Sprite Restoration - Frame Before Top Tube Decal |
 |
| Craig's 1970's Raleigh Sprite Restoration - Frame Before Down Tube Decal |
 |
| Craig's 1970's Raleigh Sprite Restoration - Frame Before Seat Lug |
 |
| Craig's 1970's Raleigh Sprite Restoration - Frame Before Made in England - Decal |
 |
| Craig's 1970's Raleigh Sprite Restoration - Frame Before Bottom Bracket |
 |
| Craig's 1970's Raleigh Sprite Restoration - Frame Before Bottom Bracket |
 |
| Craig's 1970's Raleigh Sprite Restoration - Frame Before Bottom Bracket |
 |
| Craig's 1970's Raleigh Sprite Restoration - Frame Before Seat Lug |
 |
| Craig's 1970's Raleigh Sprite Restoration - Frame Before Chain Stays |
 |
| Craig's 1970's Raleigh Sprite Restoration - Frame Before Drop Outs |
 |
| Craig's 1970's Raleigh Sprite Restoration - Frame Before Fork |
 |
| Craig's 1970's Raleigh Sprite Restoration - Frame Before Fork Crown |
 |
| Craig's 1970's Raleigh Sprite Restoration - Frame Before Fork Blades |
 |
| Craig's 1970's Raleigh Sprite Restoration - Frame Before Fork Drop Outs |
After cleaning the frame I found that the grease and grime covered up a few more chips and scratches then original though but not bad at all!!
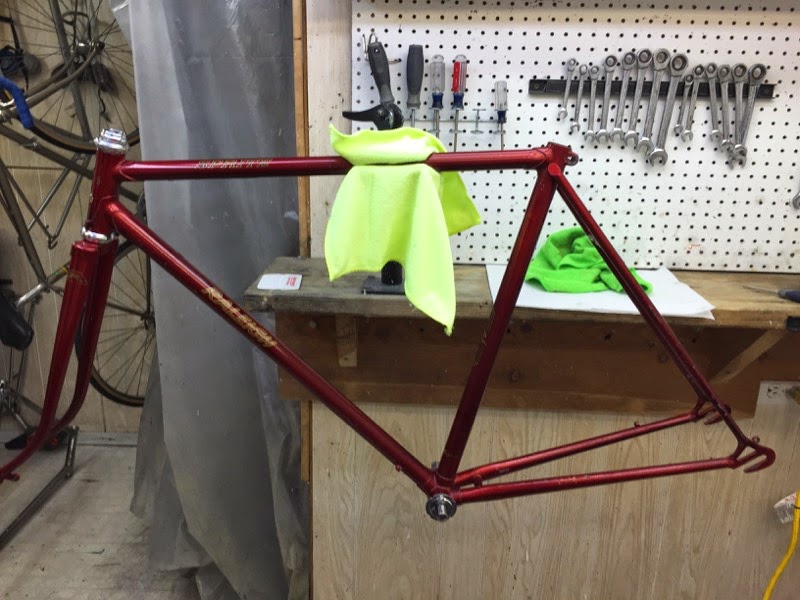
I worked through a few polishing grits and the polishing turned out just fantastic!! The red paint is soft like all Raleigh paint so it makes for really nice polishing. The red is just beautiful, such a deep color and a high shine! I could not be more happy with the results of the polishing!! I love it and the color!!
 |
| Craig's 1970's Raleigh Sprite Restoration - Frame Polished |
 |
| Craig's 1970's Raleigh Sprite Restoration - Frame Polished Head Tube |
 |
| Craig's 1970's Raleigh Sprite Restoration - Frame Polished Head Tube |
 |
| Craig's 1970's Raleigh Sprite Restoration - Frame Polished Top Tube |
 |
| Craig's 1970's Raleigh Sprite Restoration - Frame Polished Down Tube Decal - Amazing!! |
 |
| Craig's 1970's Raleigh Sprite Restoration - Frame Polished Seat lug |
 |
| Craig's 1970's Raleigh Sprite Restoration - Frame Polished Bottom Bracket |
 |
| Craig's 1970's Raleigh Sprite Restoration - Frame Polished Bottom Bracket |
 |
| Craig's 1970's Raleigh Sprite Restoration - Frame Polished Bottom Bracket |
 |
| Craig's 1970's Raleigh Sprite Restoration - Frame Polished Bottom Bracket |
 |
| Craig's 1970's Raleigh Sprite Restoration - Frame Polished Seat Lug |
 |
| Craig's 1970's Raleigh Sprite Restoration - Frame Polished Chain Stays |
 |
| Craig's 1970's Raleigh Sprite Restoration - Frame Polished Drop Outs |
 |
| Craig's 1970's Raleigh Sprite Restoration - Frame Polished Fork |
 |
| Craig's 1970's Raleigh Sprite Restoration - Frame Polished Fork Crown |
 |
| Craig's 1970's Raleigh Sprite Restoration - Frame Polished Fork Blades |
 |
| Craig's 1970's Raleigh Sprite Restoration - Frame Polished Fork Drop Outs |
The headset and bottom bracket where pretty dirty and dried out but a little time in the crock pot and then a good polishing and the pieces look great! With new bearings and grease the headset and bottom bracket spin great, already the Sprite is coming together nice!
 |
| Craig's 1970's Raleigh Sprite Restoration - Headset & Bottom Bracket Before |
 |
| Craig's 1970's Raleigh Sprite Restoration - Headset & Bottom Bracket Polished |
 |
| Craig's 1970's Raleigh Sprite Restoration Headset Cups - Press |
 |
| Craig's 1970's Raleigh Sprite Restoration Headset Cups - Pressed |
 |
| Craig's 1970's Raleigh Sprite Restoration Headset Bearings - Packed |
 |
| Craig's 1970's Raleigh Sprite Restoration Headset - Complete |
 |
| Craig's 1970's Raleigh Sprite Restoration Headset - Complete |
 |
| Craig's 1970's Raleigh Sprite Restoration - Bottom Bracket Bearings Packed |
 |
| Craig's 1970's Raleigh Sprite Restoration - Bottom Bracket Complete |
 |
| Craig's 1970's Raleigh Sprite Restoration - Headset & Bottom Bracket Complete |
 |
| Craig's 1970's Raleigh Sprite Restoration - Handlebars & Stem - Before |
 |
| Craig's 1970's Raleigh Sprite Restoration - Handlebars Before |
 |
| Craig's 1970's Raleigh Sprite Restoration - Stem - Before |
 |
| Craig's 1970's Raleigh Sprite Restoration - Stem - Exploded |
 |
| Craig's 1970's Raleigh Sprite Restoration - Stem - Polished |
 |
| Craig's 1970's Raleigh Sprite Restoration - Stem - Complete |
 |
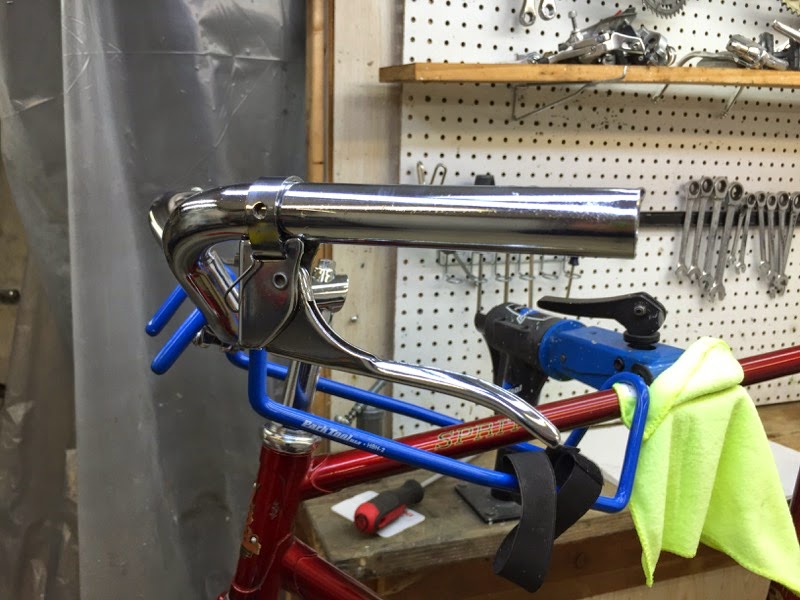
| Craig's 1970's Raleigh Sprite Restoration Stem - Installed |
 |
| Craig's 1970's Raleigh Sprite Restoration - Handlebars - Installed |
 |
| Craig's 1970's Raleigh Sprite Restoration - Handlebars - Complete |
 |
| Craig's 1970's Raleigh Sprite Restoration Stem & Handlebars - Complete |
 |
| Craig's 1970's Raleigh Sprite Restoration - Stem & Handlebars Complete |
 |
| Craig's 1970's Raleigh Sprite Restoration - Brake Levers - Before |
 |
| Craig's 1970's Raleigh Sprite Restoration - Brake Levers Exploded |
 |
| Craig's 1970's Raleigh Sprite Restoration - Brake Levers Polished |
 |
| Craig's 1970's Raleigh Sprite Restoration - Brake Levers Installed |
 |
| Craig's 1970's Raleigh Sprite Restoration - Handlebar Grips |
Below you can see the cotter pins and the one I had to drill. I do not have a photo of the crank before and together because I had to disassemble it on the bottom bracket spindle to get good access to the cotter pins. Now that the crank is unfrozen the crank should really clean up and polish very nicely, I can't wait!
I polished the pieces to the crank. The pieces polished beautifully! With the pieces polished I assembled the crank and installed it with new cotter pins. The crank looks beautifully installed, I did see some wobble in the crank when I installed it. I pound out some off the wobble and it looks better, I will have to check it out again when the bike is complete and riding.
I polished the pieces to the crank. The pieces polished beautifully! With the pieces polished I assembled the crank and installed it with new cotter pins. The crank looks beautifully installed, I did see some wobble in the crank when I installed it. I pound out some off the wobble and it looks better, I will have to check it out again when the bike is complete and riding.
 |
| Craig's 1970's Raleigh Sprite Restoration - Crank - Exploded |
 |
| Craig's 1970's Raleigh Sprite Restoration - Drilled & Old Crank Cotter Pin |
 |
| Craig's 1970's Raleigh Sprite Restoration - Crank - Polished |
 |
| Craig's 1970's Raleigh Sprite Restoration - Crank Complete |
 |
| Craig's 1970's Raleigh Sprite Restoration Crank - Installed |
 |
| Craig's 1970's Raleigh Sprite Restoration - Front Derailleur Before |
 |
| Craig's 1970's Raleigh Sprite Restoration - Front Derailleur Exploded |
 |
| Craig's 1970's Raleigh Sprite Restoration - Front Derailleur Polished |
 |
| Craig's 1970's Raleigh Sprite Restoration - Front Derailleur Complete |
 |
| Craig's 1970's Raleigh Sprite Restoration - Front Derailleur Installed |
 |
| Craig's 1970's Raleigh Sprite Restoration - Rear Derailleur Before |
 |
| Craig's 1970's Raleigh Sprite Restoration - Rear Derailleur - Exploded |
 |
| Craig's 1970's Raleigh Sprite Restoration - Rear Derailleur Polished |
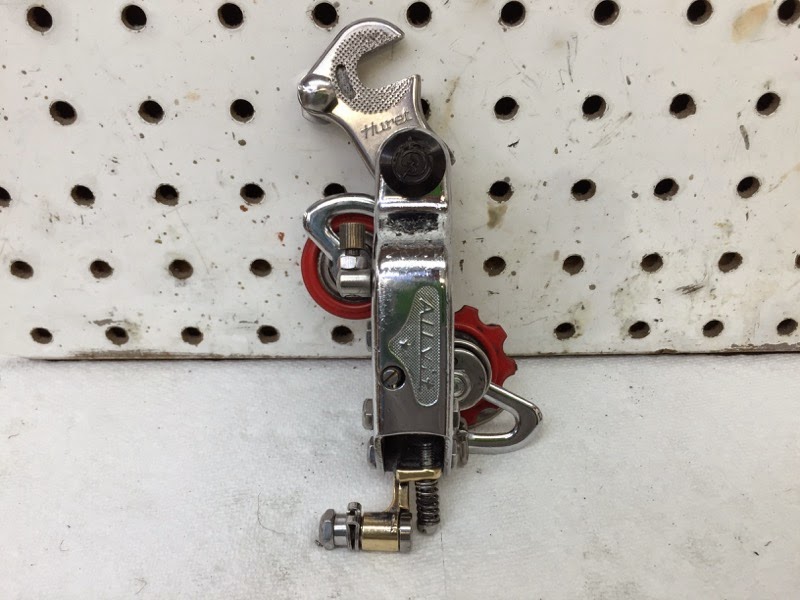 |
| Craig's 1970's Raleigh Sprite Restoration - Rear Derailleur Complete |
The brake calipers are the classic Raleigh calipers. I disassembled the calipers and cleaned all the pieces. With the pieces cleaned I started the polishing process, the caliper arms polished beautifully and all the small pieces turned out very nice.
Scroll down from here to see the fenders before and then scroll back up. The completed brake calipers and the fenders go together I just couldn't wait to see the fenders installed so they are installed with the brake calipers. I love how the calipers polished and the polished fenders running through them!! Oh and I installed the new brake pads...
 |
| Craig's 1970's Raleigh Sprite Restoration - Brake Calipers Before |
 |
| Craig's 1970's Raleigh Sprite Restoration - Brake Calipers Exploded |
 |
| Craig's 1970's Raleigh Sprite Restoration - Brake Calipers Polished |
 |
| Craig's 1970's Raleigh Sprite Restoration - Brake Calipers Complete |
 |
| Craig's 1970's Raleigh Sprite Restoration - Fenders - polished |
 |
| Craig's 1970's Raleigh Sprite Restoration - Fender Struts Pounded Straight |
 |
| Craig's 1970's Raleigh Sprite Restoration Front Brake & Fender - Installed Love it!! |
 |
| Craig's 1970's Raleigh Sprite Restoration Rear Brake & Fender - Installed |
 |
| Craig's 1970's Raleigh Sprite Restoration - Brakes & Fenders Installed |
The shift levers where very difficult to shift, they where almost frozen in place. I disassembled the levers, cleaned and polished the pieces and then lubricated and assembled the levers. The levers turned out very nice and shift very easy and smooth, I am very happy with the shift levers.
 |
| Craig's 1970's Raleigh Sprite Restoration - Shift Levers Before |
 |
| Craig's 1970's Raleigh Sprite Restoration - Shift Levers Exploded |
 |
| Craig's 1970's Raleigh Sprite Restoration - Shift Levers Polished |
 |
| Craig's 1970's Raleigh Sprite Restoration Shift Levers - Complete |
The seat post polished surprising nice, it looks like new. The seat coupling in the before photo will not work with the new Brooks B67 saddle so tomorrow I will go through the collection to find one that will.
 |
| Craig's 1970's Raleigh Sprite Restoration - Saddle & Seat Post Before |
 |
| Craig's 1970's Raleigh Sprite Restoration - Seat Post Before |
 |
| Craig's 1970's Raleigh Sprite Restoration - Seat Post Polished |
 |
| Craig's 1970's Raleigh Sprite Restoration Seat Post - Installed |
 |
| Craig's 1970's Raleigh Sprite Restoration - Cable Bracket Before |
 |
| Craig's 1970's Raleigh Sprite Restoration - Cable Bracket Polished |
 |
| Craig's 1970's Raleigh Sprite Restoration - Cable Bracket Installed |
 |
| Craig's 1970's Raleigh Sprite Restoration - Pedals - Before |
 |
| Craig's 1970's Raleigh Sprite Restoration - Front Fender Before |
 |
| Craig's 1970's Raleigh Sprite Restoration - Front Fender Before - A little bit of scratching but not bad for fenders. |
 |
| Craig's 1970's Raleigh Sprite Restoration - Front Fender Before |
 |
| Craig's 1970's Raleigh Sprite Restoration - Front Fender Strut Before |
 |
| Craig's 1970's Raleigh Sprite Restoration - Rear Fender Before |
 |
| Craig's 1970's Raleigh Sprite Restoration - Rear Fender Before |
 |
| Craig's 1970's Raleigh Sprite Restoration Rear Fender Bracket - Before |
 |
| Craig's 1970's Raleigh Sprite Restoration Rear Fender - Before |
 |
| Craig's 1970's Raleigh Sprite Restoration Rear Fender - Before |
 |
| Craig's 1970's Raleigh Sprite Restoration Rear Fender Reflector - Before |
 |
| Craig's 1970's Raleigh Sprite Restoration - Rear Fender Strut & Reflector - Before |
 |
| Craig's 1970's Raleigh Sprite Restoration - Rear Fender Hardware Before |
 |
| Craig's 1970's Raleigh Sprite Restoration - Fender Struts Before |
Below is a photo of the main body components mostly complete.

The wheels looked like they where in pretty good shape, the rust looked like surface rust. After some work the rear wheel rim has some chrome damage in areas. The chrome damage is not what I wanted to be there, I wanted the wheels to look a little better but in the end they look a lot better then they where and will be true good riding wheels.
The rear wheel has some chrome damage, the front wheel has a few bad spots but not as bad. I polished the wheel hubs and they look great.
The freewheel is one I have never seen before, it requires a three prong freewheel removal tool. I searched the internet for quite a while and found nothing on the freewheel and really nothing on a freewheel removal tool for it. This is really annoying, it will make restoring the rear wheel a lot more time consuming. This is annoying, I have many freewheel tools that people have never come across before, here is one I have not come across before.
I also seem to have forgotten to take an overall before photo of the rear wheel, which is also annoying.
The wheels are complete, they do not look perfect but they do look pretty good but they do spin great which is the most important thing. the tires where cleaned and treated and they really look good under those polished rims! Overall I am happy with the results of the wheels considering everything.
The wheels are complete, they do not look perfect but they do look pretty good but they do spin great which is the most important thing. the tires where cleaned and treated and they really look good under those polished rims! Overall I am happy with the results of the wheels considering everything.
 |
| Craig's 1970's Raleigh Sprite Restoration Front Wheel - Before |
 |
| Craig's 1970's Raleigh Sprite Restoration - Front Wheel Hub Before |
 |
| Craig's 1970's Raleigh Sprite Restoration - Front Wheel Rim Before |
 |
| Craig's 1970's Raleigh Sprite Restoration - Front Wheel Hub Old Grease |
 |
| Craig's 1970's Raleigh Sprite Restoration - Front Wheel Hub Polished |
 |
| Craig's 1970's Raleigh Sprite Restoration - Front Wheel Rim Polished |
|
| Craig's 1970's Raleigh Sprite Restoration - Front Wheel Hub Polished |
 |
| Craig's 1970's Raleigh Sprite Restoration - Front Wheel Hub Bearings Packed |
 |
| Craig's 1970's Raleigh Sprite Restoration - Axle Pieces - Ready |
 |
| Craig's 1970's Raleigh Sprite Restoration - Front Wheel Complete |
 |
| Craig's 1970's Raleigh Sprite Restoration - Front Wheel Complete |
 |
| Craig's 1970's Raleigh Sprite Restoration - Rear Wheel Freewheel Before |
 |
| Craig's 1970's Raleigh Sprite Restoration - Rear Wheel Hub Polished |
 |
| Craig's 1970's Raleigh Sprite Restoration - Rear Wheel Freewheel Polished |
 |
| Craig's 1970's Raleigh Sprite Restoration - Rear Wheel Rim Polished - Rough Chrome |
 |
| Craig's 1970's Raleigh Sprite Restoration - Rear Wheel Rim Polished - Good Chrome |
|
| Craig's 1970's Raleigh Sprite Restoration - Rear Wheel Hub Polished |
 |
| Craig's 1970's Raleigh Sprite Restoration Rear Wheel Hub - Bearings Packed |
 |
| Craig's 1970's Raleigh Sprite Restoration - Rear Wheel Complete |
 |
| Craig's 1970's Raleigh Sprite Restoration - Rear Wheel - Complete |
 |
| Craig's 1970's Raleigh Sprite Restoration - Wheels Complete |
 |
| Craig's 1970's Raleigh Sprite Restoration - Front Tire Installed |
 |
| Craig's 1970's Raleigh Sprite Restoration - Rear Tire - Installed |
 |
| Craig's 1970's Raleigh Sprite Restoration - Tires - Installed |
The original handlebar grips cleaned beautifully and after a little treatment look fantastic, I am very happy that the original handlebar grips turned out so nice!
 |
| Craig's 1970's Raleigh Sprite Restoration - Handlebar Grips Cleaned & Treated |

With the Sprite almost complete it is time to install the new Brooks B67 in black, what a beautiful saddle!! I had to replace the original seat collar and found this one in the parts collection. Installed the saddle is perfect and in person really makes the red paint pop. After seeing the Brooks installed no other saddle would do!
 |
| Craig's 1970's Raleigh Sprite Restoration - New Brooks B67 Saddle |
 |
| Craig's 1970's Raleigh Sprite Restoration - Replacement Seat Collar |
 |
| Craig's 1970's Raleigh Sprite Restoration Brooks B67 Saddle - Installed |
 |
| Craig's 1970's Raleigh Sprite Restoration - Brooks B67 Installed |
Next time to wire the Sprite, I had to rebuild the shift levers and are photoed above. The shift levers require the shift cables to be installed by disassembling the levers so those cables where installed above.
The Sprite had gray cable housings and the Jagwire Ice Gray is the perfect color to go with the red.
The original Raleigh block pedals cleaned up just beautifully and the pedal chrome polished very nice, I could not be happier with the results of the pedals, they look fantastic installed!
That completes Craig's Raleigh Sprite, it turned out beautiful. The bright work is not perfect but when the bright work is assembled with that deep polished red paint the Sprite is just stunning!! I love it! The Brooks saddle is perfect. The polished fenders shine beautifully. Overall just stunning, the crank draws your eye in and then you just stair at the Sprite.
 |
| Craig's 1970's Raleigh Sprite Restoration - New Cables & Cable Housings |
 |
| Craig's 1970's Raleigh Sprite Restoration - Brake Cables Installed |
 |
| Craig's 1970's Raleigh Sprite Restoration - Rear Break Cable Installed |
 |
| Craig's 1970's Raleigh Sprite Restoration - Rear Brake Cable Installed |
 |
| Craig's 1970's Raleigh Sprite Restoration Shift Cables - Installed |
 |
| Craig's 1970's Raleigh Sprite Restoration - Pedals - Cleaned & Polished |
 |
| Craig's 1970's Raleigh Sprite Restoration Pedals - Installed |
That completes Craig's Raleigh Sprite, it turned out beautiful. The bright work is not perfect but when the bright work is assembled with that deep polished red paint the Sprite is just stunning!! I love it! The Brooks saddle is perfect. The polished fenders shine beautifully. Overall just stunning, the crank draws your eye in and then you just stair at the Sprite.
 |
| Craig's 1970's Raleigh Sprite Restoration - Raleigh Sprite Complete |
If I can get some better weather I can't wait to test ride the Sprite and take the final photos. I think tomorrow morning it should be good for a test ride and final photos. Check back tomorrow.
I test rode the Raleigh Sprite a few times over the last few days, the ride is very smooth but I have been having some trouble with the tuning of the rear derailleur, it is not shifting at the standards I like. I am hoping a few more test rides and a few more tweaks and it will be ready to go.
The Sprite in the final photos looks amazing. The red paint may be my new favorite, and most people know how much I like a blue metallic, the deep dark red metallic is just amazing! The black Brooks saddle, the black tires and the black handlebar grips are just perfect with the dark red color. The bright work looks good, it may not be perfect but it sure looks good! I really really like the looks of this Sprite, just a classic beautiful bike! Will probably look even better with the saddle lowered to a normal height, the proportions will be even better but I need it up high for test rides with my height.
The rear derailleur fought me for a couple of days, or at least I thought it was the rear derailleur. I finally switched out the chain and the Sprite shift and rides wonderfully.
I spent a lot of time riding around the neighborhood trying to get the sprite shifting correctly and i would stop at neighbors out in the yard to talk with them, the Sprite got a lot of great compliments and a lot of envy from bicycle people. It just looked amazing parked in a driveway or under a tree, such a classic stunning look!!
 |
| Craig's 1970's Raleigh Sprite Restoration - Bicycle Complete |
 |
| Craig's 1970's Raleigh Sprite Restoration - Bicycle Complete |
 |
| Craig's 1970's Raleigh Sprite Restoration - Bicycle Complete Handlebars |
 |
| Craig's 1970's Raleigh Sprite Restoration - Bicycle Complete head Tube |
 |
| Craig's 1970's Raleigh Sprite Restoration - Bicycle Complete Front Fender |
 |
| Craig's 1970's Raleigh Sprite Restoration - Bicycle Complete Front Brake |
 |
| Craig's 1970's Raleigh Sprite Restoration - Bicycle Complete Front Wheel Hub |
 |
| Craig's 1970's Raleigh Sprite Restoration - Bicycle Complete Head Tube Area |
 |
| Craig's 1970's Raleigh Sprite Restoration - Bicycle Complete Handlebars |
 |
| Craig's 1970's Raleigh Sprite Restoration - Bicycle Complete Stem & Shift Levers |
 |
| Craig's 1970's Raleigh Sprite Restoration - Bicycle Complete Front Half |
 |
| Craig's 1970's Raleigh Sprite Restoration - Bicycle Complete Sprite Decal |
 |
| Craig's 1970's Raleigh Sprite Restoration - Bicycle Complete Raleigh Decal - Amazing!! |
 |
| Craig's 1970's Raleigh Sprite Restoration - Bicycle Complete Brooks B67 |
 |
| Craig's 1970's Raleigh Sprite Restoration - Bicycle Complete Drive Train |
 |
| Craig's 1970's Raleigh Sprite Restoration - Bicycle Complete Crank |
 |
| Craig's 1970's Raleigh Sprite Restoration - Bicycle Complete Front Derailleur |
 |
| Craig's 1970's Raleigh Sprite Restoration - Bicycle Complete Rear Derailleur |
 |
| Craig's 1970's Raleigh Sprite Restoration - Bicycle Complete Brooks Saddle |
 |
| Craig's 1970's Raleigh Sprite Restoration - Bicycle Complete Rear Brake |
 |
| Craig's 1970's Raleigh Sprite Restoration - Bicycle Complete Rear Wheel Hub |
 |
| Craig's 1970's Raleigh Sprite Restoration - Bicycle Complete Rear Fender |
 |
| Craig's 1970's Raleigh Sprite Restoration - Bicycle Complete |
Wow, all your hard work plus the B67 - what a marvelous result !
ReplyDeletewhat about the missing paint , did you just leave it as it? I have a Raleigh also and i came across your page very exciting and i am wondering what compounds so you use to polish and save the original paint ?
ReplyDelete