 |
| Tom C's Raleigh Sprite Restoration - Bicycle After |
This is Tom's restoration of a Raleigh Sprite. I love Raleigh sprites, I believe they are one of the most under rated all around bicycles ever made. So much so that I built a show bike out of one and ride it so much it probably should not be called a show bike, that bike can be seen by clicking here.
This Raleigh Sprite I found a few months ago, it very much deserves to be restored. The yellow Raleigh is rough in some spots and in good shape in others. The Raleigh Sprite will receive a total restoration with a few new pieces. I have a lot of Raleigh Sprite parts in my collection so I will be replacing the rough areas. I will replace the front derailleurs with a much better Sprite front derailleur. The wheel set will be replaced with a Raleigh Sprite wheel set from the collection that is in much better shape. I love the stem on this Sprite, it is the one with a lot of character but I am not sure it will be polished they way I like, if I can't bring it back I will replace the stem.
The Sprite will get all new cables, all new cable housings, new bearings and brake pads. The Sprite will also receive new tire and tire tubes, new chain and new handlebar grips.
I love the yellow color and the white on the fender, I am going to try very hard to save the yellow, if I can not I will newly powder coat the Sprite.

 |
| Tom C's Raleigh Sprite Restoration - Bicycle Before |
 |
| Tom C's Raleigh Sprite Restoration - Bicycle Before - Handlebars |
 |
| Tom C's Raleigh Sprite Restoration - Bicycle Before Front Brake |
 |
| Tom C's Raleigh Sprite Restoration - Bicycle Before Front Wheel Hub |
 |
| Tom C's Raleigh Sprite Restoration - Bicycle Before Stem |
 |
| Tom C's Raleigh Sprite Restoration - Bicycle Before Head Set |
 |
| Tom C's Raleigh Sprite Restoration - Bicycle Before Saddle |
 |
| Tom C's Raleigh Sprite Restoration - Bicycle Before Crank Set |
 |
| Tom C's Raleigh Sprite Restoration - Bicycle Before Front Derailleur |
 |
| Tom C's Raleigh Sprite Restoration - Bicycle Before Rear Brake |
 |
| Tom C's Raleigh Sprite Restoration - Bicycle Before Rear Derailleur |
 |
| Tom C's Raleigh Sprite Restoration - Bicycle Before Rear Fender |
 |
| Tom C's Raleigh Sprite Restoration - Bicycle Before Rear Wheel |
 |
| Tom C's Raleigh Sprite Restoration - Bicycle Before Rear Rack |
 |
| Tom C's Raleigh Sprite Restoration - Frame Before |
 |
| Tom C's Raleigh Sprite Restoration - Frame Before Head Tube |
 |
| Tom C's Raleigh Sprite Restoration - Frame Before Head Tube |
 |
| Tom C's Raleigh Sprite Restoration - Frame Before Down Tube |
 |
| Tom C's Raleigh Sprite Restoration - Frame Before Seat Lug |
 |
| Tom C's Raleigh Sprite Restoration - Frame Before Bottom Bracket |
 |
| Tom C's Raleigh Sprite Restoration - Frame Before Bottom Bracket |
 |
| Tom C's Raleigh Sprite Restoration - Frame Before Chain Stay |
 |
| Tom C's Raleigh Sprite Restoration - Frame Before Drop Outs |
 |
| Tom C's Raleigh Sprite Restoration - Frame Before Fork |
 |
| Tom C's Raleigh Sprite Restoration - Frame Before Fork Crown |
 |
| Tom C's Raleigh Sprite Restoration - Frame Before Fork Crown |
 |
| Tom C's Raleigh Sprite Restoration - Frame Before Fork |

The frame really polished very nice, the paint really shines. I am still debating touch up the bad spots or powder coat the frame. The yellow really shines and the decals came out great. The fork also really polished very nice. I am pleased with the results just three spots I am not. The debating continues in mind.
 |
| Tom C's Raleigh Sprite Restoration - Frame Polished |
 |
| Tom C's Raleigh Sprite Restoration Frame Polished - Head Tube |
 |
| Tom C's Raleigh Sprite Restoration Frame Polished - Head Tube |
 |
| Tom C's Raleigh Sprite Restoration - Frame Polished - Down Tune |
 |
| Tom C's Raleigh Sprite Restoration - Frame Polished Seat Lug |
 |
| Tom C's Raleigh Sprite Restoration - Frame Polished Bottom Bracket |
 |
| Tom C's Raleigh Sprite Restoration - Frame Polished Seat Lug |
 |
| Tom C's Raleigh Sprite Restoration - Frame Polished Brake Bridge |
 |
| Tom C's Raleigh Sprite Restoration - Frame Polished Drop Outs |
 |
| Tom C's Raleigh Sprite Restoration - Frame Polished Fork |
 |
| Tom C's Raleigh Sprite Restoration - Frame Polished Fork Crown |
 |
| Tom C's Raleigh Sprite Restoration - Frame Polished Fork Crown |
After polishing the paint it just was not where I wanted, the existing paint polished very nice it was the rust in the paint chips that was bothering me. I stripped the paint from the frame, fork, fenders and a tiny fender bracket. Fortunately the rust was only on the surface so there was no damage. With the paint removed I prepared the surface and then cleaned it very well.
 |
| Tom C's Raleigh Sprite Restoration - Frame Stripped |
 |
| Tom C's Raleigh Sprite Restoration - Frame Stripped Head Tube |
 |
| Tom C's Raleigh Sprite Restoration - Frame Stripped Seat Lug |
 |
| Tom C's Raleigh Sprite Restoration - Frame Stripped Bottom Bracket |
 |
| Tom C's Raleigh Sprite Restoration - Fork Stripped |
 |
| Tom C's Raleigh Sprite Restoration - Fork Stripped |
 |
| Tom C's Raleigh Sprite Restoration - Fenders Stripped |
 |
| Tom C's Raleigh Sprite Restoration - Front Fender Dent |
 |
| Tom C's Raleigh Sprite Restoration - Dent Tapped Out |
 |
| Tom C's Raleigh Sprite Restoration - Fender Prepped For Powder |
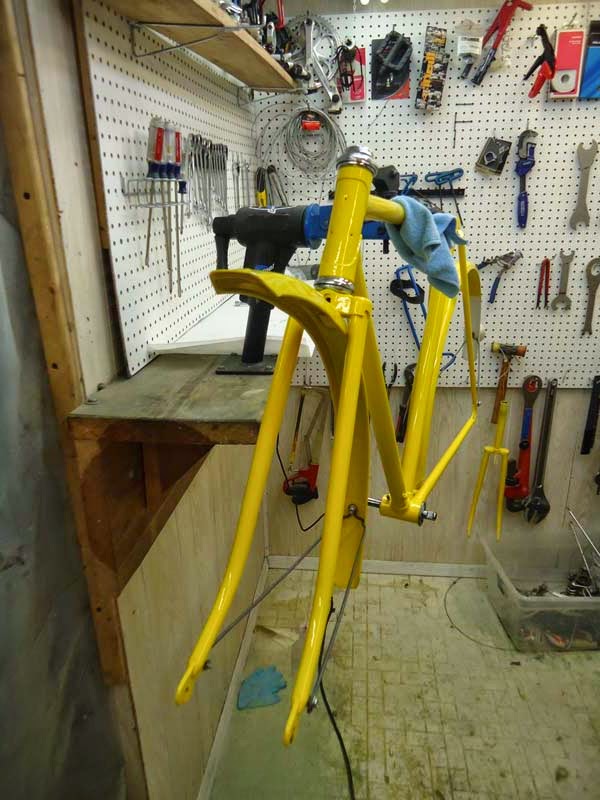
The Raleigh Sprite is going back to its original yellow with a white tail on the rear fender. I start the powder coating by powdering the areas that are hard to reach like the bottom bracket, seat lug and fork crown and bake it. I then do a layer of powder covering everything. With the yellow and the white fender tail complete I do a clear coat to really bring the depth out.
The powder coating turned out just beautiful, I feel I really took a huge step forward in my powder coating ability with this Sprite. I could not be happier, well i could be happier with the braze work of the lugs but its the 70's Raleigh brae work wear neatness was not their goal. I did add some brazing here and there just to fill a few spots.
With the powder coating done I am going to start repairing the fender struts. The fender struts are all intact just not straight. I will pound them strait on the anvil and then decided if they need a little primer and silver paint or if they are in good shape.
The fender struts straightened very nice and cleaned up very nice, I am happy with the struts.
With the powder coating complete its time to install the headset, the headset had lots of old hard grease but the bearing surface polished nice and with new bearings spins very nice. The components of the headset and bottom bracket polished very nice and with the headset and bottom bracket installed they look fantastic with the new yellow.
With fork, headset & bottom bracket complete I am able to fit the fenders and fender struts. I installed the fenders with new mounting hardware or new nuts and bolts. I also cleaned the rear reflector the best it would and installed it. It is actually pretty amazing to have a rear fender reflector in such good shape.
I am so proud and happy of the results so far, the new yellow is stunning the way it shines and the fenders add so much the the Sprite, I am so happy!
I tried polishing the original stem, It has so much character i would like to save it. After polishing though there was just to much rust pitting, which is a downer. I polished this stem for the Sprite for now, it is nicely streamlined but I am not sure it is going to work with the handlebars, I may need to find a different or shims. However the stem looks great installed.
 |
| Tom C's Raleigh Sprite Restoration - Frame Powder Coating Complete |
 |
| Tom C's Raleigh Sprite Restoration - Frame Powder Coating Complete - Head Tube |
 |
| Tom C's Raleigh Sprite Restoration - Frame Powder Coating Complete - Seat Lug |
 |
| Tom C's Raleigh Sprite Restoration - Frame Powder Coating Complete - Bottom Bracket |
 |
| Tom C's Raleigh Sprite Restoration - Frame Powder Coating Complete - Bottom Bracket |
 |
| Tom C's Raleigh Sprite Restoration - Frame Powder Coating Complete |
 |
| Tom C's Raleigh Sprite Restoration - Frame Powder Coating Complete - Fork |
 |
| Tom C's Raleigh Sprite Restoration - Frame Powder Coating Complete - Fork Crown |
 |
| Tom C's Raleigh Sprite Restoration - Frame Powder Coating Complete - Fenders |
 |
| Tom C's Raleigh Sprite Restoration - Frame Powder Coating Complete - Front Fender |
 |
| Tom C's Raleigh Sprite Restoration - Frame Powder Coating Complete - Rear Fender |
 |
| Tom C's Raleigh Sprite Restoration - Frame Powder Coating Complete - Fender Clip |
With the powder coating done I am going to start repairing the fender struts. The fender struts are all intact just not straight. I will pound them strait on the anvil and then decided if they need a little primer and silver paint or if they are in good shape.
 |
| Tom C's Raleigh Sprite Restoration - Fender Struts - Before |
 |
| Tom C's Raleigh Sprite Restoration - Fender Struts - Before |
 |
| Tom C's Raleigh Sprite Restoration - Fender Struts - Before |
 |
| Tom C's Raleigh Sprite Restoration - Struts Straightened |
 |
| Tom C's Raleigh Sprite Restoration - Headset & Bottom Bracket Before |
 |
| Tom C's Raleigh Sprite Restoration - Headset & Bottom Bracket Polished |
 |
| Tom C's Raleigh Sprite Restoration - Pressing Headset Cups |
 |
| Tom C's Raleigh Sprite Restoration - Headset Cups - Pressed |
 |
| Tom C's Raleigh Sprite Restoration - Headset Complete |
 |
| Tom C's Raleigh Sprite Restoration - Bottom Bracket Complete |
I am so proud and happy of the results so far, the new yellow is stunning the way it shines and the fenders add so much the the Sprite, I am so happy!
 |
| Tom C's Raleigh Sprite Restoration - Rear Reflector Parts |
 |
| Tom C's Raleigh Sprite Restoration - Rear Reflector - Installed |
 |
| Tom C's Raleigh Sprite Restoration - Fenders - Fitted |
 |
| Tom C's Raleigh Sprite Restoration - Fenders Fitted |
 |
| Tom C's Raleigh Sprite Restoration - Fenders - Fitted |
 |
| Tom C's Raleigh Sprite Restoration - Fenders Fitted |
 |
| Tom C's Raleigh Sprite Restoration - Stem - before |
 |
| Tom C's Raleigh Sprite Restoration - Stem - exploded |
 |
| Tom C's Raleigh Sprite Restoration - Stem Polished Old & New |
 |
| Tom C's Raleigh Sprite Restoration - Stem Installed |
Next on the list is the brake calipers, the brake calipers are in descent starting shape and will look great polished. I disassembled the calipers and cleaned and polished the pieces. I reassembled the calipers and installed new brake pads. The calipers turned out nice and look fantastic installed next to the fenders.
 |
| Tom C's Raleigh Sprite Restoration - Brake Calipers Before |
 |
| Tom C's Raleigh Sprite Restoration - Brake Calipers Exploded |
 |
| Tom C's Raleigh Sprite Restoration - Brake Calipers Polished |
 |
| Tom C's Raleigh Sprite Restoration - Brake Calipers Complete |
 |
| Tom C's Raleigh Sprite Restoration - Front Caliper Installed |
 |
| Tom C's Raleigh Sprite Restoration - Rear Brake Caliper Installed |
The crank is the type that is on most Sprites, I disassembled the crank and cleaned it. With the crank cleaned I got on to polishing, the crank took the polishing very well, the chrome has a deep shine. The bolts and spacers where also polished and this is one of the most enjoyable parts of a restoration, when all the pieces are restored the components go back together so nice and easy. The crank installed is actually pretty stunning with all the shine and against the new yellow, I am very pleased with it. I also installed new cotter pins with the crank.
 |
| Tom C's Raleigh Sprite Restoration - Crank - Before |
 |
| Tom C's Raleigh Sprite Restoration - Crank - Exploded |
 |
| Tom C's Raleigh Sprite Restoration - Crank - Polished |
 |
| Tom C's Raleigh Sprite Restoration - Crank - Complete |
 |
| Tom C's Raleigh Sprite Restoration - New Cotter Pins |
 |
| Tom C's Raleigh Sprite Restoration - Crank Installed |
 |
| Tom C's Raleigh Sprite Restoration - Bicycle to This Point |
I went through and looked at all the wheels I have plus the maybe 12 Sprite wheels I have. I decided on the Sprite wheels below, they are in fantastic condition, they still need to be restored I just wanted to fit them and see them on the frame. The wheels will be restored and new bearings, grease, tires and tubes will be installed. I think gum wall tires are the way to go, not the black wall photoed here. Another nice feature of these particular Sprite wheels is they are later model Sprite wheels and have the alloy hubs, earlier models had steel hubs.
 |
| Tom C's Raleigh Sprite Restoration - Sprite Wheels Prerestoration Test Fit |
The wheels re in really good starting shape, I wish I had the time to keep better track of where all the parts came from, I just don't remember how i got these wheels, I think they came off a Raleigh sprite that had a damaged frame, the seat lug area was badly damaged, at least that what I think.
Th cleaned the wheels and removed the old grease, the old grease was not all that bad. I polished the wheels and packed the new bearings in new grease. The wheels polished just beautifully, I could not be happier. I installed new Kenda Gum wall tires in 2"' x 1 3/8", I choice the bigger 1 3/8" size because the rims are on the wider side, and seats the tires nicer.
With the new grease and bearings the wheels spin for ever and the best part is how great the wheels and tires look installed with the new yellow.
 |
| Tom C's Raleigh Sprite Restoration - Rear Wheel Before |
 |
| Tom C's Raleigh Sprite Restoration - Rear Wheel Hub Before |
 |
| Tom C's Raleigh Sprite Restoration - Rear Wheel Rim Before |
 |
| Tom C's Raleigh Sprite Restoration - Rear Wheel Hub Old Grease |
 |
| Tom C's Raleigh Sprite Restoration - Rear Wheel Hub - Polished |
 |
| Tom C's Raleigh Sprite Restoration - Rear Wheel Rim Polished |
 |
| Tom C's Raleigh Sprite Restoration - Rear Wheel - New Grease & New BEarings |
 |
| Tom C's Raleigh Sprite Restoration - New Kenda Tires 27" x 1 3/8" |
 |
| Tom C's Raleigh Sprite Restoration - Pie Plate - Polished |
 |
| Tom C's Raleigh Sprite Restoration - Front Wheel Before |
 |
| Tom C's Raleigh Sprite Restoration - Front Wheel Hub Before |
 |
| Tom C's Raleigh Sprite Restoration - Front Wheel Rim Before |
 |
| Tom C's Raleigh Sprite Restoration - Front Wheel Hub Old Grease |
 |
| Tom C's Raleigh Sprite Restoration - Front Wheel Hub - Polished |
 |
| Tom C's Raleigh Sprite Restoration - Front Wheel New Bearings & Grease |
 |
| Tom C's Raleigh Sprite Restoration - Front Wheel - Complete |
 |
| Tom C's Raleigh Sprite Restoration - Rear Wheel Complete |
 |
| Tom C's Raleigh Sprite Restoration - Wheels Complete |
I went look through the pedal collection for replacement Raleigh Block pedals, which I probably have 60 to chose from and in the Raleigh pedals section I found this stem at the bottom, a perfect condition matching original!! Again, no clue I had it and I am thinking it came off the damaged seat lug Sprite but I am very happy I have it. I cleaned and polished it and it is perfect and looks fantastic installed!!! What is also nice is a do not need to figure out shims for the other stem.
I should take a weekend and organize the parts collection better. My dream is someday have a shop on my property with many windows and a 50 foot wall of shelving floor to ceiling with all the parts.
 |
| Tom C's Raleigh Sprite Restoration - Found Sprite Stem Before |
 |
| Tom C's Raleigh Sprite Restoration - Stem Exploded |
 |
| Tom C's Raleigh Sprite Restoration - Stem - Polished |
 |
| Tom C's Raleigh Sprite Restoration - Stem - Installed |
 |
| Tom C's Raleigh Sprite Restoration - Stem - Installed |
The original brake levers on the Sprite are very cool but unfortunately long past usable. I went in the parts collection and found some nice light alloy Die-Comp levers that polished very nice because they are alloy. I installed the levers and they are perfect.
 |
| Tom C's Raleigh Sprite Restoration - Original Brake Levers Past Usable |
 |
| Tom C's Raleigh Sprite Restoration - Nice Light Alloy Simple Replacement Levers |
 |
| Tom C's Raleigh Sprite Restoration - Brake Levers Polished |
 |
| Tom C's Raleigh Sprite Restoration - Brake Levers Installed |
With the stem and handlebars installed its time to install the shift levers. I like the levers, the are Huret levers that have a nice shape to them, I wish they where one step up for alloy but that is not a big deal at all. I disassembled the levers and did the polishing, they polished very nice. I assembled the levers and with all the correct areas lubricated they move like butter. I guess I forgot to take a before photo.
 |
| Tom C's Raleigh Sprite Restoration - Shift Levers Polished |
 |
| Tom C's Raleigh Sprite Restoration - Shift Levers - Complete |
 |
| Tom C's Raleigh Sprite Restoration - Shift Levers Installed |
The original front Huret derailleur was to far gone to save, it is pictured in the first photo, I don't mind that the front derailleur is being replaced because I really don't like the action of the derailleurs put on Sprites, they move to the lower chain ring when tension is put on compared to more modern shift action where the chain moves to the larger ring when tension is put on. I replaced the front derailleur with a Shimano 60 front derailleur, a nice derailleur for the time. the replacement derailleur polished very nice, I am happy with the change and the results.
 |
| Tom C's Raleigh Sprite Restoration - Original Front Derailleur & Replacement Derailleur |
 |
| Tom C's Raleigh Sprite Restoration - Replacement Derailleur Polshed |
 |
| Tom C's Raleigh Sprite Restoration - Front Derailleur Installed |
 |
| Tom C's Raleigh Sprite Restoration - Front Derailleur Installed |
The original rear derailleur probably could have been saved but it was in rough shape. I would rather put a better derailleur on it anyways and I have a nice Sun Tour derailleur all set for it. Later Raleigh put a version of this derailleur on a lot of bicycles and what I like about it is it polishes very nice and is pretty much bullet proof.
I cleaned and polished the replacement derailleur and lubricated all the pivot points, it fuctions perfect and looks fantastic against the yellow.
on to the saddle and seat post. The saddle is a Brooks mattress saddle that is in very good shape. The saddle is not the prettiest saddle ever made but it is an original in fantastic shape and it is a Brooks, plus their is nothing new that would be as comfortable.
The original chain is shot and is being replaced with a new chain, the two chains are photoed below and shows why a new chain is needed.
Now we are on to the pedal that led me to the perfect original replacement stem. I chose two pedals from my collection that are in good shape and did the cleaning and hand polishing. The pedals clean up fantastically and I love the Raleigh Logo in the rubber blocks. The pedal look great installed and make all the differences in a restoration.
 |
| Tom C's Raleigh Sprite Restoration - Original Derailleur Replacement Derailleur on Left |
 |
| Tom C's Raleigh Sprite Restoration - Rear Derailleur Exploded |
 |
| Tom C's Raleigh Sprite Restoration - Rear Derailleur Polished |
 |
| Tom C's Raleigh Sprite Restoration - Rear Derailleur Complete |
 |
| Tom C's Raleigh Sprite Restoration - Rear Derailleur Installed |
on to the saddle and seat post. The saddle is a Brooks mattress saddle that is in very good shape. The saddle is not the prettiest saddle ever made but it is an original in fantastic shape and it is a Brooks, plus their is nothing new that would be as comfortable.
 |
| Tom C's Raleigh Sprite Restoration - Saddle & Seat Post Before |
 |
| Tom C's Raleigh Sprite Restoration - Seat Post Polished |
 |
| Tom C's Raleigh Sprite Restoration - Saddle Bracket - Before |
 |
| Tom C's Raleigh Sprite Restoration - Saddle Bracket Polished |
 |
| Tom C's Raleigh Sprite Restoration - Saddle Bracket Complete |
The original chain is shot and is being replaced with a new chain, the two chains are photoed below and shows why a new chain is needed.
 |
| Tom C's Raleigh Sprite Restoration - New Chain & Old Chain |
Now we are on to the pedal that led me to the perfect original replacement stem. I chose two pedals from my collection that are in good shape and did the cleaning and hand polishing. The pedals clean up fantastically and I love the Raleigh Logo in the rubber blocks. The pedal look great installed and make all the differences in a restoration.
 |
| Tom C's Raleigh Sprite Restoration - Old Pedals Replacement Pedals (Left) |
 |
| Tom C's Raleigh Sprite Restoration - Replacement Pedals Cleaned & Polished |
 |
| Tom C's Raleigh Sprite Restoration - Replacement Pedals Installed |
 |
| Tom C's Raleigh Sprite Restoration - New Cables & Cable Housings |
 |
| Tom C's Raleigh Sprite Restoration - Cables & Cable Housings Installed |
 |
| Tom C's Raleigh Sprite Restoration - Cables Installed |
 |
| Tom C's Raleigh Sprite Restoration - Cables Installed |
 |
| Tom C's Raleigh Sprite Restoration - Side Reflectors Before |
 |
| Tom C's Raleigh Sprite Restoration - Side Reflectors Polished |
 |
| Tom C's Raleigh Sprite Restoration - Original Handlebar Grips Cleaned and Treated |
One of the best parts of the whole process is putting the head badge on. I tried a different method for reattaching the head badge that my friend Darryl Y. showed me. It worked wonderful. Thank you Darrell for the rivets and the info.
The head badge attached is just amazing, what a look against that yellow!!
 |
| Tom C's Raleigh Sprite Restoration - Head Badge Attached |
Last thing left to do is the rear rack. Alloy racks are not the easiest things to bring back to looking good. I soaked the rack in soapy water most of the day and then used steel wool to remove the hard dirt and corrosion. From there I used some clean steel wool just to burnish the finish and make it consistent. Racks have a lot of angles and tight spots that makes it impossible to get an even high polish. I installed the rack with new stainless steel hardware nd it looks great. Will be great for Tom to commute with.
 |
| Tom C's Raleigh Sprite Restoration - New Rear Rack Hardware |
 |
| Tom C's Raleigh Sprite Restoration - Rear Rack Complete |
The Raleigh Sprite is finished. I took it for the test and tune up rides. The bike rides very solid and very smooth and a little faster then I expected. By the bike is solid I mean that when I bike with fenders is not put together tight there are vibrations and the fenders tend to make noise, the Sprite is silent and tight.
Now to the looks and style, I love it, so classic.The yellow just pops, the yellow fenders make the whole bike. The fenders are also dead straight and look great with the fender line and gum wall line. I am very pleased with the way the chrome polished, it is perfect and complements the yellow paint so nicely.
I think the Raleigh Sprite is such an under ratted bicycle, it rides very nicely and does what its made to do very well. The Sprite will make a fantastic bicycle for Tom to commute each day with.
I love this bicycle!!
Thank you for all the interest, Merry Christmas if I don't say it again before Christmas,
John Z.
|
| Tom C's Raleigh Sprite Restoration - Bicycle Complete |
 |
| Tom C's Raleigh Sprite Restoration - Bicycle Complete |
 |
| Tom C's Raleigh Sprite Restoration - Bicycle Complete Front |
 |
| Tom C's Raleigh Sprite Restoration - Bicycle Complete Handlebars |
 |
| Tom C's Raleigh Sprite Restoration - Bicycle Complete Front Brake |
 |
| Tom C's Raleigh Sprite Restoration - Bicycle Complete Front Wheel |
 |
| Tom C's Raleigh Sprite Restoration - Bicycle Complete Front Rim |
 |
| Tom C's Raleigh Sprite Restoration - Bicycle Complete Stem |
 |
| Tom C's Raleigh Sprite Restoration - Bicycle Complete Down Tube |
 |
| Tom C's Raleigh Sprite Restoration - Bicycle Complete Front Half |
 |
| Tom C's Raleigh Sprite Restoration - Bicycle Complete Drive Train |
 |
| Tom C's Raleigh Sprite Restoration - Bicycle Complete Crank |
 |
| Tom C's Raleigh Sprite Restoration - Bicycle Complete Front Derailleur |
 |
| Tom C's Raleigh Sprite Restoration - Bicycle Complete Rear Brake |
 |
| Tom C's Raleigh Sprite Restoration - Bicycle Complete Rear Derailleur |
 |
| Tom C's Raleigh Sprite Restoration - Bicycle Complete Rear Wheel |
 |
| Tom C's Raleigh Sprite Restoration - Bicycle Complete Rear |
 |
| Tom C's Raleigh Sprite Restoration - Bicycle Complete Rear |
Thank you for all the interest, Merry Christmas if I don't say it again before Christmas,
John Z.
What a beautiful result, Tom will be the envy of other commuters, the Sprite looks like it came right out of the Nottingham factory, that yellow just sparkles. I seem to recall from reading his blog that Sheldon Brown shared your love of Sprites and gives the credit for being the forerunner of the more modern "Hybrid" concept.
ReplyDeleteAmazing attention to detail. Do you happen to have two extra bolts and spacers for front sprocket? I've been looking for a year for my identical sprint. Mine looks like the before images, though.
ReplyDelete