 |
| 1970's Motobecane Mixte Restoration & Conversion Bicycle After Restoration |
 |
| 1970's Motobecane Mixte Restoration & Conversion Bicycle After Restoration |
 |
| 1970's Motobecane Mixte Restoration & Conversion Bicycle Before Restoration |
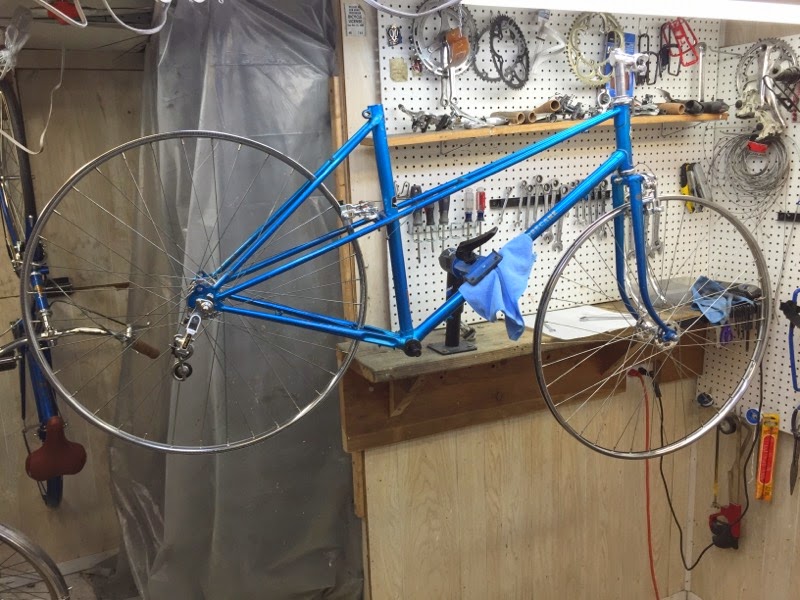
I started work on this 1970's Motobecane Mixte about a week ago and am posting it now as the new handlebars should be here today. I really like the blue of the Motobecane and I am hoping the blue is in good shape under the dirt and dullness. The Mixte has drop handlebars, I don't think drop handlebars on a mixte frame are very useful so I will convert the mixte into a city bicycle with upright handlebars turning the Motobecane into one of the most useful bicycles. When Complete the Motobeane will be going up for sale.
I want to see how the paint polishes before I decide but I think I am going to go all out on the Motobecane with a lot of new pieces and a new set of Velo-Orange hammered stainless steel fenders to top the Motobecane off, I very cool classic look to commute, ride the neighborhood, run errands or hit the coffee shop in style!
The Motobecane will receive a total restoration with new cables, cable housings, bearings, brake pads, handlebars, brake levers, cork handlebar grips, saddle, tires, tubes and the new fenders. I can't wait to see the results of the Motobecane restoration, I think its going to be one beautiful looking bicycle and a great rider!
|
| 1970's Motobecane Mixte Restoration & Conversion - Bicycle Before |
 |
| 1970's Motobecane Mixte Restoration & Conversion - Bicycle Before Handlebars |
 |
| 1970's Motobecane Mixte Restoration & Conversion - Bicycle Before Stem |
 |
| 1970's Motobecane Mixte Restoration & Conversion - Bicycle Before Head Tube |
 |
| 1970's Motobecane Mixte Restoration & Conversion - Bicycle Before Front Brake |
 |
| 1970's Motobecane Mixte Restoration & Conversion - Bicycle Before Front Wheel Hub |
 |
| 1970's Motobecane Mixte Restoration & Conversion - Bicycle Before Front Wheel Rim |
 |
| 1970's Motobecane Mixte Restoration & Conversion - Bicycle Before Stem |
 |
| 1970's Motobecane Mixte Restoration & Conversion - Bicycle Before Headset |
 |
| 1970's Motobecane Mixte Restoration & Conversion - Bicycle Before Fork |
 |
| 1970's Motobecane Mixte Restoration & Conversion - Bicycle Before Shift Levers |
 |
| 1970's Motobecane Mixte Restoration & Conversion - Bicycle Before Down Tube Decal |
 |
| 1970's Motobecane Mixte Restoration & Conversion - Bicycle Before Seat Tube |
 |
| 1970's Motobecane Mixte Restoration & Conversion - Bicycle Before Bottom Bracket |
 |
| 1970's Motobecane Mixte Restoration & Conversion - Bicycle Before Crank |
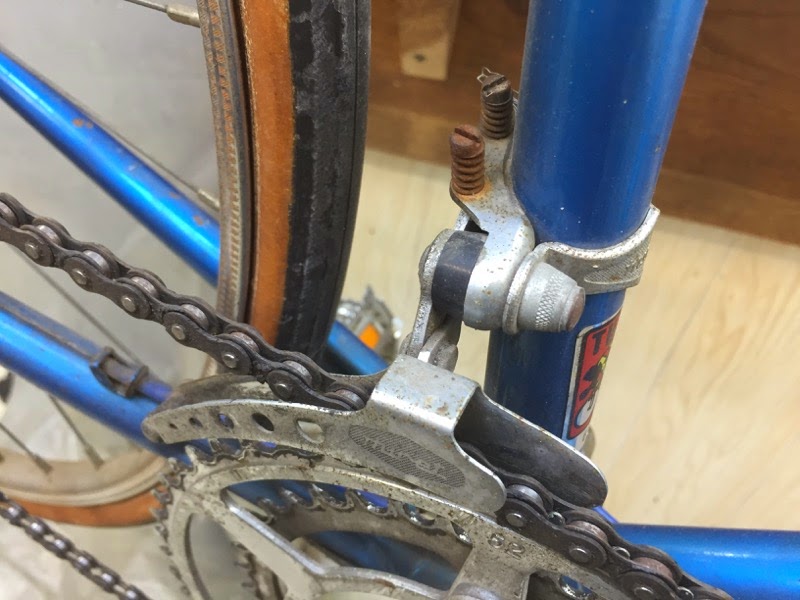 |
| 1970's Motobecane Mixte Restoration & Conversion - Bicycle Before Front Derailleur |
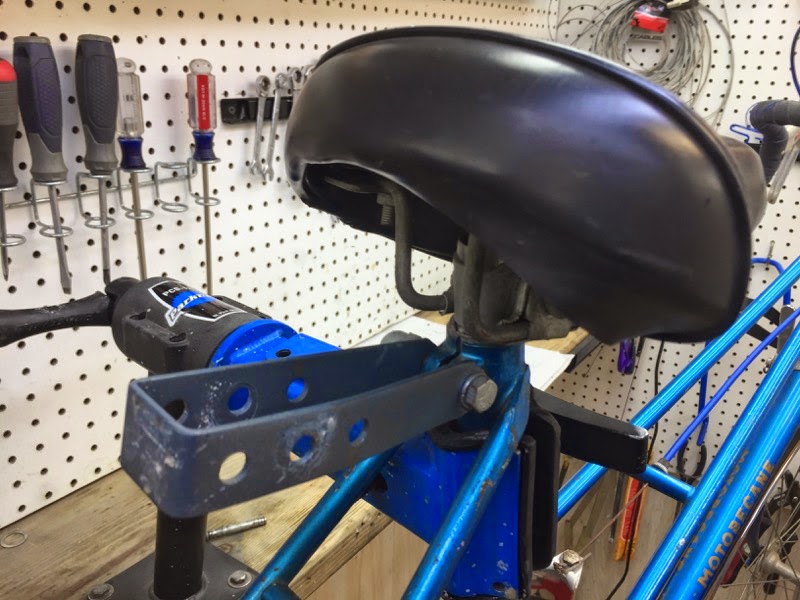 |
| 1970's Motobecane Mixte Restoration & Conversion - Bicycle Before Saddle |
 |
| 1970's Motobecane Mixte Restoration & Conversion - Bicycle Before Rear Brake Caliper |
 |
| 1970's Motobecane Mixte Restoration & Conversion - Bicycle Before Rear Derailleur |
 |
| 1970's Motobecane Mixte Restoration & Conversion - Bicycle Before Rear Wheel Hub |
 |
| 1970's Motobecane Mixte Restoration & Conversion - Bicycle Before Rear Wheel Rim |
 |
| 1970's Motobecane Mixte Restoration & Conversion - Frame Before |
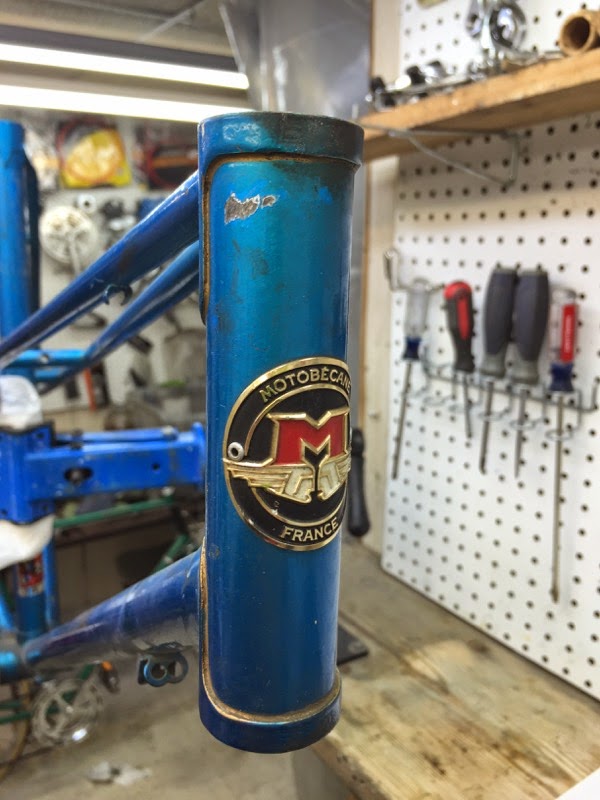 |
| 1970's Motobecane Mixte Restoration & Conversion - Frame Before Head Tube |
 |
| 1970's Motobecane Mixte Restoration & Conversion - Frame Before Head Tube |
 |
| 1970's Motobecane Mixte Restoration & Conversion - Frame Before Down Tube |
 |
| 1970's Motobecane Mixte Restoration & Conversion - Frame Before Down Tube |
 |
| 1970's Motobecane Mixte Restoration & Conversion - Frame Before Down Tubes |
 |
| 1970's Motobecane Mixte Restoration & Conversion - Frame Before Seat Tube |
 |
| 1970's Motobecane Mixte Restoration & Conversion - Frame Before Seat Tube |
 |
| 1970's Motobecane Mixte Restoration & Conversion - Frame Before Bottom Bracket |
 |
| 1970's Motobecane Mixte Restoration & Conversion - Frame Before Bottom Bracket |
 |
| 1970's Motobecane Mixte Restoration & Conversion - Frame Before Bottom Bracket |
 |
| 1970's Motobecane Mixte Restoration & Conversion - Frame Before Bottom Bracket |
 |
| 1970's Motobecane Mixte Restoration & Conversion - Frame Before Seat Tube |
 |
| 1970's Motobecane Mixte Restoration & Conversion - Frame Before Brake Bridge |
 |
| 1970's Motobecane Mixte Restoration & Conversion - Frame Before Brake Bridge |
 |
| 1970's Motobecane Mixte Restoration & Conversion - Frame Before Stays |
 |
| 1970's Motobecane Mixte Restoration & Conversion - Frame Before Drop Outs |
 |
| 1970's Motobecane Mixte Restoration & Conversion - Frame Before Fork |
 |
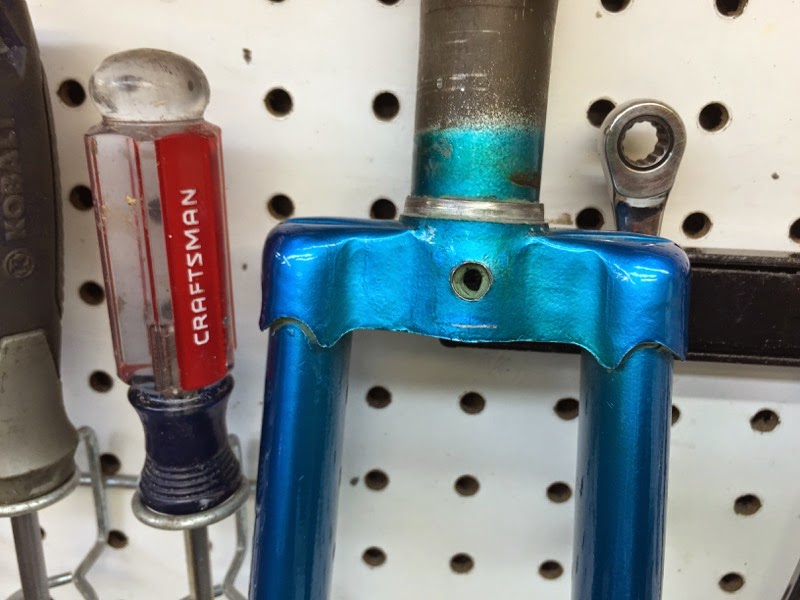
| 1970's Motobecane Mixte Restoration & Conversion - Frame Before Fork Crown |
 |
| 1970's Motobecane Mixte Restoration & Conversion - Frame Before Fork Blade |
 |
| 1970's Motobecane Mixte Restoration & Conversion - Frame Before Fork Drop Outs |
It took a good deal of cleaning but when cleaned I started the polishing process. The Motobecane took a lot of elbow grease and polishing grits but the frame turned out just beautifully! The blue is amazing and has a very high shine, I love it! Everything polished out very nice and the chips are not to bad and don't stand out and will touch up nicely. The gold lug lines and decals came through very nicely and look amazing as well. Did I mention I love it??!!
 |
| 1970's Motobecane Mixte Restoration & Conversion - Frame Polished |
 |
| 1970's Motobecane Mixte Restoration & Conversion - Frame Polished Head Tube |
 |
| 1970's Motobecane Mixte Restoration & Conversion - Frame Polished Head Tube |
 |
| 1970's Motobecane Mixte Restoration & Conversion - Frame Polished Down Tube |
 |
| 1970's Motobecane Mixte Restoration & Conversion - Frame Polished Down Tube Decal |
 |
| 1970's Motobecane Mixte Restoration & Conversion - Frame Polished Seat Lug |
 |
| 1970's Motobecane Mixte Restoration & Conversion - Frame Polished Bottom Bracket |
 |
| 1970's Motobecane Mixte Restoration & Conversion - Frame Polished Seat Tube |
 |
| 1970's Motobecane Mixte Restoration & Conversion - Frame Polished Drop Outs |
 |
| 1970's Motobecane Mixte Restoration & Conversion - Frame Polished Fork |
 |
| 1970's Motobecane Mixte Restoration & Conversion - Frame Polished Fork Crown |
 |
| 1970's Motobecane Mixte Restoration & Conversion - Frame Polished Fork Blade |
 |
| 1970's Motobecane Mixte Restoration & Conversion - Frame Polished Fork Blade |
 |
| 1970's Motobecane Mixte Restoration & Conversion - Frame Polished Fork Drop Outs |
I put the headset & bottom bracket into the crock pot. After cleaning the headset & bottom bracket polished beautifully. I did not use the original plastic bottom bracket bearing cages and replaced them with new bearings. It takes a few extra bearings more to make up the space of the bearing cages. I instaleld the headset & bottom bracket and they both spin great. This is where the fun starts, the polished pieces going back on the polished blue frame.
I don't know if I have said it in other posts but it is an absolute joy to reassemble a bicycle after all the parts have been restored. Everything reassembles very easily and the rewards of all the hard work of restoring things starts to be rewarded!
 |
| 1970's Motobecane Mixte Restoration & Conversion - Headset & Bottom Bracket Before |
 |
| 1970's Motobecane Mixte Restoration & Conversion - Headset & Bottom Bracket Polished |
 |
| 1970's Motobecane Mixte Restoration & Conversion Headset Cups - Press |
 |
| 1970's Motobecane Mixte Restoration & Conversion Headset Cups - Pressed |
 |
| 1970's Motobecane Mixte Restoration & Conversion - Headset Bearings Packed |
 |
| 1970's Motobecane Mixte Restoration & Conversion Headset - Compelte |
 |
| 1970's Motobecane Mixte Restoration & Conversion Headset - Complete |
 |
| 1970's Motobecane Mixte Restoration & Conversion - New & Old Bearings |
 |
| 1970's Motobecane Mixte Restoration & Conversion - New Bearings Packed |
 |
| 1970's Motobecane Mixte Restoration & Conversion - Bottom Bracket Complete |
 |
| 1970's Motobecane Mixte Restoration & Conversion - Headset & Bottom Bracket Complete |
The handlebars will be installed when they arrive which should be very soon.
 |
| 1970's Motobecane Mixte Restoration & Conversion - Stem Before |
 |
| 1970's Motobecane Mixte Restoration & Conversion Stem - Exploded |
 |
| 1970's Motobecane Mixte Restoration & Conversion - Stem Polished |
 |
| 1970's Motobecane Mixte Restoration & Conversion Stem - Complete |
 |
| 1970's Motobecane Mixte Restoration & Conversion Stem - Installed |
I have always liked center pull brakes but I think they have grown into my favorite. They polish beautifully and work good, they also have such a nice shape and look to them. I cleaned, polished and lubricated all the pivot points and assembled the brake calipers. They turned out wonderful and look great with the blue paint, I can't wait to see the new fenders running through them!
 |
| 1970's Motobecane Mixte Restoration & Conversion - Brake Calipers Before |
 |
| 1970's Motobecane Mixte Restoration & Conversion - Brake Calipers Exploded |
 |
| 1970's Motobecane Mixte Restoration & Conversion - Brake Calipers Polished |
 |
| 1970's Motobecane Mixte Restoration & Conversion - Brake Calipers Complete |
 |
| 1970's Motobecane Mixte Restoration & Conversion Front Caliper - Installed |
 |
| 1970's Motobecane Mixte Restoration & Conversion - Rear Calipers Installed |
I love the looks of old cotter cranks, they always have such a nice classic look to them that really have a refined look. What I do not like is cotter cranks that have not been removed in 40 years. Over those 40 years the grease has dried and the cotters have frozen in place. I managed to get the drive side off with just a little penetrating oil and the cotter press but the cotter pin was destroyed.
The non-drive side was nightmare, the cotter pin would not budge with penetrating oil, hammering or even heat. I gave up on the heat and cut the ends off flush with the crank arm and punched a few starting marks for a drill bit. I started with a 1/8" drill bit and drilled through, I then went to slightly bigger bit and drilled through, I then finished with a 5/16" drill bit a drilled through. With most of the pin drilled I took a punch and hammered the rest through easily. I think the drilling out of material allows the remaining material to collapse the slightest bit inward and allows the pin to slide out. I don't know if you can see in the photos below the drilled out pin but the hole through it is so straight and so very close to the edge with out going through that I am extremely proud of that drilling!! Especially it being by hand.
I did not notice on the last cotter crank that I used the last of my cotter pins on hand so I ordered 60 more and they should be here any day, I will then install the crank.
The crank turned out just fantastic, it is a Stronglight crank and the chrome polished beautifully! I can't wait to see it on the Motobecane.
 |
| 1970's Motobecane Mixte Restoration & Conversion - Crank Before |
 |
| 1970's Motobecane Mixte Restoration & Conversion - Crank Exploded |
 |
| 1970's Motobecane Mixte Restoration & Conversion - Drilled Pin |
 |
| 1970's Motobecane Mixte Restoration & Conversion - Crank Polished |
 |
| 1970's Motobecane Mixte Restoration & Conversion - Crank Complete |
The rear derailleur is not one of my favorites from a restoration stand point, it takes a lot of work to disassemble the Hurret derailleur and clean and polish it but in the end its worth every bit of work. The rear derailleur cleand and polished beautifully and the looks fantastic!
 |
| 1970's Motobecane Mixte Restoration & Conversion - Rear Derailleur Before |
 |
| 1970's Motobecane Mixte Restoration & Conversion - Rear Derailleur Exploded |
 |
| 1970's Motobecane Mixte Restoration & Conversion Rear Derailleur - Polished |
 |
| 1970's Motobecane Mixte Restoration & Conversion - Rear Derailleur Complete |
 |
| 1970's Motobecane Mixte Restoration & Conversion Front Derailleur - Before |
 |
| 1970's Motobecane Mixte Restoration & Conversion Front Derailleur - Exploded |
 |
| 1970's Motobecane Mixte Restoration & Conversion Front Derailleur - Polished |
 |
| 1970's Motobecane Mixte Restoration & Conversion Front Derailleur - Complete |
 |
| 1970's Motobecane Mixte Restoration & Conversion - Hurret Shift Levers Before |
 |
| 1970's Motobecane Mixte Restoration & Conversion - Hurret Shift Levers Before |
 |
| 1970's Motobecane Mixte Restoration & Conversion - Hurret Shift Levers Polished |
 |
| 1970's Motobecane Mixte Restoration & Conversion - Hurrett Shift Levers Polished |
 |
| 1970's Motobecane Mixte Restoration & Conversion Hurrett Shift Levers - Installed |
 |
| 1970's Motobecane Mixte Restoration & Conversion - Seat Post Before |
 |
| 1970's Motobecane Mixte Restoration & Conversion - Seat Post Before |
 |
| 1970's Motobecane Mixte Restoration & Conversion - Seat Post Polished |
I think the wheels are very cool! They are steal but they have the textured pattern on the rim braking surface that just looks cool and is a very French thing to do. The rear hub has an amazing unusual look to it with the overlapping holes drilled into it. I disassembled the wheels and started the cleaning and polishing, the hubs did not clean easily at all, very stubborn dirt but eventually they cleaned up nice. The hubs would also not polish easy so that took sometime but in the end the hubs look great polished.
The wheel rims really polished nicely, I could not be happier with the results. I can't wait to see the wheel rims with the new tires installed and to test the braking surface with new brake pads. Best of all the wheels spin wonderfully!!
 |
| 1970's Motobecane Mixte Restoration & Conversion Rear Wheel - Before |
 |
| 1970's Motobecane Mixte Restoration & Conversion - Rear Wheel Freewheel - Before |
 |
| 1970's Motobecane Mixte Restoration & Conversion - Rear Wheel Rim Before - Textured Pattern on Braking Surface |
 |
| 1970's Motobecane Mixte Restoration & Conversion - Rear Wheel Hub Before - Love the overlapping drilled holes! |
 |
| 1970's Motobecane Mixte Restoration & Conversion - Rear Wheel Hub Old Grease |
 |
| 1970's Motobecane Mixte Restoration & Conversion - Rear Wheel Hub Polished |
 |
| 1970's Motobecane Mixte Restoration & Conversion - Rear Wheel Rim Polished |
 |
| 1970's Motobecane Mixte Restoration & Conversion - Rear Wheel Hub New Bearings - Packed |
 |
| 1970's Motobecane Mixte Restoration & Conversion - Wheel Axle Pieces Ready |
 |
| 1970's Motobecane Mixte Restoration & Conversion Rear Wheel Complete |
 |
| 1970's Motobecane Mixte Restoration & Conversion Front Wheel - Before |
 |
| 1970's Motobecane Mixte Restoration & Conversion - Front Wheel Hub Before |
 |
| 1970's Motobecane Mixte Restoration & Conversion - Front Wheel Rim Before |
 |
| 1970's Motobecane Mixte Restoration & Conversion - Front Wheel Hub Old Grease |
 |
| 1970's Motobecane Mixte Restoration & Conversion - Front Wheel Hub Polished |
 |
| 1970's Motobecane Mixte Restoration & Conversion - Front Wheel Hub New Bearings - Packed |
 |
| 1970's Motobecane Mixte Restoration & Conversion - Front Wheel Rim Polished |
 |
| 1970's Motobecane Mixte Restoration & Conversion - Front Wheel Complete |
 |
| 1970's Motobecane Mixte Restoration & Conversion - Wheels Complete |
This is where the restoration becomes a little mixed up as for a few weeks ago all the new parts got delayed in arriving with a few winter storms going on. Things are a little out of the usual order.
The new handlebars arrived along with the new Velo Orange brake levers and the cork handlebar grips. The Motobecane is coming along nice with the parts installed.
 |
| 1970's Motobecane Mixte Restoration & Conversion - New Handlebars New Brake Levers & Cork Grips |
 |
| 1970's Motobecane Mixte Restoration & Conversion New Grips & Brake Levers |
 |
| 1970's Motobecane Mixte Restoration & Conversion - New Handlebars Grips & Brake Levers - Installed |
With the handlebars installed I installed the new saddle. I like this saddle, I think its a good value and a good look, I just wish the white letters on the back where not so obnoxiously large.
 |
| 1970's Motobecane Mixte Restoration & Conversion New Saddle - Installed |
I have around 100 9.5 mm crank cotter pins on hand but I ran out of 9 mm cotter pins so I was waiting for the cotter pins to arrive. With the 9 mm cotter pins I was able to install the crank. I really really like the looks of the crank, I think its classic and great looking. I don't mind cotter cranks, in fact I think they are some of the most beautiful cranks I just don't like 40-50 year old cotter pins that have not been removed in 40-50 years.
 |
| 1970's Motobecane Mixte Restoration & Conversion Crank - Installed |
New Kenda gum wall tires arrived and they where a quick install with new tubes and rim strips. The Motobecane is starting to look like a bike again.
 |
| 1970's Motobecane Mixte Restoration & Conversion New Kenda Gum Wall Tires |
 |
| 1970's Motobecane Mixte Restoration & Conversion New Tires - Installed |
I have been thinking lately as I am running out of space for the parts collection that I should use more of the parts as I go. I always find parts here and there or at swaps or in barns that I think wow this is an awesome part to build a whole bike around but then I never get to it and a really cool part just sits on the shelf. That is the case with these fenders.
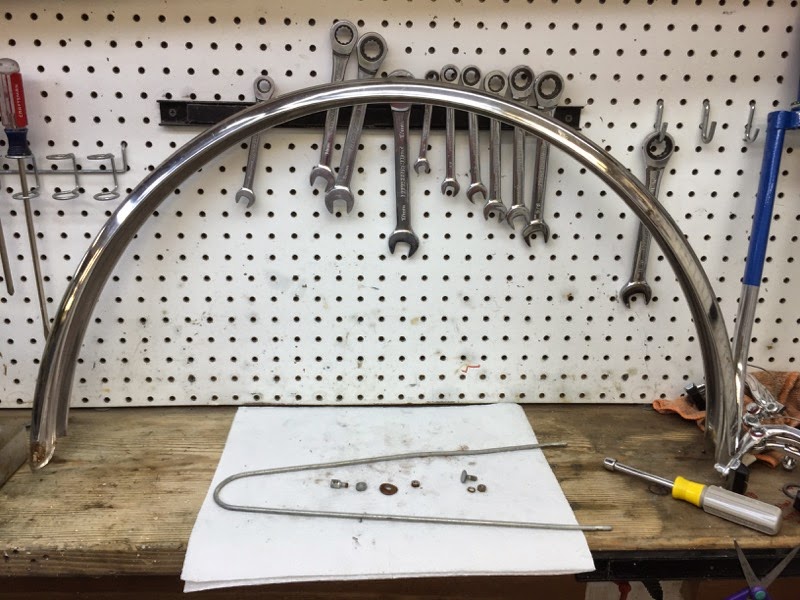
These are beautiful French fenders that i found at a flea market I think but I do remember the gentleman telling me they where off an old rusted out Peugeot mixte. I wish he had the whole bike with the fenders rusted out or not. I was going to build up a whole French bike just around these fenders. I was originally going to order Velo Orange fenders for the Motobecane but then why if I have these true French fenders, and you know the Motobecane is French!
The fenders are in good shape and they had all the hardware including the bolt that the front brake runs through and the rubber washer that goes under the fork crown. I only replaced the bolt nuts with new stainless as they just where not polishing nice.
About an hpur with the polishing area and the fenders look perfect. Installed the fenders are amazing and the Motobecane is amazing. I love it!! Those are the moments that give me so much satisfaction!
I think I need to take more photos of the fenders installed as I can't find anymore.
 |
| 1970's Motobecane Mixte Restoration & Conversion - Rear Fender Before |
 |
| 1970's Motobecane Mixte Restoration & Conversion Rear Fender - Before |
 |
| 1970's Motobecane Mixte Restoration & Conversion Rear Fender - Before |
 |
| 1970's Motobecane Mixte Restoration & Conversion - Front Fender Before |
 |
| 1970's Motobecane Mixte Restoration & Conversion Front Fender - Before |
 |
| 1970's Motobecane Mixte Restoration & Conversion Front Fender - Before |
 |
| 1970's Motobecane Mixte Restoration & Conversion - Fenders Polished |
 |
| 1970's Motobecane Mixte Restoration & Conversion - Fenders Complete |
Photos start with wiring the bike. I picked the color I pick all the time now for cable housing, the ice gray color. It is pretty much perfect for anything and looks great with the blue.
 |
| 1970's Motobecane Mixte Restoration & Conversion New Cables & Wires |
 |
| 1970's Motobecane Mixte Restoration & Conversion Bicycle Wired |
 |
| 1970's Motobecane Mixte Restoration & Conversion Bicycle Wired |
 |
| 1970's Motobecane Mixte Restoration & Conversion Chain - Installed |
 |
| 1970's Motobecane Mixte Restoration & Conversion Bicycle Wired |
With the bike wired its time to shellac the cork handlebar grips. I have been going with amber shellac lately, it dries darker and I think a better look. After 8 coats the grips are ready and looking great!
 |
| 1970's Motobecane Mixte Restoration & Conversion Shellacking Handlebar Grips |
 |
| 1970's Motobecane Mixte Restoration & Conversion Shellacking Handlebar Grips |
 |
| 1970's Motobecane Mixte Restoration & Conversion Handlebar Grips Shellacked |
Last thing I had to do was come up with a bracket for the rear fender to attach to the rear brake bridge. The fender was original made for a vertical hole through the brake bridge and then bolted on. The Motobecane has a horizontal hole. I took a small piece of metal and bent it just slightly less then 90 degrees but I did drill holes first. A couple of lock nuts completes the bracket. I think it came out pretty good.
 |
| 1970's Motobecane Mixte Restoration & Conversion Made Rear Fender Bracket |
That completes the Motbecane. I really really like this look!!
 |
| 1970's Motobecane Mixte Restoration & Conversion Bicycle - Complete |
The Motobecane Mixte will be up for sale shortly, I want to test ride it first and what do you know, 4 inches of snow so far today after it all finally melted. I will post some measurements and details soon too.
Right off I love the look of the Motobecane, the blue is amazing and there are few bicycles that look as good as a Mixte with some natural colors like the grips and saddle and of course fenders and city handlebars. I love it!!
The Motobecane Mixte Details;
19.5 Inch / 49.5 cm Mixte Frame
10 Speed Drive Train
New Handlebars
New Velo Orange Brake Levers
New Cork Handlebar Grips
New Saddle
New Cables
New Cable Housings
New Bearings
New Brake Pads
New Tires
New Tire Tubes
Restored French Fenders
Rigida Textured Brake Surface Wheels
After some fine tuning the Motobecane mixte road very well! It rode very well even with my 6'-4" frame on it. The Motobecane shift very well and stops excellent with the textured braking surface, I did not expect it to brake that well the first time, I locked the wheels up and skidded a bit.
I am extremely happy with the results of the restoration and conversion of the Motobecane mixte. It rides great and has a classic French look especially with those French fenders.
|
| 1970's Motobecane Mixte Restoration & Conversion Bicycle Complete |
 |
| 1970's Motobecane Mixte Restoration & Conversion Bicycle Complete |
 |
| 1970's Motobecane Mixte Restoration & Conversion Bicycle Complete - Handlebars |
 |
| 1970's Motobecane Mixte Restoration & Conversion Bicycle Complete - Head Tube |
 |
| 1970's Motobecane Mixte Restoration & Conversion Bicycle Complete - Front Fender |
 |
| 1970's Motobecane Mixte Restoration & Conversion Bicycle Complete - Front Brake & Fender I Love this Look!! |
 |
| 1970's Motobecane Mixte Restoration & Conversion Bicycle Complete - Front Wheel Hub |
 |
| 1970's Motobecane Mixte Restoration & Conversion Bicycle Complete - Front Rim |
 |
| 1970's Motobecane Mixte Restoration & Conversion Bicycle Complete - Cork Handlebar Grips |
 |
| 1970's Motobecane Mixte Restoration & Conversion Bicycle Complete - Stem |
 |
| 1970's Motobecane Mixte Restoration & Conversion Bicycle Complete - Front Side |
 |
| 1970's Motobecane Mixte Restoration & Conversion Bicycle Complete - Shift Levers |
 |
| 1970's Motobecane Mixte Restoration & Conversion Bicycle Complete - Front Fender |
 |
| 1970's Motobecane Mixte Restoration & Conversion Bicycle Complete - Front Half |
 |
| 1970's Motobecane Mixte Restoration & Conversion Bicycle Complete - Down Tube Decal |
 |
| 1970's Motobecane Mixte Restoration & Conversion Bicycle Complete - Saddle |
 |
| 1970's Motobecane Mixte Restoration & Conversion Bicycle Complete - Rear Brake |
 |
| 1970's Motobecane Mixte Restoration & Conversion Bicycle Complete - Motobecane Decal |
 |
| 1970's Motobecane Mixte Restoration & Conversion Bicycle Complete - Bottom Bracket |
 |
| 1970's Motobecane Mixte Restoration & Conversion Bicycle Complete - Drive Train |
 |
| 1970's Motobecane Mixte Restoration & Conversion Bicycle Complete - Crank |
 |
| 1970's Motobecane Mixte Restoration & Conversion Bicycle Complete - Front Derailleur |
 |
| 1970's Motobecane Mixte Restoration & Conversion Bicycle Complete - Rear Derailleur |
 |
| 1970's Motobecane Mixte Restoration & Conversion Bicycle Complete - Saddle |
 |
| 1970's Motobecane Mixte Restoration & Conversion Bicycle Complete - Rear Wheel Hub |
 |
| 1970's Motobecane Mixte Restoration & Conversion Bicycle Complete - Rear Fender |
Finally able to take some outdoor photos, light was not my favorite at that time of day but the bike still looks great.
|
| 1970's Motobecane Mixte Restoration & Conversion Bicycle Complete |
 |
| 1970's Motobecane Mixte Restoration & Conversion Bicycle Complete |
 |
| 1970's Motobecane Mixte Restoration & Conversion Bicycle Complete - Handlebars |
 |
| 1970's Motobecane Mixte Restoration & Conversion Bicycle Complete - Front |
 |
| 1970's Motobecane Mixte Restoration & Conversion Bicycle Complete - Head Badge |
 |
| 1970's Motobecane Mixte Restoration & Conversion Bicycle Complete - Front Brake & Fender |
 |
| 1970's Motobecane Mixte Restoration & Conversion Bicycle Complete - Front Wheel Hub |
 |
| 1970's Motobecane Mixte Restoration & Conversion Bicycle Complete - Front Wheel Rim |
 |
| 1970's Motobecane Mixte Restoration & Conversion Bicycle Complete - Stem |
 |
| 1970's Motobecane Mixte Restoration & Conversion Bicycle Complete - Beautiful Motobecane Decals |
 |
| 1970's Motobecane Mixte Restoration & Conversion Bicycle Complete - Front Half |
 |
| 1970's Motobecane Mixte Restoration & Conversion Bicycle Complete - Shift Levers |
 |
| 1970's Motobecane Mixte Restoration & Conversion Bicycle Complete - Saddle |
 |
| 1970's Motobecane Mixte Restoration & Conversion Bicycle Complete - Rear Brake |
 |
| 1970's Motobecane Mixte Restoration & Conversion Bicycle Complete - Motobecane Decal |
 |
| 1970's Motobecane Mixte Restoration & Conversion Bicycle Complete - Crank |
 |
| 1970's Motobecane Mixte Restoration & Conversion Bicycle Complete - Front Derailleur |
 |
| 1970's Motobecane Mixte Restoration & Conversion Bicycle Complete - Rear Derailleur |
 |
| 1970's Motobecane Mixte Restoration & Conversion Bicycle Complete - Rear Wheel Hub |
 |
| 1970's Motobecane Mixte Restoration & Conversion Bicycle Complete |
Wow the blue came out beautifully and those "3 dot" Huret shifters are cool. I have only seen plastic bearing cages on one other bike an early 70s Peugeot AO-8 the less expensive sibling of the UO-8, must have been a French thing. Look forward to seeing the rest of the City bike metamorphosis of this Motobecane.
ReplyDeleteHi Ryan
DeleteThank you on the blue paint. I have seen those plastic cages many times mostly on French bikes. I take them outand throw them away. These cages actually melted from heating the crank arm trying to remove the pin.
The Huret Challenger setup is excellent. One of my favorite derailleurs!
ReplyDeleteWOW the bike looks absolutely wonderful!!!! I just bought a 1970's motobecane today for 60.00 and it is kind of in bad shape. New tires though and breaks work great but paint is peeling off everywhere and a couple cables need replacing. I just love vintage bikes and thought it would be a an ok ride. Well I test drove it today and I hate the handle bars so low. I want upright handle bars and was looking around the web and found your blog. Did this take you a long time and was it expensive?
ReplyDeleteAgain the bike came out gorgeous.....I want my bike to look like that!
ReplyDeleteWow! What a phenomenal transformation! I have a 70's Nomade Sprint, a family bike, that I'm looking to restore over time. Can you share how you got rid of rust and got the rims shining so bright?
ReplyDelete