I started work on Marks Team Miyata last fall. It has been a start and stop project mainly on my part as a I learned somethings and added equipment. The beginning of the restoration can be seen by clicking here.
It was one of the early frames I powder coated when I first got the equipment. I am mostly very happy with the powder coating with a few small spots I wish where a little better but then I am a little obsessive about things. The blue color turned out very nice, I like that a lot and it has just a bit of metal flake in it.
Mark has collected a wonderful set of components for the Team Miyata. A wonderful mix of Shimano Dura Ace 7400 & 7401. He also laced some beautiful wheels that I will overhaul the hubs on.
I think I forgot to take a photo of the frame overall powder coated.
 |
| Mark's Team Miyata Restoration - Frame Powder Coated Head Tube |
 |
| Mark's Team Miyata Restoration - Frame Powder Coated Head Tube |
 |
| Mark's Team Miyata Restoration - Frame Powder Coated Top Tube - New Cable Brackets Brazed |
 |
| Mark's Team Miyata Restoration - Frame Powder Coated Down Tube |
 |
| Mark's Team Miyata Restoration - Frame Powder Coated Seat Lug |
 |
| Mark's Team Miyata Restoration - Frame Powder Coated Bottom Bracket |
 |
| Mark's Team Miyata Restoration - Frame Powder Coated Seat Stays |
 |
| Mark's Team Miyata Restoration - Frame Powder Coated Chrome Stays |
 |
| Mark's Team Miyata Restoration - Chrome Fork Polished |
 |
| Mark's Team Miyata Restoration - Chrome Fork - Polished |
 |
| Mark's Team Miyata Restoration - Chrome Fork Polished |
 |
| Mark's Team Miyata Restoration - Chrome Fork Polished |
The Dura Ace headset is in very good shape. I cleaned the headset pieces and then hand polished them. I hand polished the pieces to keep the original finish, hand polishing brightened up everything. Installed the headset looks amazing and function beautifully!
 |
| Mark's Team Miyata Restoration - Dura Ace Headset Before |
 |
| Mark's Team Miyata Restoration - Dura Ace Headset Polished |
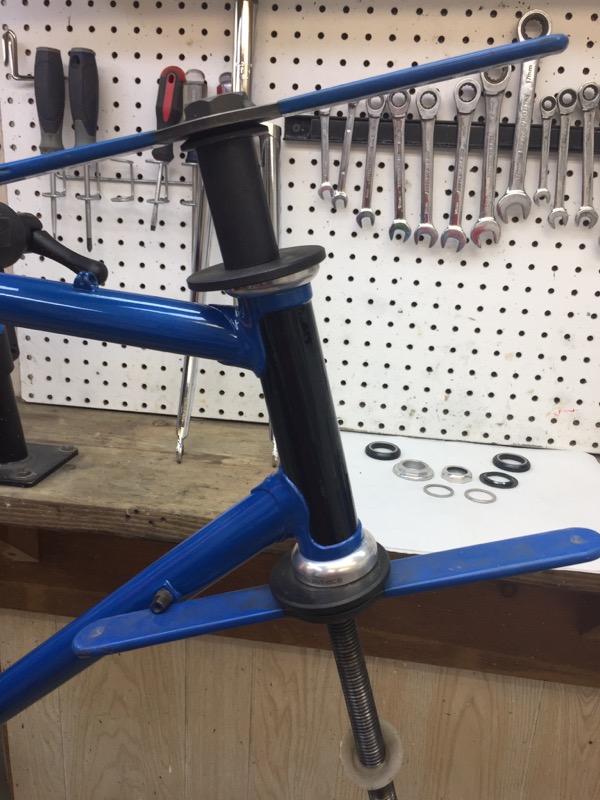 |
| Mark's Team Miyata Restoration - Pressing Headset Cups |
 |
| Mark's Team Miyata Restoration - Headset Cups Pressed |
 |
| Mark's Team Miyata Restoration - Dura Ace Headset Complete |
The bottom bracket is a fantastically light Dura Ace bottom bracket. The bottom bracket is in good shape, I cleaned all the pieces and then I did use the power polishers on the bottom bracket. The bottom bracket turned out very nice and spins like butter. The black bottom bracket lock ring had some scrapes that I polished and then filled with black paint. I like the black lock ring a lot.
 |
| Mark's Team Miyata Restoration - Bottom Bracket - Before |
 |
| Mark's Team Miyata Restoration - Bottom Bracket - Polished |
 |
| Mark's Team Miyata Restoration - Bottom Bracket - Bearings Packed |
 |
| Mark's Team Miyata Restoration - Bottom Bracket - Complete |
Mark was able to find a nice set of handlebars with a stem that has the Miyata stamp on the side, very cool! The previous owner of the stem and handlebars had an interesting Minnie Mouse theme going there.
I polished the handlebars, the handlebars had some deeper scratches that would not remove but polished and with handlebar tape the handlebars will look great. The handlebars are Cinelli.
The Miyata black stem was in okay starting shape. I worked through a couple grits of polish and the paint really came back nice. I then used black touch up paint to fill scratches in the paint. I am very happy with the way the stem turned out and is very cool to have the Miyata stamp on the side.
The Dura Ace brake calipers are in good starting condition. I disassembled the calipers and then gave them a good cleaning. I decided to hand polish the main body of the caliper by hand, I wanted to save the original finish of the metal. I think they polished very nice by hand. All of the small hardware pieces where polished on the power polishers. I love these brake calipers, so smooth and beautiful!
I decided to install the shift levers next. I cleaned the levers and then a quick hand polish. The shift levers are in great shape. I also lubricated the levers. The shift levers look great installed!
At this time I decided to run a tap through the water bottle cage mounts just to clean them out and make sure there was no powder in the start of the threads. The threads are clean!
The derailleurs are next, they are beatuiful Dura Ace derailleurs, nothing like a Dura Ace derailleur. The derailleurs are in good starting shape, the front derailleur is in amazing starting shape.
While I installed the rear derailleur I decided to install the new drop out micro adjust screws also.
That is where I left off today on the Miyata build. More tomorrow and I tested fitted the wheels below.
This is just a test fit of the wheels Mark built. They are beautiful! I still need to overhaul the hubs and I will give more info on the wheels then, But they sure look great tet fitted!
The Minnie Mouse brake levers that where on the handlebars are not going to be used. Instead these beautiful Dura Ace brake levers will be used. One of the levers had a to small of clamp so I had to modify it using the clamp and bolt from one of the red brake levers.
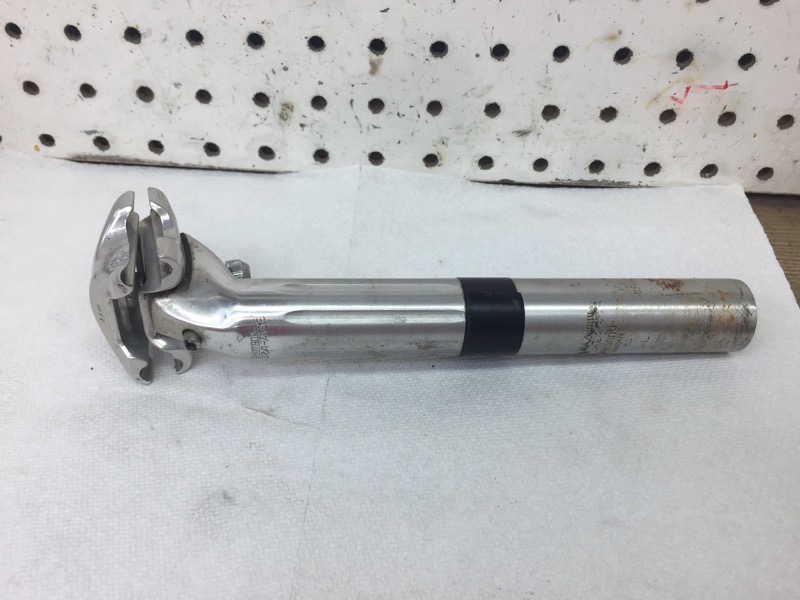
The seat post is a beautiful Dura Ace. I love this seat post, it is so well thought out and so easy to adjust. The bottom half of the seat post was a little rough but the top half was in descent shape and still had the Dura Ace finish. I hand polished the top half and the clamp components and then polished the bottom half with the power polishers. The seat post turned out amazing.
The next step is to install the new chain, install the cable and housings and install the handlebar tape. I took about 8 links out of the new chain and in tracks beautifully. Mark had the light gray color Jagwire housings but I thought the darker ice gray color is a better match. The cables housings look amazing installed.
 |
| Mark's Team Miyata Restoration - Handlebars - Before |
 |
| Mark's Team Miyata Restoration - Brake Levers - Before |
 |
| Mark's Team Miyata Restoration - Stem & Handlebars - Before |
 |
| Mark's Team Miyata Restoration - Stem & Handlebars - Before |
 |
| Mark's Team Miyata Restoration - Handlebars - Before |
 |
| Mark's Team Miyata Restoration - Stem - Before |
 |
| Mark's Team Miyata Restoration - Stem - Exploded |
 |
| Mark's Team Miyata Restoration - Handlebars - Polished |
 |
| Mark's Team Miyata Restoration - Handlebars - Polished |
 |
| Mark's Team Miyata Restoration - Stem - Polished |
 |
| Mark's Team Miyata Restoration - Stem - Complete |
 |
| Mark's Team Miyata Restoration - Stem & Handlebars Installed |
 |
| Mark's Team Miyata Restoration - Stem & Handlebars - Installed |
 |
| Mark's Team Miyata Restoration - Stem - Complete It is a beautiful stem! |
 |
| Mark's Team Miyata Restoration - Stem & Handlebars Complete |
 |
| Mark's Team Miyata Restoration - Dura Ace Brake Calipers Before |
 |
| Mark's Team Miyata Restoration - Dura Ace Brake Calipers Exploded |
 |
| Mark's Team Miyata Restoration - Dura Ace Brake Calipers Before |
 |
| Mark's Team Miyata Restoration - Dura Ace Brake Calipers Before |
 |
| Mark's Team Miyata Restoration - Dura Ace Brake Calipers Before |
 |
| Mark's Team Miyata Restoration - Dura Ace Brake Calipers Polished |
 |
| Mark's Team Miyata Restoration - Dura Ace Brake Calipers Complete |
 |
| Mark's Team Miyata Restoration - Front Brake Caliper Installed |
 |
| Mark's Team Miyata Restoration - Rear Brake Caliper Installed |
I decided to install the shift levers next. I cleaned the levers and then a quick hand polish. The shift levers are in great shape. I also lubricated the levers. The shift levers look great installed!
 |
| Mark's Team Miyata Restoration - Shift Levers - Before |
 |
| Mark's Team Miyata Restoration - Shift Levers - Installed |
At this time I decided to run a tap through the water bottle cage mounts just to clean them out and make sure there was no powder in the start of the threads. The threads are clean!
 |
| Mark's Team Miyata Restoration - Tapping The Water Bottle Cage Threads |
The derailleurs are next, they are beatuiful Dura Ace derailleurs, nothing like a Dura Ace derailleur. The derailleurs are in good starting shape, the front derailleur is in amazing starting shape.
The disassembled the derailleurs and cleaned all of the pieces. I then polished all of the small hardware on the power polisher and polished the main body by hand. The derailleurs are beautiful and look amazing installed.
 |
| Mark's Team Miyata Restoration - Derailleurs - Before |
 |
| Mark's Team Miyata Restoration - Rear Dura Ace Derailleur Before |
 |
| Mark's Team Miyata Restoration - Rear Dura Ace Derailleur Exploded |
 |
| Mark's Team Miyata Restoration - Rear Dura Ace Derailleur Before |
 |
| Mark's Team Miyata Restoration - Rear Derailleur - Polished |
 |
| Mark's Team Miyata Restoration - Rear Dura Ace Derailleur Complete - Beautiful! |
 |
| Mark's Team Miyata Restoration - Rear Dura Ace Derailleur - Installed |
 |
| Mark's Team Miyata Restoration - New Drop Out Screws |
 |
| Mark's Team Miyata Restoration - New Drop Out Screws Installed |
 |
| Mark's Team Miyata Restoration - Front Dura Ace Derailleur Exploded |
 |
| Mark's Team Miyata Restoration - Front Dura Ace Derailleur Before |
 |
| Mark's Team Miyata Restoration - Front Dura Ace Derailleur Polished |
 |
| Mark's Team Miyata Restoration - Front Dura Ace Derailleur Complete |
 |
| Mark's Team Miyata Restoration - Front Dura Ace Derailleur Installed - Beautiful!! |
 |
| Mark's Team Miyata Restoration - Bicycle So Far |
This is just a test fit of the wheels Mark built. They are beautiful! I still need to overhaul the hubs and I will give more info on the wheels then, But they sure look great tet fitted!
 |
| Mark's Team Miyata Restoration - Front Wheel |
 |
| Mark's Team Miyata Restoration - Front Wheel Dura Ace Hub |
 |
| Mark's Team Miyata Restoration - Front Wheel Rim |
 |
| Mark's Team Miyata Restoration - Rear Wheel |
 |
| Mark's Team Miyata Restoration - Rear Wheel Rim |
 |
| Mark's Team Miyata Restoration - Rear Wheel Dura Ace Hub |
 |
| Mark's Team Miyata Restoration - Wheels Test Fitted |
The Minnie Mouse brake levers that where on the handlebars are not going to be used. Instead these beautiful Dura Ace brake levers will be used. One of the levers had a to small of clamp so I had to modify it using the clamp and bolt from one of the red brake levers.
The brake elvers where in good shape and like all the other components I wanted to keep that original Dura Ace finish. The brake levers came out very nice and I love the thought that went into there design.
 |
| Mark's Team Miyata Restoration - Dura Ace Brake Levers Before |
 |
| Mark's Team Miyata Restoration - Dura Ace Brake Levers Polished |
 |
| Mark's Team Miyata Restoration - Dura Ace Brake Levers Installed |
The seat post is a beautiful Dura Ace. I love this seat post, it is so well thought out and so easy to adjust. The bottom half of the seat post was a little rough but the top half was in descent shape and still had the Dura Ace finish. I hand polished the top half and the clamp components and then polished the bottom half with the power polishers. The seat post turned out amazing.
Mark picked out a beautiful Turbo saddle that I did a good cleaning to, it looks amazing installed.
 |
| Mark's Team Miyata Restoration - Dura Ace Seat Post Before |
 |
| Mark's Team Miyata Restoration - Dura Ace Seat Post Exploded |
 |
| Mark's Team Miyata Restoration - Dura Ace Seat Post Polished |
 |
| Mark's Team Miyata Restoration - Turbo Saddle |
 |
| Mark's Team Miyata Restoration - Turbo Saddle |
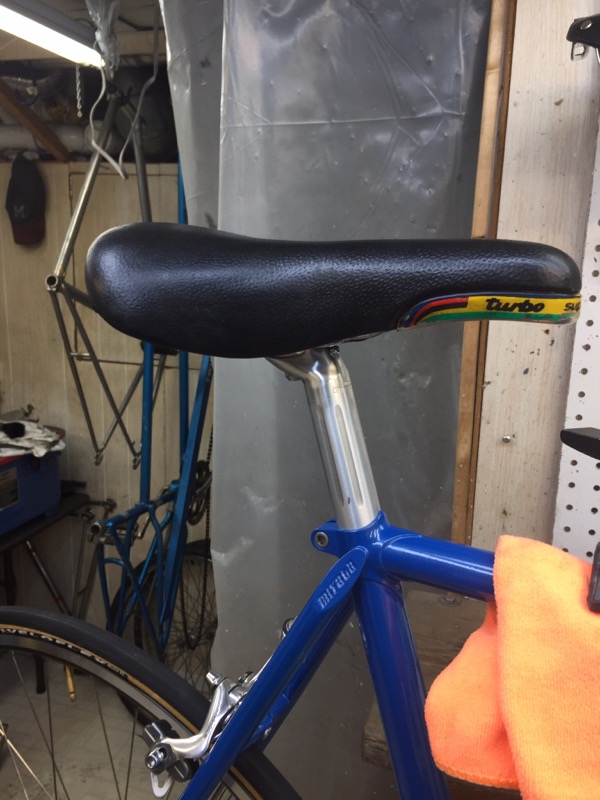 |
| Mark's Team Miyata Restoration - Saddle & Seat Post Installed |
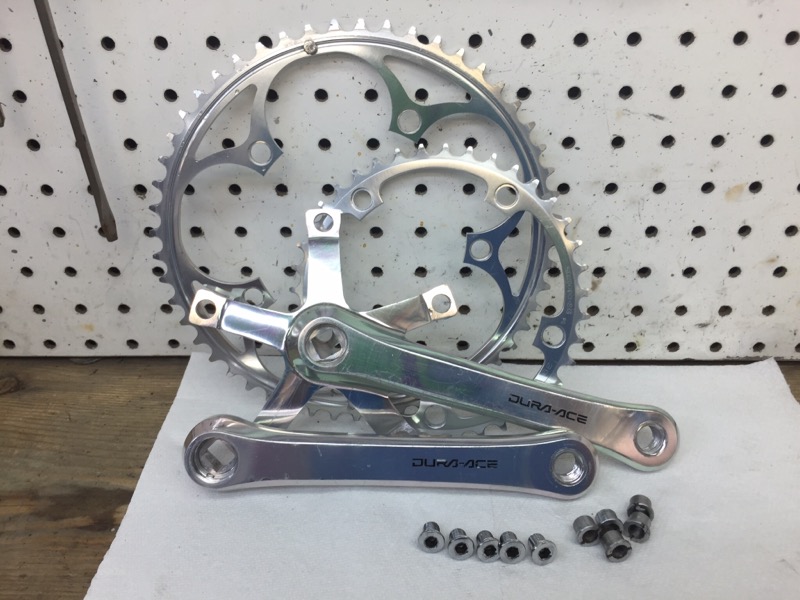
This is where I start to think hard about polishing. All of the components have polished just beautiful by hand and have that beautiful original finish. The Dura Ace crank as that beautiful finish but just a little rougher then all the other components. What happens is the factory puts a beautiful polish on the pieces and then clear coats the pieces to preserve the polish. That clear coat gets scuffed up and worn, especially on a crank that takes a beating. If I where to polish the clear off and then polish the alloy out it would look different then all the other components and would stand out like a soar thumb. I decided to hand polish out the clear coat and leave some of the rub marks. I power polished all the small hardware pieces which look great. In the end I think it was the correct choice to hand polish the crank, it looks amazing installed and matches all the other components with just a few blemishes.
 |
| Mark's Team Miyata Restoration - Dura Ace Crank - Before |
 |
| Mark's Team Miyata Restoration - Dura Ace Crank Before |
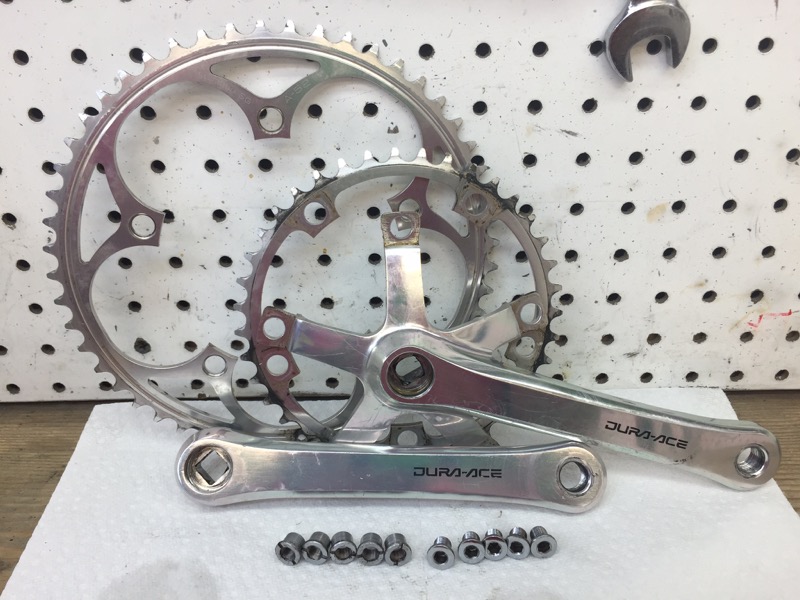 |
| Mark's Team Miyata Restoration - Crank - Exploded |
 |
| Mark's Team Miyata Restoration - Crank - Polished |
 |
| Mark's Team Miyata Restoration - Dura Ace Crank - Complete |
 |
| Mark's Team Miyata Restoration - Dura Ace Crank - Installed Beautiful!! |
 |
| Mark's Team Miyata Restoration - Bicycle So Far |
The next step is to install the new chain, install the cable and housings and install the handlebar tape. I took about 8 links out of the new chain and in tracks beautifully. Mark had the light gray color Jagwire housings but I thought the darker ice gray color is a better match. The cables housings look amazing installed.
The black handlebar tape Mark chose is perfect for the Miyata, it accents the head tube, stem and rims perfectly. I love It.
That makes the Team Miyata road worthy. I had to take it out for a test ride and some out door photos. The Miyata is not complete however. I did the art work to make new decals but I have not found a printer locally that can make them the way I need them to be made. I use to send the art work to a gentleman in Michigan but he has since retired, I so wish I would have bought his equipment, so the search continues on the decal front.
The Miyata road just amazing! There is a lot of fin tuning need though, some I worked out on the road and some I need to get more involved with in the shop. The ride was so fast, so responsive and amazingly smooth!! I don't think the Miyata would make it on the rough roads and gravel that I like but on the smooth road, just amazing!! A true race bike!!
The Miyata looks just fantastic in the out door photos even with the light not being the best. I can't wait to see it with decals. I think leaving the fork chrome and the stays chrome was the perfect choice! I really like the detail of bring the powder paint to a point on the chrome stays. The blue just shines and sparkles in the sun and I really like that the slight sparkle continues into the black head tube. I LOVE IT!! I love the choices Mark made in the components!! I love the color! I love It!! I am very proud of the Team Miyata too, or at least to this point. A lot has evolved in my business over the year and it seamed this Miyata frame was the catalyst and on the front of it. I am very proud of the results. Now to get those decals correct!
Oh, I forgot, I have yellow paint to paint the Miyata stamp in the seat stay caps, which I will do soon.
 |
| Mark's Team Miyata Restoration - New Chain |
 |
| Mark's Team Miyata Restoration - Chain - Installed |
 |
| Mark's Team Miyata Restoration - New Bits & Pieces |
 |
| Mark's Team Miyata Restoration - Bicycle Wired |
 |
| Mark's Team Miyata Restoration - Bicycle Wired |
 |
| Mark's Team Miyata Restoration - Bicycle Wired |
 |
| Mark's Team Miyata Restoration - Handlebar Tape - Compelte |
That makes the Team Miyata road worthy. I had to take it out for a test ride and some out door photos. The Miyata is not complete however. I did the art work to make new decals but I have not found a printer locally that can make them the way I need them to be made. I use to send the art work to a gentleman in Michigan but he has since retired, I so wish I would have bought his equipment, so the search continues on the decal front.
 |
| Mark's Team Miyata Restoration - Bicycle Road Worthy |
The Miyata road just amazing! There is a lot of fin tuning need though, some I worked out on the road and some I need to get more involved with in the shop. The ride was so fast, so responsive and amazingly smooth!! I don't think the Miyata would make it on the rough roads and gravel that I like but on the smooth road, just amazing!! A true race bike!!
The Miyata looks just fantastic in the out door photos even with the light not being the best. I can't wait to see it with decals. I think leaving the fork chrome and the stays chrome was the perfect choice! I really like the detail of bring the powder paint to a point on the chrome stays. The blue just shines and sparkles in the sun and I really like that the slight sparkle continues into the black head tube. I LOVE IT!! I love the choices Mark made in the components!! I love the color! I love It!! I am very proud of the Team Miyata too, or at least to this point. A lot has evolved in my business over the year and it seamed this Miyata frame was the catalyst and on the front of it. I am very proud of the results. Now to get those decals correct!
Oh, I forgot, I have yellow paint to paint the Miyata stamp in the seat stay caps, which I will do soon.
 |
| Mark's Team Miyata Restoration - Bicycle Almost Complete |
 |
| Mark's Team Miyata Restoration - Bicycle Almost Complete |
 |
| Mark's Team Miyata Restoration - Bicycle Almost Complete Handlebars |
 |
| Mark's Team Miyata Restoration - Bicycle Almost Complete Front Brake |
 |
| Mark's Team Miyata Restoration - Bicycle Almost Complete Head Tube |
 |
| Mark's Team Miyata Restoration - Bicycle Almost Complete Front Dura Ace Hub |
 |
| Mark's Team Miyata Restoration - Bicycle Almost Complete Front Wheel Rim |
 |
| Mark's Team Miyata Restoration - Bicycle Almost Complete Stem |
 |
| Mark's Team Miyata Restoration - Bicycle Almost Complete Brake Levers |
 |
| Mark's Team Miyata Restoration - Bicycle Almost Complete Head Tube |
 |
| Mark's Team Miyata Restoration - Bicycle Almost Complete Front Half |
 |
| Mark's Team Miyata Restoration - Bicycle Almost Complete Shift Levers |
 |
| Mark's Team Miyata Restoration - Bicycle Almost Complete Saddle |
 |
| Mark's Team Miyata Restoration - Bicycle Almost Complete Drive Train |
 |
| Mark's Team Miyata Restoration - Bicycle Almost Complete Dura Ace Crank |
 |
| Mark's Team Miyata Restoration - Bicycle Almost Complete Front Dura Ace Derailleur |
 |
| Mark's Team Miyata Restoration - Bicycle Almost Complete Seat Lug |
 |
| Mark's Team Miyata Restoration - Bicycle Almost Complete Rear Dura Ace Brake Caliper |
 |
| Mark's Team Miyata Restoration - Bicycle Almost Complete Rear Dura Ace Derailleur |
 |
| Mark's Team Miyata Restoration - Bicycle Almost Complete Powder Paint Points |
 |
| Mark's Team Miyata Restoration - Bicycle Almost Complete Rear Dura Ace Hub |
 |
| Mark's Team Miyata Restoration - Bicycle Almost Complete |
Wow, between that stunning paint job and cool vintage Durace components that bike is a jaw dropper! I have never replaced decals before but those I know who do have really nice things to say about VeloCals (http://www.velocals.com/).
ReplyDelete