 |
| My Rivendell "Bobish" Build - Poor Man's Version Bicycle - Complete |
You can see the beginnings of this build by clicking here My Poor Man's Rivendell Build.
Here is where I left off last fall and road the bike in a form of whats photoed here.
 |
| My Poor Man's Rivendell Where I left Off Last Fall |
My plans where to work on it through the winter and have it ready for first ride in March, well I am a little behind on being March.
I was originally going to braze studs on for cantilever brakes, I had brazed them on the rear but needed a different fork for cantilever brakes. I put on some Tektro dual pivot brake calipers and found I liked them just fine so I removed the rear cantilever studs. I also brazed on a few more cable stops and eyelets here and there. I had to put the bike back on a hook for a few months in the middle of brazing and in the end forgot to braze eyelets on the seat stays for a rack.
That is where I left off and then started the powder coating process.
 |
| My Rivendell "Bobish" Build - Poor Man's Version Fork - Stripped |
 |
| My Rivendell "Bobish" Build - Poor Man's Version Fork Stripped |
 |
| My Rivendell "Bobish" Build - Poor Man's Version Frame - Stripped |
I chose a powder color called Rexford Red. It has a nice slight metal flake to it and is a deep red. The color looks totally different in sunlight versus the florescent light in the shop. The fork powder coated beautifully and the clear coat went down perfect. The frame has one small spot on the under side I am not happy with, its a very small spot and I rushed it because I was feeling a little guilty working on my bike with lots of customer work going on.
 |
| My Rivendell "Bobish" Build - Poor Man's Version Frame - Powder Coated |
 |
| My Rivendell "Bobish" Build - Poor Man's Version Frame Powder Coated - Head Tube |
 |
| My Rivendell "Bobish" Build - Poor Man's Version Frame Powder Coated - Seat Lug Area |
 |
| My Rivendell "Bobish" Build - Poor Man's Version Frame Powder Coated - Bottom Bracket |
 |
| My Rivendell "Bobish" Build - Poor Man's Version Frame Powder Coated - Bottom Bracket |
 |
| My Rivendell "Bobish" Build - Poor Man's Version Frame Powder Coated - Drop Outs |
 |
| My Rivendell "Bobish" Build - Poor Man's Version Fork Powder Coated |
 |
| My Rivendell "Bobish" Build - Poor Man's Version Fork Powder Coated |
I am installing a new Velo Orange headset. I really like Velo Orange headsets, they look great, have a classic look and they work pretty well too. I had a Velo Orange headset on the build last fall and used that headset on another build somtime over the winter so a new headset it is.
 |
| My Rivendell "Bobish" Build - Poor Man's Version Velo Orange Headset |
 |
| My Rivendell "Bobish" Build - Poor Man's Version Pressing Headset Cups |
 |
| My Rivendell "Bobish" Build - Poor Man's Version Headset Cups - Pressed |
 |
| My Rivendell "Bobish" Build - Poor Man's Version Headset Bearings - Packed |
 |
| My Rivendell "Bobish" Build - Poor Man's Version Headset - Complete |
 |
| My Rivendell "Bobish" Build - Poor Man's Version Headset - Complete |
I was going to put a sealed cartridge bottom bracket in, I even went as far as taking a new one out of inventory but then just went with a good old stand by. I like bottom brackets like this that can be easily overhauled and last for ever with maintenance.
 |
| My Rivendell "Bobish" Build - Poor Man's Version Bottom Bracket - Ready |
 |
| My Rivendell "Bobish" Build - Poor Man's Version Bottom Bracket Bearings - Packed |
 |
| My Rivendell "Bobish" Build - Poor Man's Version Bottom Bracket - Complete |
 |
| My Rivendell "Bobish" Build - Poor Man's Version Bottom Bracket - Complete |
I had a very short horizontally Nitto Technomics tall stem, I think it was 30 mm. I have since purchased two Nitto stems, a tall 80 mm stretch stem and a Nitto Dynamics 80 mm stem. I decided to go with the tall version and it looks great installed and way better then the 30 mm stretch one I had.
 |
| My Rivendell "Bobish" Build - Poor Man's Version Nitto Stem Choices |
 |
| My Rivendell "Bobish" Build - Poor Man's Version Nitto Stem - Installed |
 |
| My Rivendell "Bobish" Build - Poor Man's Version Nitto Stem - Installed |
With the stem installed it is time to install the Nitto Albatross handlebars. They look great installed!
 |
| My Rivendell "Bobish" Build - Poor Man's Version New Nitto Albatross Handlebars |
 |
| My Rivendell "Bobish" Build - Poor Man's Version Nitto Albatross Handlebars - Installed |
 |
| My Rivendell "Bobish" Build - Poor Man's Version New Nitto Albatross Handlebars - Installed |
 |
| My Rivendell "Bobish" Build - Poor Man's Version New Nitto Handlebars - Installed |
A couple months ago I got a couple sets of wheels that where from a customers new Treks and where never used. He wanted to upgrade his wheels on his bike and his wife's bike with very nice wheels so I got the original new wheels with from the replacements.
I really do not like these wheels but they will do for now, I have been looking for a nice set of Dura Ace hubs to build up with some nice rims, I have found some very nice hubs just not in my price range. For now I will use these Bontrager wheels, the red decals have to go!! Why do bicycle companies now need to put three ugly decals on there wheels? Look at that!! Just ugly!!
 |
| My Rivendell "Bobish" Build - Poor Man's Version New Front Wheel |
 |
| My Rivendell "Bobish" Build - Poor Man's Version New Rear Wheel |
 |
| My Rivendell "Bobish" Build - Poor Man's Version Wheels - Installed |
The crank is the same that I put on last year, I just cleaned up the crank with soapy water and it looks great! Looks even better installed!
 |
| My Rivendell "Bobish" Build - Poor Man's Version Sugino Crank - Ready |
 |
| My Rivendell "Bobish" Build - Poor Man's Version Sugino Crank - Installed |
The rear derailleur is the same Shimano 105 8 speed derailleur, I just cleaned and lubricated it and it looks great installed.
 |
| My Rivendell "Bobish" Build - Poor Man's Version Rear Shimano 105 Derailleur - Ready |
 |
| My Rivendell "Bobish" Build - Poor Man's Version Shimano 105 Rear Derailleur - Installed |
The front derailleur is just the same simple Sun Tour derailleur. The front Dura Ace bar end shift lever is just friction so I really don't need a fancy front derailleur so I went with a bullet proof derailleur that I like the looks of.
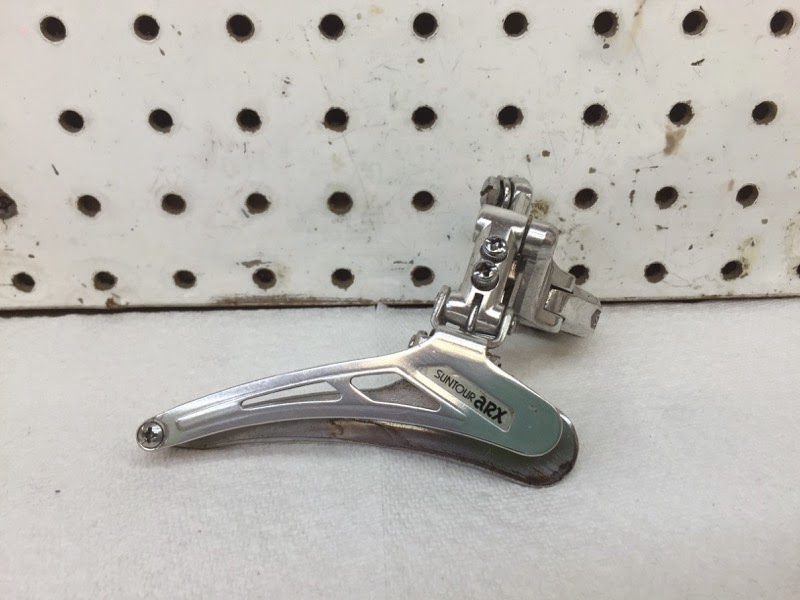 |
| My Rivendell "Bobish" Build - Poor Man's Version Front Derailleur - Cleaned & Ready |
 |
| My Rivendell "Bobish" Build - Poor Man's Version Sun Tour Front Derailleur - Installed |
At this time I installed the seat post but not the Brooks yet.
 |
| My Rivendell "Bobish" Build - Poor Man's Version Seat Post - Installed |
I had to order a new front brake caliper. The front brake caliper has not arrived yet so I will install the rear caliper now. I had to get a new front caliper because I sold the one I had on it it to a customer a week or two ago. I have 5 short reach front dual pivot calipers on hand and 4 long reach Tektro Calipers on hand and no medium, reach. It seems I always need the medium reach for most applications. Looks good installed.
 |
| My Rivendell "Bobish" Build - Poor Man's Version Rear Tektro Caliper |
 |
| My Rivendell "Bobish" Build - Poor Man's Version Rear Tektro Brake Caliper - Installed |
Just put the shift cable stop on, nothing special but I think it looks really good against the red powder coat.
 |
| My Rivendell "Bobish" Build - Poor Man's Version Shift Cable Stop - Installed |
I did not decided on tires until today when I ordered some Continetal 32 mm folding bead tires, I forget the exact model right now but I have wanted to try them for a while and they where on sale. For now I put some Bontrager Hardcasing Race Lite 32 mm tires. I absolutely hate these tires but they are in the inventory and I need a place holder.
Wow those red decals on the wheels look even worse now with tires!!
 |
| My Rivendell "Bobish" Build - Poor Man's Version Tires - Installed |
I cleaned and polished the brake levers and they look great. They are just classic city brake levers and I like them. I then installed the cork handlebar grips and Dura Ace bar end shift levers.
All looks great installed!! Can't wait to see the cork grips shellacked!
 |
| My Rivendell "Bobish" Build - Poor Man's Version Brake Levers - Polished |
 |
| My Rivendell "Bobish" Build - Poor Man's Version Cork Grips & Dura Ace Bar End Shift Levers - Ready |
 |
| My Rivendell "Bobish" Build - Poor Man's Version Brake LEvers - Grips - Shift Levers - Installed |
 |
| My Rivendell "Bobish" Build - Poor Man's Version Brake Levers - Shift Levers - Cork Grips - Installed |
 |
| My Rivendell "Bobish" Build - Poor Man's Version Bicycle - So Far |
I am upset that I missed or more accurately forgot to braze the rack eyelets on. I had to use P-Clamps to install the rack to the seat stays.
I have this rack, its been around the shop for years and I use to use it a lot. I think I got it 8-10 years ago. I figure I will use it for now while I figure out what rack I want, maybe I don't even need a different rack. I really like just a saddle bag for carrying more stuff so maybe no rack will be the final choice. For now this rack doesn't look to bad.
 |
| My Rivendell "Bobish" Build - Poor Man's Version Rack - Installed |
 |
| My Rivendell "Bobish" Build - Poor Man's Version Rack - Installed |
Tomorrow I hope the front brake shows up and in a few days the tires. Tomorrow I will install the chain and wire the shifting and rear brake. I will also install the Brooks saddle and give it a quick test ride if the brake caliper doesn't come. A long ride if the brake caliper does come.
Today I installed the chain and pedals. The pedals are just very basic platform pedals for my bad foot. The bike looks good with the chain installed. I also installed the water bottle cages, i chose the alloy color that I think goes good with the other bright work.
 |
| My Rivendell "Bobish" Build - Poor Man's Version Pedals - Installed |
 |
| My Rivendell "Bobish" Build - Poor Man's Version Chain - Installed |
 |
| My Rivendell "Bobish" Build - Poor Man's Version Water Bottle Cages - Installed |
 |
| My Rivendell "Bobish" Build - Poor Man's Version Chain & Water Bottle Cages - Installed |
 |
| My Rivendell "Bobish" Build - Poor Man's Version Shellacking the Handlebar Grips |
 |
| My Rivendell "Bobish" Build - Poor Man's Version Shellacking the Handlebar Grips |
 |
| My Rivendell "Bobish" Build - Poor Man's Version New Shift Cables & Cable Housings |
 |
| My Rivendell "Bobish" Build - Poor Man's Version Shift & Rear Brake Wired |
 |
| My Rivendell "Bobish" Build - Poor Man's Version Cork Handlebar Grips - Shellacked & Complete |
 |
| My Rivendell "Bobish" Build - Poor Man's Version Rear Brake Cable Line - Thinking on this. |
Below is a photo of the bike almost road ready. I am really really liking the looks so far! As of this afternoon the front brake caliper has not arrived yet. Check back tomorrow!
 |
| My Rivendell "Bobish" Build - Poor Man's Version Bicycle Almost Complete |
For now I installed a long reach Tektro dual pivot brake caliper until the medium, reach caliper arrives. With the temporary brake caliper installed I went ahead and installed the Brooks Flyer saddle, a saddle I have had around for a while and I like it a lot.
The last thing I need to do is install some hemp twin around the cork handlebar grips and the shift cable and then shellac the twine. I am also thinking about installing cloth handlebar tape on the curved part of the handlebars and shellacking that.
With the brake caliper and saddle installed it was time for a ride. I took the Rivendell like bike for about a 15 mile ride through the usual routs of gravel and rough roads and two things instantly jumped out to me, first the bike felt great and second the tires I still absolutely hate!! ( But I mentioned that earlier about the tires, I can't wait for the new tires to arrive.)
It was so nice to ride a very large bike that fit me, I could actually place the balls of my feet on the pedals with out being cramped. The bike was very responsive even with the Albatross handlebars. The brakes worked well, I think good enough not to need cantilever brakes. The bike is so comfortable and does not give up much speed in sacrifice of that comfort. I love it, I really love this bike! It will be fantastic for extremely long rides and also the ride from here to visit family in Upper Michigan I am planning.
One more thing I need to do is find the hubs and rims I want to use to build up wheels for the bike.
|
| My Rivendell "Bobish" Build - Poor Man's Version Bicycle Complete |
 |
| My Rivendell "Bobish" Build - Poor Man's Version Bicycle - Complete |
 |
| My Rivendell "Bobish" Build - Poor Man's Version Bicycle Complete - Handlebars |
 |
| My Rivendell "Bobish" Build - Poor Man's Version Bicycle Complete - Head Tube |
 |
| My Rivendell "Bobish" Build - Poor Man's Version Bicycle Complete - Front |
 |
| My Rivendell "Bobish" Build - Poor Man's Version Bicycle Complete - Stem |
 |
| My Rivendell "Bobish" Build - Poor Man's Version Bicycle Complete - Front Half |
 |
| My Rivendell "Bobish" Build - Poor Man's Version Bicycle Complete - Brake/Shift Levers & Handlebar Grips |
 |
| My Rivendell "Bobish" Build - Poor Man's Version Bicycle Complete - Brooks Flyer Saddle |
 |
| My Rivendell "Bobish" Build - Poor Man's Version Bicycle Complete - Water Bottle Cages |
 |
| My Rivendell "Bobish" Build - Poor Man's Version Bicycle Complete - Bottom Bracket Area |
 |
| My Rivendell "Bobish" Build - Poor Man's Version Bicycle Complete - Crank |
 |
| My Rivendell "Bobish" Build - Poor Man's Version Bicycle Complete - Front Derailleur |
 |
| My Rivendell "Bobish" Build - Poor Man's Version Bicycle Complete - Brooks Flyer Saddle |
 |
| My Rivendell "Bobish" Build - Poor Man's Version Bicycle Complete - Rear Brake Caliper |
 |
| My Rivendell "Bobish" Build - Poor Man's Version Bicycle Complete - Rear Wheel Hub |
 |
| My Rivendell "Bobish" Build - Poor Man's Version Bicycle Complete - Rear |
Thank you for the interest!
John Z.
John Z.