|
| Racer Before - My outdoor photos are really Bad |
 |
| Breeze Before |
 |
| Racer Before Restoration |
 |
| Racer Before Restoration |
I started work on a his and her Schwinn Racer and Schwinn Breeze for Joe. They are his parents bikes and have some history in them. I like working on the old city style bikes. Both bikes are in descent starting condition. A few scratches in the paint but not bad for 40 years old. The tires, tubes and rim liners are shot. A lot of grime and surface rust to clean and polish.
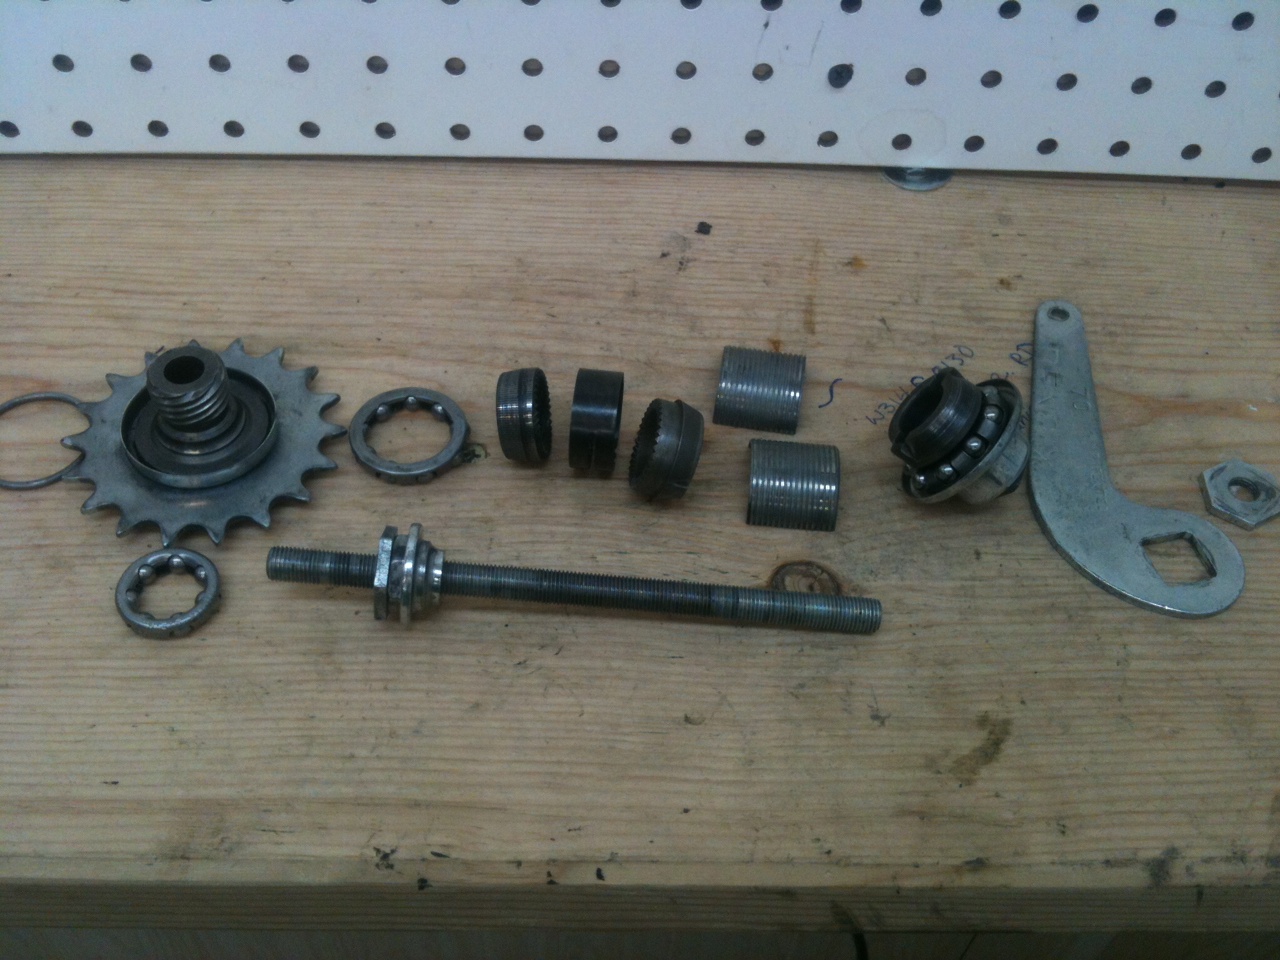
I was a bit worried when I got the bikes up on the bike stand and found that the coaster brakes did not work at all, when you peddle backwards the crank just kept going back and not engaging. I usually start with tearing down the bike into all its pieces, but instead I started with the coaster brake and rear wheel. If the coaster brake would be bad it might not be worth restoring the bikes.
When I got the coaster brake open I discovered that the grease was as hard as could be, no parts would move and the gears on the brake could not meet up. It took most of the day to get the grease off. It was like hard glue on everything. I tried all the tricks I know and the only thing that started to loosen the grease was soaking the parts in soapy water in a crock pot set on low.
Tomorrow I will do the tear downs of both bikes and start work on the frames and bottom brackets. I have not decided how I am going to proceeded yet. I am thinking I will start with the men's Racer and get the bottom bracket, headset, and wheels restored then do the same on the women's Breeze. Then work on both at the same time on the finishing touches.
I also ordered new tires last night. I was out of the old S-6 Schwinn style tires. I do have a lot of the English 3 speed tires still if anyone has one out there that needs restoring.
I will also take better before photos before tearing them down in the morning. The ones I took turned out awful. That digital photography class at school isn't paying of yet I guess.
Once the coaster brake components where cleaned I started the greasing and reassembling process. Everything went back together smoothly with out all the old grease, and the most important thing, the coaster brake now works perfectly. Below are photos of the process.
 |
| Racer Coaster Brake Before Restoration |
 |
| Rear Hub Cleaned - Before Polishing |
 |
| Coaster Brake Components - Exploded View |
 |
| Greasing Components |
 |
| Coaster Brake Complete - Needs One More Polishing |
 |
| Coaster Brake - Left Side Complete |
 |
| Coaster Brake - Cog View |
I started polishing the rims tonight. They are pretty rusty, The photo below is of the Schwinn Racer rear wheel. There is a little pitting, but after polishing it turned out pretty nice. I always leave the old tire on until the end. It is very helpful to have the rubber surface to help hold the wheel against a work bench while working on and polishing the wheel.
 |
| Rear Racer Wheel - Before Polishing |
 |
| Rear Racer Wheel - Polished |
I added a few before photos at the top, but my outdoor photos are still not turning out. I tore down the Schwinn Racer to the frame. The frame was pretty greasy, it cleaned up nice and polishing the paint looks good, but with the paint polished you really notice some pretty bad scratches in the frame, I will do my best to match and touch up the spots, but it won't be perfect.
 |
| Racer Frame Stripped Down |
 |
| Racer Frame Dirty |
 |
| Racer Frame Polished |
As I took the headset and crank apart, I threw the components directly in the soapy water crock pot. The grease was very dry and hard to remove. After 4 or 5 hours in the crock pot on low the grease wiped right off. I then polished all the headset, crank set stem and handle bars. The headset and crank set turned out great. The stem polished nicely and the handle bars look great for where they started. The handle bars do show a little pitting in a few spots but not to bad for the rust that was there.
With everything polished I installed the headset and stem. I started by pressing the headset cups in place with a cups press, I then greased and installed the bearings. After cleaning the bearings are in great shape. Schwinn made great headset bearings, although they are not light. Next I installed the fork, I always grease the fork stem to help prevent corrosion. I first install the fork crown bearing race and then lock the fork into place with the top bearing race and lock nut. The ehadset looks great polished.
With the headset in place I installed the stem. The stem wedge was pretty nasty, but after using heavy de-greaser and a quick polish on the bench buffer it looks great. Also the the stem bolts where in rough shape, but after cleaning and buffing I am surprised how good they look. I always heavily grease the stem so there is no chance of it ever rusting in place.
The handlebars had a lot of rust. Joe wanted to keep the green original handle grips, but to get the handle bars and stem apart for proper polishing you must remove at least one grip. It is pretty hard to remove these old Schwinn grips with out tearing them, over the years they dry and get brittle. Good news is I got one grip of with no tearing, it wasn't easy, but it is off with no problems and cleaned up pretty nice too. Now I just have to hope for the same good luck on the Schwinn Breeze. The handle bars polished pretty nice on the bench buffer, the rust is removed, but there are a few areas of rust pitting in the chrome. I will be putting a protect-ant on the pitting to help keep it from rusting in the future. The headset, stem and bars look great polished and installed.
 |
| Headset & Bottom Bracket Components after Crock Pot |
 |
| Stem & Handlebars Before |
 |
| Components - Stem - Handlebars Polished |
 |
| Pressing Headset Cups |
 |
| Headset Bearing Greased |
 |
| Stem Polished & Installed |
 |
| Headset & Handle Bars Complete |
With the headset, stem and handle bars complete I got to work on the crank set. The crank did not turn smoothly at all before overhaul. The crank had a good deal of rust and grime. I polished all the components after the crock pot bath, they polished out nicely.
The once piece crank took a lot of polishing. I did the easy to reach areas with the bench top buffer, the tighter areas required a polishing compound and a small brass brush, and a little elbow grease. It was all worth it because the crank looks awesome. The polished chrome of the crank is really going to stand out when the bike is finished.
I installed the crank cups with the cups press and greased the bearing. The bearings are in great shape. I was worried the cups and bearings would be badly worn the way it original turned, but there is absolutely no wear visible. I greased the bearing, installed the crank and tightened down the lock nuts. There can be some art in setting bearings and lock nuts, to tight and the bearings grind, to loose and the crank will wobble and cause wear. I am supper happy with the polished crank, especially the way it started. It looks great and turns very smooth.
 |
| Racer Crank - Before |
 |
| Racer Crank Arm - Before |
 |
| Crank Arm Rear - Before |
 |
| Crank Arm - Before |
 |
| Pressing Crank Cups |
 |
| Bearing Installed |
 |
| Crank Installed - Left Side - Love the Transformation |
 |
| Crank Polished & Installed - Drive Side |
Below is a photo of the bike to this point. I have the front wheel hub components soaking now in the crock pot and will be polishing the rim and hub soon. When the front wheel is finished the bearings systems will be done. I will start the Breeze at that point and restore both bikes to the same point. After that I will work on the detail parts and finishing touches. The new tires should be here soon.
I am also going to try to find time to install a couple more lights in the new shop for better photos.
Thanks,
John
 |
| Bike to this point |
This afternoon I worked on the front wheel. The bearings where true but dirty, and I need to replace a few spokes, I have to order them special, I do not have any Schwinn s-5 spokes left. The rim and hub polished up really nice, and the bearing cones and races polished out nice. The wheel turns really nice. I am going to check a local guy for spokes on my way to class tomorrow, otherwise I will have to order them. When the new tires go on the chrome will really pop.
 |
| Racer Front Hub - Dirty |
 |
| Racer Front Rim Polished |
 |
| Racer Front Hub Polished |
 |
| Racer at the End of The Day |
On Tuesdays I have class so i did not get a lot done. I did visit my friend Vaughn and he had plenty of replacement spokes for the front wheel and a spoke nipple. I bought extra for my supply. The new spoke went easy. I also got two better lock buts for the bearing cones on the front wheel. What was on the bike was very cheap and hard to tighten. With that said, I got to work on the front fender.
The front fender strut on the drive side had a bend in it. I laid it out on a flat board and bounded it straight. It now looks strait. The outside of the fender polished nice on the buffing wheel. The inside took a lot of elbow grease. I out a heavy coat of polishing compound and then used a brass brush and scrub all the rust and dirt off, this took a while, but well worth it, you would really notice it if it wasn't down, now its just invisible in the bigger picture.
The bike is coming along fast now. I will finish the rear fender tomorrow and the small detail pieces like the seat post, seat clap, coaster brake arm clamp and polish the chain guard. After that it will be waiting for tires and stripping down the Breeze.
 |
| New Spokes - Bad Photo |
 |
| Racer - Bent Front Fender Strut |
 |
| Racer - Front Fender - Before |
 |
| Racer - Fender Installed |
 |
| Racer - Fender Installed |
 |
| Racer - Fender Installed |
Today i started work on the rear fender for the Racer. I tried to pound out a bad dent and twist in the fender. It is defiantly not close to perfect, but a lot better then before. The rear fender was in a lot worse shape then the front fender. It polished okay. There was a lot of rust and scratching. It looks good to probably anyone else, but I see everything. I replaced the connection hardware on both fenders, I replaced the nuts and bolts with new chrome nuts and bolts. The new bolts look so much better then polishing the old bolts.
With the fenders installed I polished the seat post and seat post collar. I am thrilled with the way they turned out. This is what makes me love doing this work. The collar and seat post where corroded a dirty and where never really polished nice new from the factory. They now look better then the factory ever did.
The last step I did today and last step before I put it aside before I start the Breeze was to clean and polish the chain guard and install the chain. The guard cleaned nice and polished descent. The guard takes a lot of wear so in the end it looks good. The chain I have been oil soaking for a couple of days. I wiped it down and cleaned it with a wire brush, it looks new.
I will save the seat and peddles to restore with the Breeze's seat and peddles. Later today I will start the tear down of the Breeze, and I am still waiting on tires. I am also going to clean the shop before I start the Breeze. I am still having a hard time with the flow of the new shop.
 |
| Racer - Rear Fender Polished & Installed |
 |
| Racer - Rear Fender Installed |
 |
| Racer - Seat Post & Collar Polished & Installed |
 |
| Racer - Chain & Chain Guard Installed |
 |
| Schwinn Racer to This Point |
I started work on the Schwinn Breeze this afternoon after a good shop cleaning and I added a few more shop lights for better photos, I think I still need a few. The Breeze is in better condition then the Racer, most women's bike are in better shape then men's bikes.
Everything broke down easy. The grease is hard as a rock. All the components are in the crock pot of soapy water and will be ready to go in the morning. I should say the frame paint is in better condition then the Racer. There is a lot of rust like the Racer, and all the grease is like hard glue. Below are some photos. I hope to get the headset and crank cleaned, polished and installed tomorrow and hope fully get the coaster brake apart and in the crock pot. And of course the frame polished first.
 |
| Breeze - Before |
 |
| Breeze - Drive Train - Before |
 |
| Breeze - Rear Fender - Before |
 |
| Breeze - Rear Wheel Hub - Before |
 |
| Breeze - Frame Stripped Down Not Polished |
 |
| Breeze - Wheels - Before |
Last two days I have had a lot of school work so I was slow at getting the blog updated. I left off with the Breeze torn down to the frame. The frame cleaned and polished nicely. The frame has a lot of weld splatter, more then I have seen before, but the paint is in very good shape.
I started with assembling the crank. The rust is a little deeper then the rust was on the Racer, so there is a little more pitting, but things did polish up nice. I didn't want to just show the same type of photos I showed for the Racer, so I tried to show the assemble process of both the crank and headset. The crank loads into the bottom bracket from the bottom. Next comes the bearing cone, then a spacer and lock nut. I was very happy with the way the components polished up.
 |
| Crank & Headset Out of Crock Pot - Not Polished |
 |
| Breeze - Crank Before |
 |
| Breeze - Crank Polished |
 |
| Breeze - Loading Crank |
 |
| Breeze - Bearing Cone Installed |
 |
| Breeze - Crank Spacer Installed |
 |
| Breeze - Crank Lock Nut |
 |
| Breeze - Crank Complete |
With the crank installed I worked on the Headset. I installed the cups and packed the bearings. Next I cleaned the rust off the fork tube with a wire brush and coated it with a layer of grease. I then installed the fork and put on the bearing race nut, the headset spacer and the headset lock nut. Everything looks good on the headset and turns smoothly.
 |
| Breeze - Fork Tube Cleaned |
 |
| Breeze - Fork Tube Greased |
 |
| Breeze - Headset Bearing Race Nut |
 |
| Breeze - Headset Spacer - Did Clean Inside Rust After Looking at this Photo |
 |
| Breeze - Headset Lock Nut |
With the Crank & Headset Complete I took apart the coaster brake and put the components in the crock pot. The grease wasn't hard in this brake, but was a sticky as could be. No wonder it did not work, everything was stuck together. I then cleaned the Hub.
 |
| Breeze - Rear Hub/Coaster Brake Before |
 |
| Breeze - Rear Coaster Brake - Before |
 |
| Breeze - Rear Coaster Brake Exploded - Dirty |
 |
| Breeze - Rear Hub - Dirty |
 |
| Breeze - Rear Hub - Dirty |
Being all caught up on school the rest of the bicycle restoration should go pretty fast. The tires finally showed up today. Tomorrow I am going to the Packer game, so I will only get a little work done tomorrow evening. Monday & Tuesday should go fast and the bicycles will be done soon.
 |
| New Tubes & Tires |
I started Sunday Evening with polishing for the Breeze. I had the stem, handle bars, front wheel, rear wheel, coaster brake, front fender & rear fender to polish. I was mistaken how bad the rust was on the Breeze, it was a lot worse then I thought. The frame looked so good that I did not notice how much rust there was. It took a lot of polishing compound and time to get it looking bright and shiny. I am very happy with the results, the main thing with chrome and rust is just putting the patience and time into the work.
I polished the rear rim, hub and the coaster brake components. Everything went together well and looks good polished. The coaster brake now works very well, the grease was so sticky that it did not work at all before.
 |
| Breeze - Coaster Brake - Polished & Installed |
 |
| Breeze - Rear Wheel - Polished & Installed |
 |
| Breeze - Rear Wheel Rim - Polished |
With the rear wheel I started work on the front wheel. I polished the hub, rim and spoke nipples. The wheel looks great and will look even better with a new tire. I have not installed the hub components. One of the bearing cages is damaged, I do not have the correct size on hand and Vaughn, an local restore had none on hand, so I had to order one. It should be here tomorrow and everything should be put together in minutes.
 |
| Breeze - Front Wheel - Polished |
The stem and handle bars had the most surface rust. I was worried that they where not going to polish, but the right compound on the buffing wheel and everything looks great. I was able to remove one of the handle bar grips with out damaging it, so I had no trouble removing the bars and polishing them.
A neglected part of restored bicycles I see are always the bolts and nuts. When polishing the stem I always remove the stem bolt and wedge and polish them as bright as the stem, even though you don't see them, except for the bolt head. Also the handle bar bolt polished very nice. I don't know if many people notice damaged or unpolished bolts on a restoration, but they are the first thing I see if they are not polished. When bolts and nuts are polished they fade into the back ground where they belong.
 |
| Breeze - Stem & Handle Bars - Before |
 |
| Breeze - Stem & Handle Bars - Polished |
I love chrome fenders on a bicycle, especially a city style bicycle. The front a rear fenders had a lot of very stubborn surface rust. It took a long time to polish. The underside of the fenders where very rusty and dirty, I used a wire wheel on a drill to remove most of it, then I used a polishing compound and a brass brush to finish it up. Again the under side of fenders are never noticed, unless they are rusty and dirty. I really like the rear reflector mounted on the fender. The Racer was missing this reflector. It looks great cleaned and polished, a real classic look.
 |
| Breeze - Fenders - Before |
 |
| Breeze - Front Render Polished & Installed |
 |
| Breeze - Front Fender - Polished |
 |
| Breeze - Rear Fender Polished & Rear Reflector |
Next is the chain guard, chain, seat post, and installing the new bearings and cage in the front wheel. Then it will be new tires on both bicycles, restoring the peddles and seats and a few last details and they bicycles will be done.
The Breeze is almost complete. It seems like the last details take forever, but that is what makes a good restoration, the details. Today I put the new bearings in the front wheel, and trued the wheel in the wheel stand. I also installed the new tire tube and new tire. The front wheel looks great for a 40+ year old bike.
 |
| Breeze - New Front Tire & Fender Installed |
I also trued the rear wheel and installed the new tire tube and tire. The new tires are rated to 65 PSI, but the rims are not rated that high, I only put about 50 PSI. When these rims get to around 65 PSI the tires start to slip of the rim, they are not made for high pressure. The 10 speeds from the 70's are rated to 65 PSI, but again anything over 55 PSI is to much for the rims.
The rear wheel looks great with the new tire. I also replaced the rear fender bolts with new chrome bolts. Looks much better that way. They photo below shows the new bolts next to the old bolts.
 |
| Breeze - Rear Wheel & Tire Installed |
 |
| Breeze - New Bolts & Old Bolts |
Next I cleaned the chain and have been oil soaking it for a couple of days. I dried it off and installed it. It moves pretty well, I will have to wipe down the oil for a couple of days, it seems to bleed oil after a oil soak.
 |
| Breeze - Chain Installed |
The seat post and collar where in pretty bad shape. The chrome and metal has been frustratingly rough on this bike. The post, collar and seat bolt polished up nicely, just took a lot of polishing compound and patience.
 |
| Breeze - Seat Post & Collar - Polished |
Next is the cleaning and polishing the chain guard, seat, peddles, a test ride, minor tuning and a wipe down and the bicycle will be finished. And I forgot, the original basket also. Below is a phot of the bicycle to now.
 |
| Breeze - Bicycle as of Now |
I finished both bicycles today except for the test ride and final photos in the sun. I will do that early in the morning. I started with the seat components and seat for both bicycles. The seat are in descent shape. The under sides where pretty bad. I used soapy water and a sponge to wash the seat and undersides. They turned out nice. The Racers seat has some pretty twisted rails underneath from over tightening, which made the seat sit crooked. I bent the seat into position, the rails are still bent, but they are bent into the correct position. The components that attach the seat to the post where very dirty and tarnished. This is another one of those areas that is barley visible you would only see it if it wasn't restored. The components polished nice. I then installed the seat.
 |
| Seat Components - Before |
 |
| Seat Components - Polished |
 |
| Breeze Seat Installed |
I cleaned and polished the chain guard for the Breeze and installed it. It polished nice and looks good installed. I also polished the bracket that hold the coaster arm to the frame. It polished the best of anything on the bike. It shines.
 |
| Breeze - Chain Guard Installed |
 |
| Breeze - Coaster Arm Bracket |
I thought the peddles where the style that could be taken apart and polished, but after closer inspection the bolts on a normal peddle where just rivets made to look like bolts, so I could not take them apart for polishing. This made it difficult. I used a polishing compound, a tooth brush and a small wire brush. They did not polish as nice as they would if I could take the peddles apart, but they turned out pretty good. I also used soap and water to clean the rubber pads and then a rubber cleaner.
 |
| Peddles - Before |
 |
| Peddles - After |
I also cleaned the original breeze basket with soapy water. It cleaned up really nice. The leather straps and mental buckles that holds the basket to the bike took some work. I used a leather cleaner on the straps and a very small brush in the Dremil tool. I had to be very careful with the buckles because they are very thin and rusted. The Dremil did a good job of removing the rust.
The reflectors and straps that fit over the wheel hubs came out wonderfully. I was worried that the rubber straps would be brittle, but it took just a little soapy water and a small amount of polishing of the metal and they look great.
I also did a few touch up paint spots on the Racer. It is really hard to match the old Schwinn green. I did a few of the bad scratches, but did not want to touch up every tiny nick, it would look worse with the green that does not quiet match freckled all over then having the small scratches the way they are.
 |
| Breeze - Wheel Hub Reflectors |
Below are the photos of the bike to this point. The outdoor photos tomorrow will really show the transformation. Thanks for looking. Have a good night. The final photos will be up tomorrow.
 |
| Breeze - After Photo - No Basket |
 |
| Racer - After Photo |
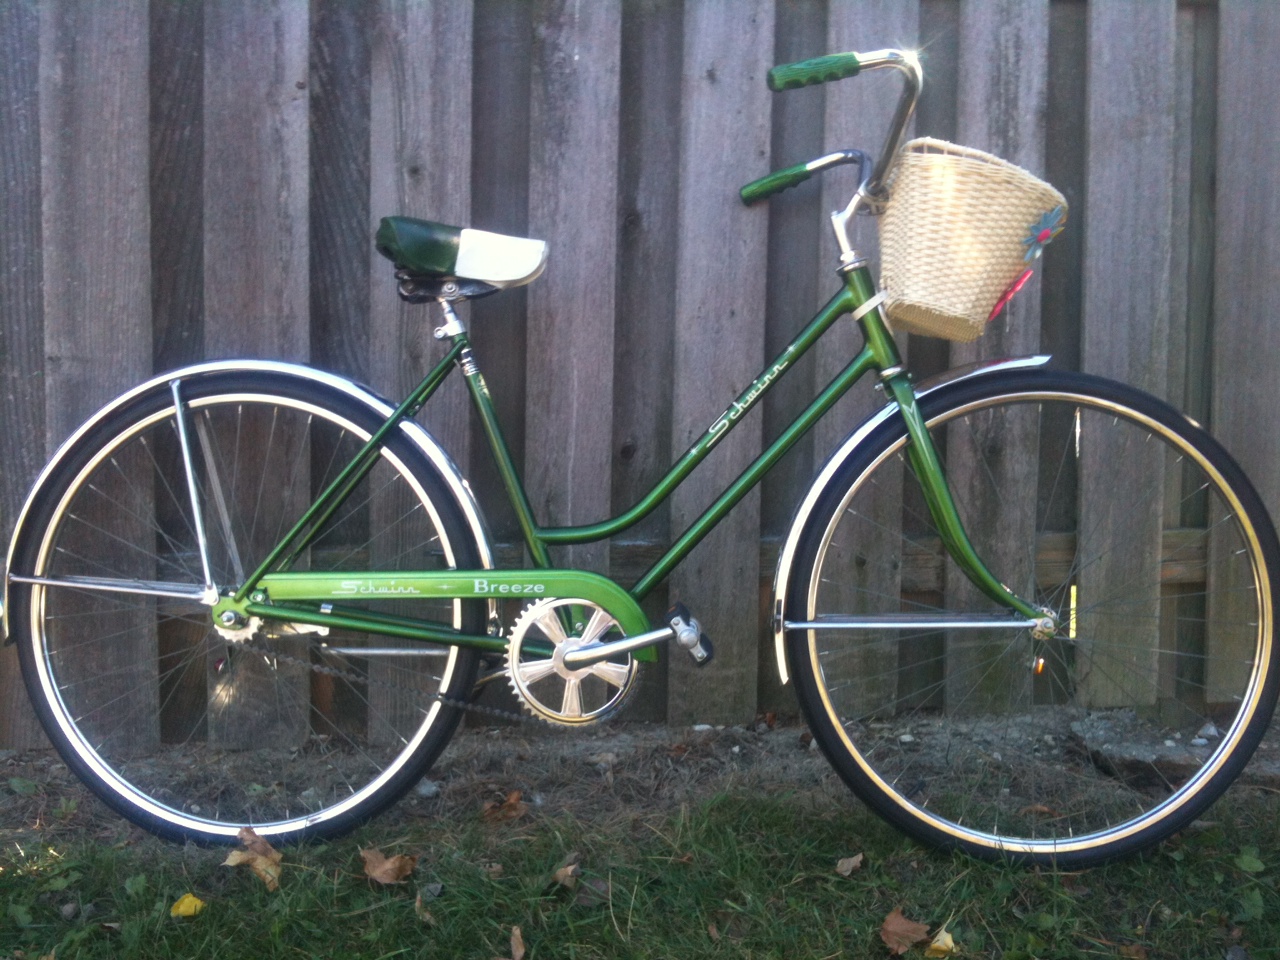
I gave the bikes a test ride today, they ride very smooth. The coaster brakes work fine, they will work a little better after being broken in. I may have polished the parts a little to clean. I took the photos outdoors. The bikes look great.
 |
| Breeze & Racer Finished |
 |
| Breeze & Racer Finished |
 |
| Breeze - Finished - Side View |
 |
| Breeze - Finished - Angle View |
 |
| Breeze - Finished - Drive Train |
 |
| Breeze - Finished - Rear View |
 |
| Breeze - Finished - Front View |
 |
| Racer - Finished - Side View |
 |
| Racer - Finished - Rear View |
 |
| Racer - Finished - Front View |