Last Spring Shannon found this Raleigh Grand Prix and we spent a very nice Saturday in Central Wisconsin exploring and picking it up. It struck me how nice the decals where for a 1973 Grand Prix.
I didn't really know how I wanted to proceed with the Grand Prix. It had the beautiful decals but the derailleurs and shift levers where the cheap plastic Simplex components that would break almost instantly. I thought about it for a couple months, I thought about finding a nice set of Sun Tour components from the same era. I thought about putting modern parts on it. I thought about finding even older components and making it a tribute to the Golden Era of Cycle Touring. In the end I decided to make it a single speed with some wide and aggressive tires. That is the direction I headed.
I got all the way to the point of mocking up new wheels with the wide and aggressive tires and test road it up and down the road. Then one day Joel was visiting the shop and saw the frame and fell in love with it like I did. That is when the build totally changed.
The post for the Raleigh will be in two parts. The original part of the build and then the change. This is the first part below.
The Grand Prix looked in pretty good shape to start but did not look as good as it actually was. I think the seat and foam handlebar tape did not help the look.
 |
| Joel's 1973 Raleigh Grand Prix Restoration Bicycle Before |
 |
| Joel's 1973 Raleigh Grand Prix Restoration Bicycle Before - Handlebars |
 |
| Joel's 1973 Raleigh Grand Prix Restoration Bicycle Before - Stem & Handlebars |
 |
| Joel's 1973 Raleigh Grand Prix Restoration Bicycle Before - Head Tube |
 |
| Joel's 1973 Raleigh Grand Prix Restoration Bicycle Before - Head Tube |
 |
| Joel's 1973 Raleigh Grand Prix Restoration Bicycle Before - Front Brake Caliper |
 |
| Joel's 1973 Raleigh Grand Prix Restoration Bicycle Before - Front Wheel Hub |
 |
| Joel's 1973 Raleigh Grand Prix Restoration Bicycle Before - Stem |
 |
| Joel's 1973 Raleigh Grand Prix Restoration Bicycle Before - Fork Crown |
 |
| Joel's 1973 Raleigh Grand Prix Restoration Bicycle Before - Front Wheel Hub |
 |
| Joel's 1973 Raleigh Grand Prix Restoration Bicycle Before - Front Wheel Hub |
 |
| Joel's 1973 Raleigh Grand Prix Restoration Bicycle Before - Front Wheel Rim |
 |
| Joel's 1973 Raleigh Grand Prix Restoration Bicycle Before - Top Tube |
 |
| Joel's 1973 Raleigh Grand Prix Restoration Bicycle Before - Shift Levers |
 |
| Joel's 1973 Raleigh Grand Prix Restoration Bicycle Before - Down Tube |
 |
| Joel's 1973 Raleigh Grand Prix Restoration Bicycle Before - Seat Post |
 |
| Joel's 1973 Raleigh Grand Prix Restoration Bicycle Before - Seat Tube |
 |
| Joel's 1973 Raleigh Grand Prix Restoration Bicycle Before - Bottom Bracket |
 |
| Joel's 1973 Raleigh Grand Prix Restoration Bicycle Before - Crank |
 |
| Joel's 1973 Raleigh Grand Prix Restoration Bicycle Before - Front Derailleur |
 |
| Joel's 1973 Raleigh Grand Prix Restoration Bicycle Before - Seat Lug |
 |
| Joel's 1973 Raleigh Grand Prix Restoration Bicycle Before - Rear Brake Caliper |
 |
| Joel's 1973 Raleigh Grand Prix Restoration Bicycle Before - Chain Stay |
 |
| Joel's 1973 Raleigh Grand Prix Restoration Bicycle Before - Rear Derailleur |
 |
| Joel's 1973 Raleigh Grand Prix Restoration Bicycle Before - Rear Wheel Hub |
 |
| Joel's 1973 Raleigh Grand Prix Restoration Bicycle Before - Rear Wheel Rim |
 |
| Joel's 1973 Raleigh Grand Prix Restoration Frame Before |
 |
| Joel's 1973 Raleigh Grand Prix Restoration Frame Before - Head Tube |
 |
| Joel's 1973 Raleigh Grand Prix Restoration Frame Before - Head Tube |
 |
| Joel's 1973 Raleigh Grand Prix Restoration Frame Before - Head Tube |
 |
| Joel's 1973 Raleigh Grand Prix Restoration Frame Before - Top Tube |
 |
| Joel's 1973 Raleigh Grand Prix Restoration Frame Before - Down Tube |
 |
| Joel's 1973 Raleigh Grand Prix Restoration Frame Before - Seat Lug |
 |
| Joel's 1973 Raleigh Grand Prix Restoration Frame Before - Seat Tube |
 |
| Joel's 1973 Raleigh Grand Prix Restoration Frame Before - Bottom Bracket |
 |
| Joel's 1973 Raleigh Grand Prix Restoration Frame Before - Bottom Bracket |
 |
| Joel's 1973 Raleigh Grand Prix Restoration Frame Before - Seat Stays |
 |
| Joel's 1973 Raleigh Grand Prix Restoration Frame Before - Seat Stays |
 |
| Joel's 1973 Raleigh Grand Prix Restoration Frame Before - Chain Stays |
 |
| Joel's 1973 Raleigh Grand Prix Restoration Frame Before - Chain Stays |
 |
| Joel's 1973 Raleigh Grand Prix Restoration Frame Before - Drop Outs |
 |
| Joel's 1973 Raleigh Grand Prix Restoration Frame Before - Fork |
 |
| Joel's 1973 Raleigh Grand Prix Restoration Frame Before - Fork Crown |
 |
| Joel's 1973 Raleigh Grand Prix Restoration Frame Before - Fork Crown |
 |
| Joel's 1973 Raleigh Grand Prix Restoration Frame Before - Fork Blade |
 |
| Joel's 1973 Raleigh Grand Prix Restoration Frame Before - Fork Blades |
 |
| Joel's 1973 Raleigh Grand Prix Restoration Frame Before - Fork Blades |
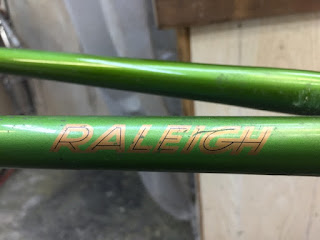
I cleaned the frame and started working through the polishing grits. I worked slowly and then the first wipe of the polishing residue reviled the beautifully perfect green paint! The paint was just stunning and was perfectly new! Old paint can be polished out and look amazing and liquid and smooth as glass but still lack that perfect newness, this Grand Prix has that perfect newness! It is so rare! Then the best thing showed up, those nice decals to start are perfect!! Just perfect!! The frame is absolutely perfect! The paint is the best paint I have ever seen for a frame over 40 years old!
 |
| Joel's 1973 Raleigh Grand Prix Restoration Frame Polished |
 |
| Joel's 1973 Raleigh Grand Prix Restoration Frame Polished - Head Tube |
 |
| Joel's 1973 Raleigh Grand Prix Restoration Frame Polished - Head Tube |
 |
| Joel's 1973 Raleigh Grand Prix Restoration Frame Polished - Head Tube |
 |
| Joel's 1973 Raleigh Grand Prix Restoration Frame Polished - Top Tube |
 |
| Joel's 1973 Raleigh Grand Prix Restoration Frame Polished - Down Tube |
 |
| Joel's 1973 Raleigh Grand Prix Restoration Frame Polished - Seat Lug |
 |
| Joel's 1973 Raleigh Grand Prix Restoration Frame Polished - Seat Tube |
 |
| Joel's 1973 Raleigh Grand Prix Restoration Frame Polished - Seat Tube |
 |
| Joel's 1973 Raleigh Grand Prix Restoration Frame Polished - Bottom Bracket |
 |
| Joel's 1973 Raleigh Grand Prix Restoration Frame Polished - Bottom Bracket |
 |
| Joel's 1973 Raleigh Grand Prix Restoration Frame Polished - Bottom Bracket |
 |
| Joel's 1973 Raleigh Grand Prix Restoration Frame Polished - Seat Lug |
 |
| Joel's 1973 Raleigh Grand Prix Restoration Frame Polished - Seat Stays |
 |
| Joel's 1973 Raleigh Grand Prix Restoration Frame Polished - Chain Stays |
 |
| Joel's 1973 Raleigh Grand Prix Restoration Frame Polished - Chain Stay |
 |
| Joel's 1973 Raleigh Grand Prix Restoration Frame Polished - Drop Outs |
 |
| Joel's 1973 Raleigh Grand Prix Restoration Frame Polished - Fork |
 |
| Joel's 1973 Raleigh Grand Prix Restoration Frame Polished - Fork Crown |
 |
| Joel's 1973 Raleigh Grand Prix Restoration Frame Polished - Fork Crown |
 |
| Joel's 1973 Raleigh Grand Prix Restoration Frame Polished - Fork Blade |
 |
| Joel's 1973 Raleigh Grand Prix Restoration Frame Polished - Fork Blade |
 |
| Joel's 1973 Raleigh Grand Prix Restoration Frame Polished - Fork Blade |
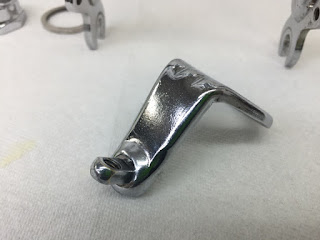
The headset and bottom bracket where in ok starting shape. I put the pieces through the crock pot and then worked through the polishing wheels. The headset and bottom bracket polished perfect! With new bearings and grease the headset and bottom bracket spin perfectly too!
 |
| Joel's 1973 Raleigh Grand Prix Restoration Headset * Bottom Bracket Before |
 |
| Joel's 1973 Raleigh Grand Prix Restoration Cable Hanger Before |
 |
| Joel's 1973 Raleigh Grand Prix Restoration Headset & Bottom Bracket Polished |
 |
| Joel's 1973 Raleigh Grand Prix Restoration Cable Hanger Polished |
 |
| Joel's 1973 Raleigh Grand Prix Restoration Pressing Headset Cups |
 |
| Joel's 1973 Raleigh Grand Prix Restoration Headset Cups Pressed |
 |
| Joel's 1973 Raleigh Grand Prix Restoration Headset Bearings Packed |
 |
| Joel's 1973 Raleigh Grand Prix Restoration Headset Complete |
 |
| Joel's 1973 Raleigh Grand Prix Restoration Headset Complete |
 |
| Joel's 1973 Raleigh Grand Prix Restoration Headset Complete |
 |
| Joel's 1973 Raleigh Grand Prix Restoration Bottom Bracket Bearings Packed |
 |
| Joel's 1973 Raleigh Grand Prix Restoration Bottom Bracket Complete |
 |
| Joel's 1973 Raleigh Grand Prix Restoration Bottom Bracket Complete |
 |
| Joel's 1973 Raleigh Grand Prix Restoration Headset & Bottom Bracket Complete |
The handlebars do not look that great to start, I think it is the old foam handlebar tape that makes them look bad. I cut the foam tape off, broke down all the pieces and then worked through the polishing wheels. The stem turned out amazing!! Just amazing and perfect!! The handlebars turned out the same way!! I love this stuff!!
 |
| Joel's 1973 Raleigh Grand Prix Restoration Handlebars Before |
 |
| Joel's 1973 Raleigh Grand Prix Restoration Handlebars & Stem Before |
 |
| Joel's 1973 Raleigh Grand Prix Restoration Handlebars Before |
 |
| Joel's 1973 Raleigh Grand Prix Restoration Stems Before |
 |
| Joel's 1973 Raleigh Grand Prix Restoration Stem Exploded View |
 |
| Joel's 1973 Raleigh Grand Prix Restoration Handlebars & Stem Polished |
 |
| Joel's 1973 Raleigh Grand Prix Restoration Handlebars Polished |
 |
| Joel's 1973 Raleigh Grand Prix Restoration Stem Polished |
 |
| Joel's 1973 Raleigh Grand Prix Restoration Stem Complete |
 |
| Joel's 1973 Raleigh Grand Prix Restoration Handlebars & Stem Complete |
 |
| Joel's 1973 Raleigh Grand Prix Restoration Stem & Handlebars Complete |
 |
| Joel's 1973 Raleigh Grand Prix Restoration Stem & Handlebars Complete |
 |
| Joel's 1973 Raleigh Grand Prix Restoration Stem & Handlebar Complete |
I removed the white Carlton brake lever hoods to protect them and then worked through the polishing wheels. The brake elvers are better then new!
 |
| Joel's 1973 Raleigh Grand Prix Restoration Brake Levers Before |
 |
| Joel's 1973 Raleigh Grand Prix Restoration Brake Levers Polished |
 |
| Joel's 1973 Raleigh Grand Prix Restoration Brake Levers Installed |
 |
| Joel's 1973 Raleigh Grand Prix Restoration Brake Levers Complete |
 |
| Joel's 1973 Raleigh Grand Prix Restoration Seat Post Before |
 |
| Joel's 1973 Raleigh Grand Prix Restoration Seat Post Before |
 |
| Joel's 1973 Raleigh Grand Prix Restoration Seat Post Polished |
 |
| Joel's 1973 Raleigh Grand Prix Restoration Seat Post Installed |
 |
| Joel's 1973 Raleigh Grand Prix Restoration Seat Post Installed |
 |
| Joel's 1973 Raleigh Grand Prix Restoration Seat Post Installed |
One of the crank cotter pins was frozen in place. I had to drill the crank cotter pin out. I real pain . With the crank removed I cleaned all the pieces and worked through the polishing wheels. The crank turned out very nicely. I assembled the crank as a single speed crank. Installed the crank looked great with the green perfect paint!
 |
| Joel's 1973 Raleigh Grand Prix Restoration Crank Before |
 |
| Joel's 1973 Raleigh Grand Prix Restoration Drilled Crank Cotter |
 |
| Joel's 1973 Raleigh Grand Prix Restoration Crank Polished |
 |
| Joel's 1973 Raleigh Grand Prix Restoration Crank Complete |
 |
| Joel's 1973 Raleigh Grand Prix Restoration New Crank Cotter Pins |
 |
| Joel's 1973 Raleigh Grand Prix Restoration Crank Installed |
 |
| Joel's 1973 Raleigh Grand Prix Restoration Crank Installed |
The brake calipers are center pull calipers. I like center pull calipers like these, they usually restore beautifully and have plenty of clearance for tires. The best part is center pull brake calipers actually work compared the the same era side pull brake calipers. The brake calipers did not look in the greatest shape when I started. I broke the calipers down and cleaned all the pieces and then worked through the polishing wheels. The pieces of the brake calipers seemed to be polishing nicely as I worked and then I assembled the brake calipers. While assembling the calipers the pieces transformed from nicely polished pieces to the most beautiful center pull brake calipers I have ever seen! I love this stuff!!!
 |
| Joel's 1973 Raleigh Grand Prix Restoration Brake Calipers Before |
 |
| Joel's 1973 Raleigh Grand Prix Restoration Brake Calipers Exploded |
 |
| Joel's 1973 Raleigh Grand Prix Restoration Brake Calipers Polished |
 |
| Joel's 1973 Raleigh Grand Prix Restoration Brake Calipers Complete |
 |
| Joel's 1973 Raleigh Grand Prix Restoration Front Brake Caliper Installed |
 |
| Joel's 1973 Raleigh Grand Prix Restoration Rear Brake Caliper Installed |
 |
| Joel's 1973 Raleigh Grand Prix Restoration Calipers Complete |
At this time I test fit the wheels I built up for the Grand Prix with 40 mm tires. The wheels and tires made the Grand Prix look like a beast!! I loved it!!
 |
| Joel's 1973 Raleigh Grand Prix Restoration Wheels Test Fitted |
With the wheels test fit it was time to wire the Grand Prix. I thought about the cable housing color for the Grand Prix for a long time. I thought white like the Grand Prix had originally. I then tried the dark gray, that was not quite right. The next I tried a light silver and it was nice but then it hit me. The Gold metallic braided cable! Perfect! Amazing!! Best combination of color I have ever seen!! It makes the whole bike!!
 |
| Joel's 1973 Raleigh Grand Prix Restoration New Cables & Cable Housings |
 |
| Joel's 1973 Raleigh Grand Prix Restoration Cables & Housings Installed |
 |
| Joel's 1973 Raleigh Grand Prix Restoration Cables & Housings Installed |
 |
| Joel's 1973 Raleigh Grand Prix Restoration Cables & Cable Housings Installed |
This is where Joel saw the Grand Prix on his visit to the shop and an even better build was formulated. See soon!
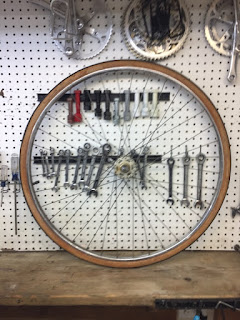
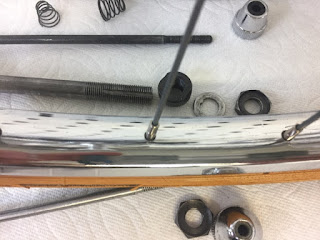
The original wheels are going to be used but not the original tires. The wheels have very nice alloy hubs and steel rims. Steel rims are not idea but the bike will be rarely ridden in the rain. I broke the wheel hubs down and started the cleaning and polishing process. The wheel hubs turned out fantastic and the rims look great! With new bearings and grease the wheels spin beautifully! When the Panaracer tires are installed the wheels will be perfect!
 |
| Joel's 1973 Raleigh Grand Prix Restoration Front Wheel Before |
 |
| Joel's 1973 Raleigh Grand Prix Restoration Front Wheel Hub Before |
 |
| Joel's 1973 Raleigh Grand Prix Restoration Front Wheel Rim Before |
 |
| Joel's 1973 Raleigh Grand Prix Restoration Front Wheel Hub Old Grease |
 |
| Joel's 1973 Raleigh Grand Prix Restoration Axle Pieces Ready |
 |
| Joel's 1973 Raleigh Grand Prix Restoration Front Wheel Hub Polished |
 |
| Joel's 1973 Raleigh Grand Prix Restoration Front Wheel Rim Polished |
 |
| Joel's 1973 Raleigh Grand Prix Restoration Front Wheel Bearings Packed |
 |
| Joel's 1973 Raleigh Grand Prix Restoration Front Wheel Hub Complete |
 |
| Joel's 1973 Raleigh Grand Prix Restoration Front Wheel Complete |
 |
| Joel's 1973 Raleigh Grand Prix Restoration Rear Wheel Before |
 |
| Joel's 1973 Raleigh Grand Prix Restoration Rear Wheel Hub Before |
 |
| Joel's 1973 Raleigh Grand Prix Restoration Rear Wheel Hub Before |
 |
| Joel's 1973 Raleigh Grand Prix Restoration Rear Wheel Rim Before |
 |
| Joel's 1973 Raleigh Grand Prix Restoration Rear Wheel Hub Old Grease |
 |
| Joel's 1973 Raleigh Grand Prix Restoration Rear Wheel Hub Polished |
 |
| Joel's 1973 Raleigh Grand Prix Restoration Rear Wheel Hub Bearings Packed |
 |
| Joel's 1973 Raleigh Grand Prix Restoration Rear Wheel Complete |
 |
| Joel's 1973 Raleigh Grand Prix Restoration Wheels Complete |
Now the real fun starts! Joel was able to find Campagnolo parts from a 1973 Raleigh Professional that has moved on to a different life and set up. The components are in beautiful shape so the main thing I will be doing is cleaning and lubricating. Its always a dilemma for me when it comes to parts like these. They are valuable parts and have collector value, I could make them highly polished and and very bright but I think that losses the character. So mainly I gave all the parts a very deep cleaning and very very light hand polishing along with lubricating when needed.
The derailleur are beautiful. I gave them a deep cleaning and some time in the sonic cleaners. Just a little hand polishing to even the surface out. Lubricated and ready to go! The Raleigh doesn't have a derailleur hanger built into the rear drop out so I had to take a Suntour derailleur hanger and then cut it with a jeweler's saw to fit the unique shape of a Campagnolo derailleur. Over all I am very happy how the derailleurs turned out!
 |
| Joel's 1973 Raleigh Grand Prix Restoration Derailleurs Before |
 |
| Joel's 1973 Raleigh Grand Prix Restoration Rear Derailleur Cleaned and Hand Polished |
 |
| Joel's 1973 Raleigh Grand Prix Restoration Rear Derailleur Cleaned and Hand Polished |
 |
| Joel's 1973 Raleigh Grand Prix Restoration Derailleur Hanger Cut |
 |
| Joel's 1973 Raleigh Grand Prix Restoration Derailleur Hanger Installed |
 |
| Joel's 1973 Raleigh Grand Prix Restoration Rear Derailleur Installed |
The front derailleur I used the power polishing wheel to polish the chrome. I think that made a nice difference. I also used the polishing wheel for the small hardware that was chrome.
 |
| Joel's 1973 Raleigh Grand Prix Restoration Front Derailleur Cleaned and Polished |
 |
| Joel's 1973 Raleigh Grand Prix Restoration Front Derailleur Installed |
 |
| Joel's 1973 Raleigh Grand Prix Restoration Front Derailleur Installed |
 |
| Joel's 1973 Raleigh Grand Prix Restoration Shift Levers Before |
 |
| Joel's 1973 Raleigh Grand Prix Restoration Shift Levers Before |
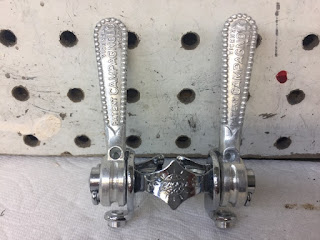 |
| Joel's 1973 Raleigh Grand Prix Restoration Shift Levers Polished |
 |
| Joel's 1973 Raleigh Grand Prix Restoration Shift Levers Complete |
 |
| Joel's 1973 Raleigh Grand Prix Restoration Shift Levers Installed |
 |
| Joel's 1973 Raleigh Grand Prix Restoration Shift Levers Installed |
 |
| Joel's 1973 Raleigh Grand Prix Restoration Brooks Saddle BEfore |
 |
| Joel's 1973 Raleigh Grand Prix Restoration Brooks Saddle Cleaned & Proof Hide |
 |
| Joel's 1973 Raleigh Grand Prix Restoration Brooks Saddle Installed |
 |
| Joel's 1973 Raleigh Grand Prix Restoration Brooks Saddle Installed |
There really is no crank as beautiful as a Campy crank. The crank is in great shape. It actually fought a little on the cleaning process but in the end it turned out great! Just a little light hand polishing and its perfect and it looks incredible with that polished Bronze Green paint!!
 |
| Joel's 1973 Raleigh Grand Prix Restoration Crank Before |
 |
| Joel's 1973 Raleigh Grand Prix Restoration Crank Before |
 |
| Joel's 1973 Raleigh Grand Prix Restoration Crank Before |
 |
| Joel's 1973 Raleigh Grand Prix Restoration Crank Polished |
 |
| Joel's 1973 Raleigh Grand Prix Restoration Crank Installed - Beautiful!! |
 |
| Joel's 1973 Raleigh Grand Prix Restoration Crank Installed |
The handlebars, stem and brake levers are beautiful. The handlebars are GB with some incredible engravings. The Stem is a TTT. One of the brake lever hoods had a small tear in it. I tried to glue it together but it just wouldn't hold. Joel was able to source NOS hoods that came from Italy and where installed after the bike was complete. The stem I hand polished, it was more then just light polishing, I put a lot of time into hand polishing the stem and handlebars. I think the time was worth it! It removed a lot of oxidation. Installed the handlebars, stem and brake levers look amazing! I love this stuff!!
 |
| Joel's 1973 Raleigh Grand Prix Restoration Handlebars - Stem - Brake Levers - Before |
 |
| Joel's 1973 Raleigh Grand Prix Restoration Handlebars Installed |
 |
| Joel's 1973 Raleigh Grand Prix Restoration Handlebars Installed |
 |
| Joel's 1973 Raleigh Grand Prix Restoration Handlebars Installed |
I chose the Ritchey synthetic leather brown handlebar tape to match the saddle. It looks fantastic but hasn't been holding up as well as it normally does. Installed the tape looks amazing or I should say the bike looks even more amazing.
 |
| Joel's 1973 Raleigh Grand Prix Restoration Ritchey Handlebar Tape |
 |
| Joel's 1973 Raleigh Grand Prix Restoration Handlebar Tape Installed |
 |
| Joel's 1973 Raleigh Grand Prix Restoration Handlebar Tape Installed |
 |
| Joel's 1973 Raleigh Grand Prix Restoration New Panaracer Tires |
 |
| Joel's 1973 Raleigh Grand Prix Restoration Panaracer Tires Installed |
I installed a light color gold chain that looked great with the theme of the Gran Prix but the chain was just to wide to work with the Campy front derailleur. I like to install wider chains on bicycles from this era because the wider chain actually works better with the spacing of the rear cogs and the derailleurs from this era but just doesn't seem to work with campy.
 |
| Joel's 1973 Raleigh Grand Prix Restoration Chain Installed |
The Raleigh Grand Prix took a good deal of tuning and fine tuning but once I got it the Grand Prix rides beautifully! There is nothing quite like the ride of a bicycle from this era when it is back to new!! Throw in the Campagnolo components and it is amazing!
Best part of the Grand Prix is the looks!! All I can say is CLASSIC!! I don't know if it gets better, a color you don't see today, leather, gold, chrome, alloy, gum wall! Just Awesome!!!
I didn't even come close to imagining the way the Grand Prix came out when I first found it with the rotted tires, bad Simplex parts and foam handlebar tape but now I think it may be the best Grand Prix ever!!
 |
| Joel's 1973 Raleigh Grand Prix Restoration Bicycle Complete |
 |
| Joel's 1973 Raleigh Grand Prix Restoration Bicycle Complete |
 |
| Joel's 1973 Raleigh Grand Prix Restoration Bicycle Complete - Handlebars |
 |
| Joel's 1973 Raleigh Grand Prix Restoration Bicycle Complete - Stem & Handlebars |
 |
| Joel's 1973 Raleigh Grand Prix Restoration Bicycle Complete - Head Tube |
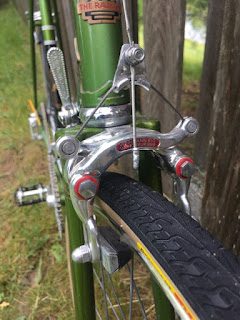 |
| Joel's 1973 Raleigh Grand Prix Restoration Bicycle Complete - Front Brake |
 |
| Joel's 1973 Raleigh Grand Prix Restoration Bicycle Complete - Front Wheel Hub |
 |
| Joel's 1973 Raleigh Grand Prix Restoration Bicycle Complete - Front Wheel Rim |
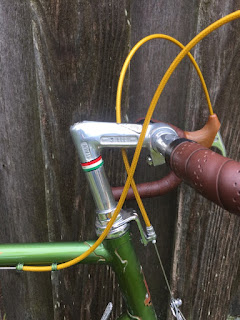 |
| Joel's 1973 Raleigh Grand Prix Restoration Bicycle Complete - Stem |
 |
| Joel's 1973 Raleigh Grand Prix Restoration Bicycle Complete - Handleabrs |
 |
| Joel's 1973 Raleigh Grand Prix Restoration Bicycle Complete - Head Tube |
 |
| Joel's 1973 Raleigh Grand Prix Restoration Bicycle Complete - Shift Levers |
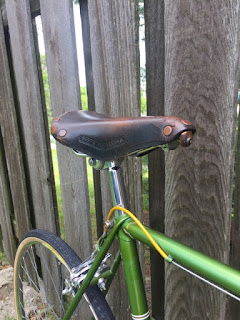 |
| Joel's 1973 Raleigh Grand Prix Restoration Bicycle Complete - Brooks Saddle |
 |
| Joel's 1973 Raleigh Grand Prix Restoration Bicycle Complete - Seat Tube |
 |
| Joel's 1973 Raleigh Grand Prix Restoration Bicycle Complete - Bottom Bracket |
 |
| Joel's 1973 Raleigh Grand Prix Restoration Bicycle Complete - Top Tube |
 |
| Joel's 1973 Raleigh Grand Prix Restoration Bicycle Complete - Down Tube |
 |
| Joel's 1973 Raleigh Grand Prix Restoration Bicycle Complete - Drive Train |
 |
| Joel's 1973 Raleigh Grand Prix Restoration Bicycle Complete - Front Derailleur |
 |
| Joel's 1973 Raleigh Grand Prix Restoration Bicycle Complete - Saddle |
 |
| Joel's 1973 Raleigh Grand Prix Restoration Bicycle Complete - Rear Brake |
 |
| Joel's 1973 Raleigh Grand Prix Restoration Bicycle Complete - Rear Derailleur |
 |
| Joel's 1973 Raleigh Grand Prix Restoration Bicycle Complete - Rear Wheel Hub |
 |
| Joel's 1973 Raleigh Grand Prix Restoration Bicycle Complete - Rear Wheel Rim |
 |
| Joel's 1973 Raleigh Grand Prix Restoration Bicycle Complete |
John Z.

I look forward to Part II, this post is like a walk down memory lane as about the 5th old 10 speed I rebuilt was a Gran Prix of this same era and the same "Bronze Green" color - your work on the frame came out stunning btw, I also had an issue with a stuck cotter pin on min and it encouraged me to shell out for a bikesmith cotter press which has worked like a champ. Your GB stem looks brand new as do the brakes as nice as the 610s Velo Orange has for sale great job! Finally I have used that gold jagwire cable set on a few builds and have always loved the result and it looks great on the GP. Your Friend is going to get a jewel.
ReplyDeleteI've only recently gotten into bikes, but already am planning to restore my own bike once I find a suitable touring frame. I find your work fascinating and absolutely gorgeous... hoping I can pick up something useful while browsing your blog. Keep it up!
ReplyDeleteWhich model of Panaracer tires are those? I like the style and tread. Fantastic build! Beautiful!
ReplyDeleteLoved seeing this bike. I bought one new in 1973 as a 12 year old with money that I’d saved & earned ($129 + tax). Rode it EVERYWHERE and had many an adventure on that saddle.
ReplyDeleteI still have my 1972 in blue bought at age 14 for $112 with paper route money. This post has spurred me to think about a restoration project. Cheaper than restoration of an old car me thinks!
ReplyDelete