This is Mike's Columbia Chopper restoration. This is just crazy cool! I did not know much about the Columbia Chopper before Mike brought it to the shop. From research I believe there was 3 versions on the Columbia Chopper. This is the single speed version.
The Columbia came to the shop in a couple of boxes. The crank was missing. It took me sometime to find crank pieces that would work for the Columbia. I basically found pieces from many different cranks that fit the frame, the original bottom bracket bearing cups and a chain ring that looks similar to the original.
The chopper is going to receive a total restoration a long with new paint, new tires and tubes, all new bearings and a few other new pieces along the way. My painting skills are not good enough to reproduce the original metallic fade. Originally we where going to go with a candy red paint scheme but have later changed that scheme to a yellow like the Schwinn Cool Yellow. I like the yellow choice a lot!
 |
| Mike's Columbia Chopper Bicycle - Frame Before |
 |
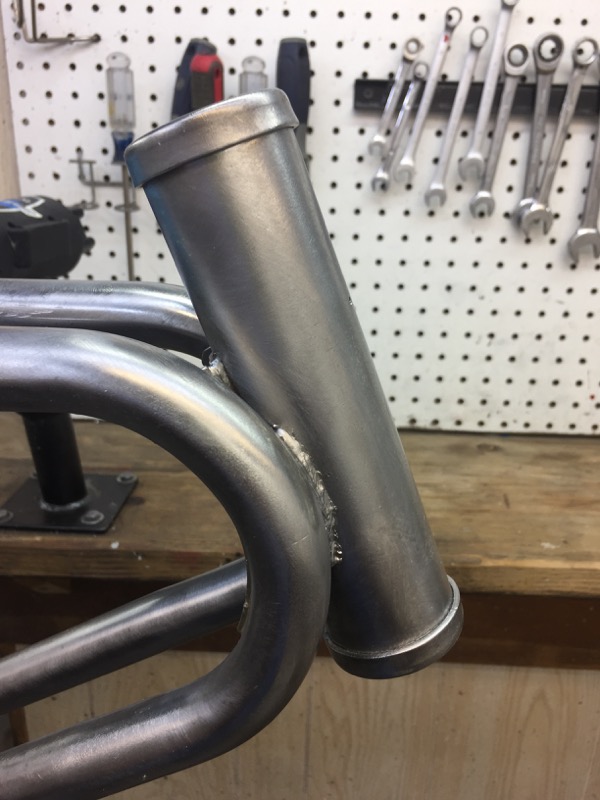
| Mike's Columbia Chopper Bicycle - Frame Before Head Tube |
 |
| Mike's Columbia Chopper Bicycle - Frame Before Head Tube |
 |
| Mike's Columbia Chopper Bicycle - Frame Before Head Tube |
 |
| Mike's Columbia Chopper Bicycle - Frame Before Top Tubes |
 |
| Mike's Columbia Chopper Bicycle - Frame Before Top Tubes |
 |
| Mike's Columbia Chopper Bicycle - Frame Before Seat Lug Area |
 |
| Mike's Columbia Chopper Bicycle - Frame Before Down Tubes |
 |
| Mike's Columbia Chopper Bicycle - Frame Before Bottom Bracket Area |
 |
| Mike's Columbia Chopper Bicycle - Frame Before Bottom Bracket Area |
 |
| Mike's Columbia Chopper Bicycle - Frame Before Seat Tube |
 |
| Mike's Columbia Chopper Bicycle - Frame Before Rear Seat Stays |
 |
| Mike's Columbia Chopper Bicycle - Frame Before Drop Outs |
 |
| Mike's Columbia Chopper Bicycle - Frame Before Rear |
 |
| Mike's Columbia Chopper Bicycle - Frame Before Chain Stays |
I chemically removed the paint from the Columbus frame and then gave the frame a good cleaning. The photos below are of the frame after chemical paint stripping and cleaning but before a light media blasting. I usually don't take the photos after the media blasting because the frame goes right from the media blasting cabinet into a cleaning solution and right on to the powder coating rack. I don't really move it around from there to take photos because the frame needs to stay absolutely perfectly clean. Moving it for photos just adds dirt.
 |
| Mike's Columbia Chopper Bicycle - Frame Paint Stripped |
 |
| Mike's Columbia Chopper Bicycle - Frame Paint Stripped Head Tube |
 |
| Mike's Columbia Chopper Bicycle - Frame Paint Stripped Head Tube |
 |
| Mike's Columbia Chopper Bicycle - Frame Paint Stripped Head Tube |
 |
| Mike's Columbia Chopper Bicycle - Frame Paint Stripped Down Tubes |
 |
| Mike's Columbia Chopper Bicycle - Frame Paint Stripped Seat Area |
 |
| Mike's Columbia Chopper Bicycle - Frame Paint Stripped Bottom Bracket |
 |
| Mike's Columbia Chopper Bicycle - Frame Paint Stripped Bottom Bracket |
 |
| Mike's Columbia Chopper Bicycle - Frame Paint Stripped Chain Stays |
 |
| Mike's Columbia Chopper Bicycle - Frame Paint Stripped Rear |
 |
| Mike's Columbia Chopper Bicycle - Frame Paint Stripped Drop Outs |
 |
| Mike's Columbia Chopper Bicycle - Frame Paint Stripped Rear |
Below is a photo of the frame after the first coat of powder, the yellow base coat. It turned out horrible, I am thinking the powder is bad, the bag it was shipped in was not closed tightly in the box so I think it might have gotten some humidity in it. Today I after re-stripped the paint and will be starting over. Sometimes the clear layer will smooth everything out but I am not even going try here, the yellow layer is just to bad.
 |
| Mike's Columbia Chopper Bicycle - Frame Paint Stripped Bad Paint |
This Columbia frame has proven to be a real challenge to powder coat. I think it was because there is so many types of mental and thickness. When I would bake the powder it would bake unevenly. At least that is what I think.
What also proved to be a challenge was getting the powder evenly in all the nooks of the frame. What also was bugging me it the sloppy welds with spatter all over. I cleaned up a lot of the splatter and booger welds with a files the best I could. I don't know if I made a huge difference cleaning up the welds with a file but I think it helped some.
I ended up painting the frame three times until I was happy with it. The powder is a little thicker then I wanted it to be but that is to help fill and smooth out everything and to help in the welds area. I am actually very happy at this point with the results and work put into it. The yellow looks great, I think it will really pop when the chrome starts going on the bike.
 |
| Mike's Columbia Chopper Bicycle - Frame Paint Complete |
 |
| Mike's Columbia Chopper Bicycle - Frame Paint Complete Head Tube |
 |
| Mike's Columbia Chopper Bicycle - Frame Paint Complete Head Tube |
 |
| Mike's Columbia Chopper Bicycle - Frame Paint Complete Head Tube |
 |
| Mike's Columbia Chopper Bicycle - Frame Paint Complete Seat Tube Area |
 |
| Mike's Columbia Chopper Bicycle - Frame Paint Complete Seat Tube |
 |
| Mike's Columbia Chopper Bicycle - Frame Paint Complete Bottom Bracket Area |
 |
| Mike's Columbia Chopper Bicycle - Frame Paint Complete Bottom Bracket |
 |
| Mike's Columbia Chopper Bicycle - Frame Paint Complete Rear Area |
 |
| Mike's Columbia Chopper Bicycle - Frame Paint Complete Seat Struts |
 |
| Mike's Columbia Chopper Bicycle - Frame Paint Complete |
The fork is so cool, so stretched out and looks cool the way the handlebars connect. The fork blades are a little rough with surface rust and the handlebars have a little bit of chrome damage but the handlebars are not to bad. I cleaned all the pieces and worked through the polishing wheels. The handlebars and fork polished great considering where they started. I am very happy with the results of the handlebars and fork.
The headset is very neat in its simplicity. It uses thread-less brass flange nuts to fit in the frame and then a smooth bolt through them. I cleaned and polished all the pieces, the pieces polished great. I installed the fork and tightened the crown nut at the bottom. The crown nut uses a cotter pin to keep it in place but I have not installed it yet just in case I have to take the fork apart again. Overall I am very happy how the fork and handlebars looks with the new yellow paint!
 |
| Mike's Columbia Chopper Bicycle - Handlebars & Fork Before |
 |
| Mike's Columbia Chopper Bicycle - Handlebars Before |
 |
| Mike's Columbia Chopper Bicycle - Handlebars Before |
 |
| Mike's Columbia Chopper Bicycle - Handlebars Before |
 |
| Mike's Columbia Chopper Bicycle - Fork Before |
 |
| Mike's Columbia Chopper Bicycle - Fork Before |
 |
| Mike's Columbia Chopper Bicycle - Fork Blades Before |
 |
| Mike's Columbia Chopper Bicycle - Fork Blades Before |
 |
| Mike's Columbia Chopper Bicycle - Fork Blade Before |
 |
| Mike's Columbia Chopper Bicycle - Fork Blade Before |
 |
| Mike's Columbia Chopper Bicycle - Fork Blade Before |
 |
| Mike's Columbia Chopper Bicycle - Fork Blade Before |
 |
| Mike's Columbia Chopper Bicycle - Fork Plate Before |
 |
| Mike's Columbia Chopper Bicycle - Handlebars Before |
 |
| Mike's Columbia Chopper Bicycle - Handlebars Before |
 |
| Mike's Columbia Chopper Bicycle - Handlebars Before |
 |
| Mike's Columbia Chopper Bicycle - Headset Before |
 |
| Mike's Columbia Chopper Bicycle -Handlebars Polished |
 |
| Mike's Columbia Chopper Bicycle - Handlebars Polished |
 |
| Mike's Columbia Chopper Bicycle - Fork Plate Poliushed |
 |
| Mike's Columbia Chopper Bicycle - Fork Polished |
 |
| Mike's Columbia Chopper Bicycle - Fork Polished |
 |
| Mike's Columbia Chopper Bicycle - Fork Polished |
 |
| Mike's Columbia Chopper Bicycle - Headset Polished |
 |
| Mike's Columbia Chopper Bicycle - Brass Flange Nuts Installed |
 |
| Mike's Columbia Chopper Bicycle - Fork Complete |
 |
| Mike's Columbia Chopper Bicycle - Fork Complete |
 |
| Mike's Columbia Chopper Bicycle - Fork Complete |
 |
| Mike's Columbia Chopper Bicycle - Handlebars Installed |
 |
| Mike's Columbia Chopper Bicycle - Fork & Handlebars Installed |
The yellow paint was really bothering me. It didn't look very even. Yellow paint has to go on to a certain thickness to keep the underneath surface from showing through. The frame has so many nooks and crannies to get into and hard to reach areas with the double tubing that I could just not get the yellow even. We switched the color to this metallic flake green color. It gives the frame a lot more pop and looks so much more even. It has that 1960's crazy gasser look. It was by far the hardest frame I ever painted and had to go backwards a few times to get it better in areas but I am very happy with it now.
 |
| Mike's Columbia Chopper Bicycle - Metallic Flake Paint Complete |
 |
| Mike's Columbia Chopper Bicycle - Metallic Flake Paint Complete |
 |
| Mike's Columbia Chopper Bicycle - Metallic Flake Paint Complete |
 |
| Mike's Columbia Chopper Bicycle - Metallic Flake Paint Complete |
 |
| Mike's Columbia Chopper Bicycle - Metallic Flake Paint Complete |
 |
| Mike's Columbia Chopper Bicycle - Metallic Flake Paint Complete |
 |
| Mike's Columbia Chopper Bicycle - Metallic Flake Paint Complete |
 |
| Mike's Columbia Chopper Bicycle - Metallic Flake Paint Complete |
The wheels, wheel rims, sissy bar pieces and fork and handlebars had a lot of rust on them. When there is this much rust I find the best way to handle it is to use an electrolysis tub and battery charger. You connect the piece you want the rust removed fro to the negative current. You then connect the positive flow to a piece of iron. The water solution is made into an alkaline solution to help current flow. You make sure the piece of iron and the piece to have the rust removed are not touching and you let it sit a while with the battery charger on. About 1.5 to 2 amps runs through it. After a while the rust is removed. The rust pitting is still there but no rust and the piece can be polished and treated. The photo below with the water solution looking very nasty is after about an hour on just the rim.
 |
| Mike's Columbia Chopper Bicycle - Battery Charger Rust Removal |
 |
| Mike's Columbia Chopper Bicycle - Battery Charger Rust Removal |
 |
| Mike's Columbia Chopper Bicycle - Battery Charger Rust Removal |
 |
| Mike's Columbia Chopper Bicycle - Battery Charger Rust Removal |
 |
| Mike's Columbia Chopper Bicycle - Battery Charger Rust Removal |
The sissy bar pieces had some rough rust. They went through the rust removal tub and then polished on the polishing wheels. They are not perfect but at least a lot better then they where. I replaced all the nuts, bolts, washers and brackets with new chrome ones.
 |
| Mike's Columbia Chopper Bicycle - Sissy Bar Piece - Before |
 |
| Mike's Columbia Chopper Bicycle - Sissy Bar Piece - Before |
 |
| Mike's Columbia Chopper Bicycle - Sissy Bar Piece - Before |
 |
| Mike's Columbia Chopper Bicycle - Sissy Bar Piece - After |
The seat for the chopper is just very cool. It had some scuffs on it. I cleaned the seat and removed most of the scuffs, a few where a little deep and just tried to remove as much as I could with out removing to much material.
 |
| Mike's Columbia Chopper Bicycle - Seat |
 |
| Mike's Columbia Chopper Bicycle - Seat and Sissy Bar Installed |
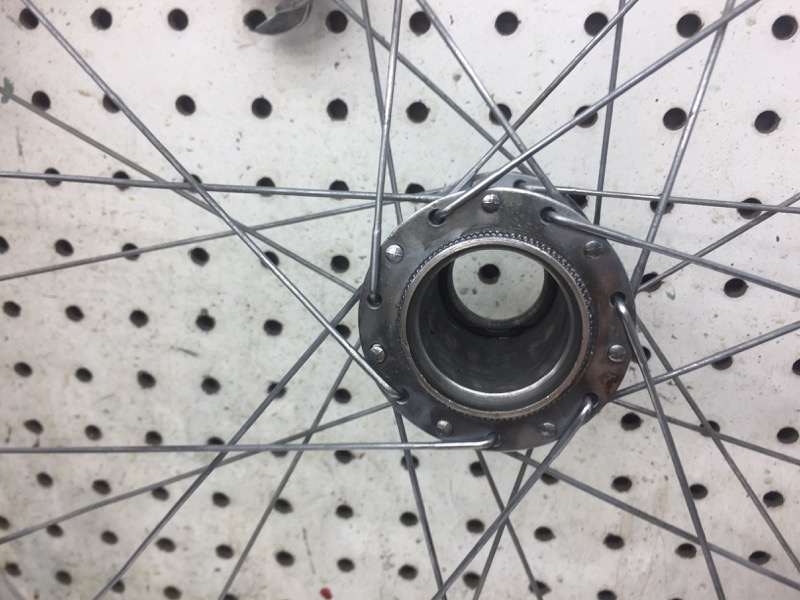
The wheels where a little rough. The went through the rust removing tub and then I polished the heck out of them. I also put a ton of work in on the spokes. The spokes turned out very nice and in a couple of months the galvanizing on the spokes will really even out and look like they where new. with everything polished the spoke nipples look awful. I put a good deal of work into the spoke nipples filing the surface and then smoothing out and polishing all the spoke nipples. The brass spoke nipples now look fantastic. With the new front tire installed and the old rear slick the wheels look great. The rear wheel hub and all the polished pieces, especially the coaster brake arm look fantastic. The wheels are not perfect but I am very proud of how they look now from where they came from.
 |
| Mike's Columbia Chopper Bicycle - Front Wheel Hub Before |
 |
| Mike's Columbia Chopper Bicycle - Front Wheel Hub Before |
 |
| Mike's Columbia Chopper Bicycle - Front Wheel Rim Before |
 |
| Mike's Columbia Chopper Bicycle - Front Wheel Hub Before |
 |
| Mike's Columbia Chopper Bicycle - Front Wheel Hub Before |
 |
| Mike's Columbia Chopper Bicycle - Front Wheel Hub After |
 |
| Mike's Columbia Chopper Bicycle - Axle Pices Ready |
 |
| Mike's Columbia Chopper Bicycle - Front Wheel Bearings Packed |
 |
| Mike's Columbia Chopper Bicycle - Front Wheel Rim After |
 |
| Mike's Columbia Chopper Bicycle - Front Tire Installed |
 |
| Mike's Columbia Chopper Bicycle - Front Wheel Complete |
 |
| Mike's Columbia Chopper Bicycle - Front Wheel Complete |
 |
| Mike's Columbia Chopper Bicycle - Front Wheel Complete |
 |
| Mike's Columbia Chopper Bicycle - Front Wheel Complete |
 |
| Mike's Columbia Chopper Bicycle - Rear Wheel Before |
 |
| Mike's Columbia Chopper Bicycle -Rear Wheel Hub Before |
 |
| Mike's Columbia Chopper Bicycle -Rear Wheel Rim Before |
 |
| Mike's Columbia Chopper Bicycle -Rear Wheel Axle & Coaster Brake Pieces |
 |
| Mike's Columbia Chopper Bicycle - Rear Wheel Hub Before |
 |
| Mike's Columbia Chopper Bicycle - Rear Wheel Hub Before |
 |
| Mike's Columbia Chopper Bicycle - Rear Wheel Hub AFter |
 |
| Mike's Columbia Chopper Bicycle - Rear Wheel Hub After |
 |
| Mike's Columbia Chopper Bicycle - Rear wheel Rim After |
 |
| Mike's Columbia Chopper Bicycle - Rear Wheel Rim After |
 |
| Mike's Columbia Chopper Bicycle - Rear Wheel Polished |
 |
| Mike's Columbia Chopper Bicycle - Old School Slick Tire |
 |
| Mike's Columbia Chopper Bicycle - Old School Slick Tire |
 |
| Mike's Columbia Chopper Bicycle - Rear Wheel Complete |
 |
| Mike's Columbia Chopper Bicycle - Rear Wheel Complete |
 |
| Mike's Columbia Chopper Bicycle - Rear Wheel Complete |
 |
| Mike's Columbia Chopper Bicycle - Rear Wheel Complete |
 |
| Mike's Columbia Chopper Bicycle - Rear Wheel Complete |
 |
| Mike's Columbia Chopper Bicycle - Chain Guard Installed |
 |
| Mike's Columbia Chopper Bicycle - One More Polish on Crank Before installing the crank. |
The crank and chain are the last to go on. After looking at the crank I am putting more work into the polishing and hoping it will look even better. It was a very hard crank to find because the original was missing, I hope it will look just a little better.
No comments:
Post a Comment