 |
| 1975 Motobecane Grand Touring Restoration Bicycle After Retoration |
This example of the Motobecane Grand Touring is really really cool to me. What I find to be so cool about this Motobecane is the component choices and they are original choices from Motobecane. The Grand Touring has a beautiful Stronlight crank (My favorite crank of all time but not my favorite to restore.). It has Mafac center pull brakes, Mafac brake levers. Normandy hubs and very nice alloy rims. To top it all off the is a Suntour drive train, works great and is bullet proof. This is the stuff I find cool and it is in a classic bike and classic styling.
When I work on a bike like this I can't help thinking about here the bike has gone, who owned it and where the adventured. The history of the bike. I have a feeling this Motobecane has seen a lot. It has some very high end touring tires on it from back in the day, to bad they are long gone.
With all the coolness the Grand Touring is a little rough. The paint is rough, for now the plan is to do what I can to the original paint. The components are in okay starting shape. The Motobecane will receive a restoration along with new tires, new tubes, new handlebar tape, new brake lever hoods, new saddle and new cables and cable housings.
I can't wait to see the Motobecane complete and to test ride it since it is so high on my cool scale.
 |
| 1975 Motobecane Grand Touring Restoration Bicycle Before |
 |
| 1975 Motobecane Grand Touring Restoration Bicycle Before - Handlebars |
 |
| 1975 Motobecane Grand Touring Restoration Bicycle Before - Brake Levers |
 |
| 1975 Motobecane Grand Touring Restoration Bicycle Before - Stem & Handlebars |
 |
| 1975 Motobecane Grand Touring Restoration Bicycle Before - Awesome Logo |
 |
| 1975 Motobecane Grand Touring Restoration Bicycle Before - Head Tube |
 |
| 1975 Motobecane Grand Touring Restoration Bicycle Before - Front Mafac Brake |
 |
| 1975 Motobecane Grand Touring Restoration Bicycle Before - Front Wheel Hub |
 |
| 1975 Motobecane Grand Touring Restoration Bicycle Before - Front Wheel Rim |
 |
| 1975 Motobecane Grand Touring Restoration Bicycle Before - Stem |
 |
| 1975 Motobecane Grand Touring Restoration Bicycle Before - Headset |
 |
| 1975 Motobecane Grand Touring Restoration Bicycle Before - Fork Crown |
 |
| 1975 Motobecane Grand Touring Restoration Bicycle Before - Front Wheel Hub |
 |
| 1975 Motobecane Grand Touring Restoration Bicycle Before - Top Tube |
 |
| 1975 Motobecane Grand Touring Restoration Bicycle Before - Shift Levers |
 |
| 1975 Motobecane Grand Touring Restoration Bicycle Before - Down Tube |
 |
| 1975 Motobecane Grand Touring Restoration Bicycle Before - Saddle |
 |
| 1975 Motobecane Grand Touring Restoration Bicycle Before - Seat Lug |
 |
| 1975 Motobecane Grand Touring Restoration Bicycle Before - Seat Tube Decal - Awesome! |
 |
| 1975 Motobecane Grand Touring Restoration Bicycle Before - Stronglight Crank |
 |
| 1975 Motobecane Grand Touring Restoration Bicycle Before - Front Derailleur |
 |
| 1975 Motobecane Grand Touring Restoration Bicycle Before - Rear Brake Caliper |
 |
| 1975 Motobecane Grand Touring Restoration Bicycle Before - Rear Derailleur |
 |
| 1975 Motobecane Grand Touring Restoration Bicycle Before - Rear Wheel Hub |
 |
| 1975 Motobecane Grand Touring Restoration Bicycle Before - Rear Wheel Hub |
 |
| 1975 Motobecane Grand Touring Restoration Frame Before |
 |
| 1975 Motobecane Grand Touring Restoration Frame Before - Head Tube |
 |
| 1975 Motobecane Grand Touring Restoration Frame Before - Head Tube - Love the gold outline! |
 |
| 1975 Motobecane Grand Touring Restoration Frame Before - Head Tube |
 |
| 1975 Motobecane Grand Touring Restoration Frame Before - Top Tube |
 |
| 1975 Motobecane Grand Touring Restoration Frame Before - Down Tube |
 |
| 1975 Motobecane Grand Touring Restoration Frame Before - Seat Lug |
 |
| 1975 Motobecane Grand Touring Restoration Frame Before - Seat Tube |
 |
| 1975 Motobecane Grand Touring Restoration Frame Before - Bottom Bracket |
 |
| 1975 Motobecane Grand Touring Restoration Frame Before - Bottom Bracket |
 |
| 1975 Motobecane Grand Touring Restoration Frame Before - Bottom Bracket |
 |
| 1975 Motobecane Grand Touring Restoration Frame Before - Seat Lug |
 |
| 1975 Motobecane Grand Touring Restoration Frame Before - Seat Stays |
 |
| 1975 Motobecane Grand Touring Restoration Frame Before - Brake Bridge |
 |
| 1975 Motobecane Grand Touring Restoration Frame Before - Chain Stays |
 |
| 1975 Motobecane Grand Touring Restoration Frame Before - Drop Outs |
 |
| 1975 Motobecane Grand Touring Restoration Frame Before - Fork |
 |
| 1975 Motobecane Grand Touring Restoration Frame Before - Fork Crown |
 |
| 1975 Motobecane Grand Touring Restoration Frame Before - Fork Crown |
 |
| 1975 Motobecane Grand Touring Restoration Frame Before - Fork Blades |
 |
| 1975 Motobecane Grand Touring Restoration Frame Before - Chrome Blades |
 |
| 1975 Motobecane Grand Touring Restoration Frame Before - Fork Drop Outs |
I cleaned the frame and started working through some of the polishing grits. I was able to remove a good amount of the paint yellowing. Some of the paint staining and smooth out a little of the rough spots. The frame paint actually looks better then the photos show, I have a hard time photographing white paint. I am actually pretty happy with the results of the frame, yes it is rough but it also came back a long way. There is some shine to the paint and the look overall just goes with the bike overall.
 |
| 1975 Motobecane Grand Touring Restoration Frame Polished |
 |
| 1975 Motobecane Grand Touring Restoration Frame Polished - Head Tube |
 |
| 1975 Motobecane Grand Touring Restoration Frame Polished - Head Tube |
 |
| 1975 Motobecane Grand Touring Restoration Frame Polished - Head Tube |
 |
| 1975 Motobecane Grand Touring Restoration Frame Polished - Top Tube |
 |
| 1975 Motobecane Grand Touring Restoration Frame Polished - Down Tube |
 |
| 1975 Motobecane Grand Touring Restoration Frame Polished - Seat Lug |
 |
| 1975 Motobecane Grand Touring Restoration Frame Polished - Seat Tube |
 |
| 1975 Motobecane Grand Touring Restoration Frame Polished - Bottom Bracket |
 |
| 1975 Motobecane Grand Touring Restoration Frame Polished - Bottom Bracket |
 |
| 1975 Motobecane Grand Touring Restoration Frame Polished - Bottom Bracket |
 |
| 1975 Motobecane Grand Touring Restoration Frame Polished - Seat Lug |
 |
| 1975 Motobecane Grand Touring Restoration Frame Polished - Chain Stays |
 |
| 1975 Motobecane Grand Touring Restoration Frame Polished - Drop Outs |
 |
| 1975 Motobecane Grand Touring Restoration Frame Polished - Fork |
 |
| 1975 Motobecane Grand Touring Restoration Frame Polished - Fork Crown |
 |
| 1975 Motobecane Grand Touring Restoration Frame Polished - Fork Corwn |
 |
| 1975 Motobecane Grand Touring Restoration Frame Polished - Fork Blades |
 |
| 1975 Motobecane Grand Touring Restoration Frame Polished - Fork Chrome Blades |
The reason the Motobecane was a slow process was because the Stronglight crank puller I had and paid a lot for broke off in the crank. The screw in portion cracked in half and it was a pain to get out of the crank. I found that Velo Orange is selling a Stronglight crank puller, so far it is pretty darn nice.
 |
| 1975 Motobecane Grand Touring Restoration Velo Orange Stronglight Crank Puller |
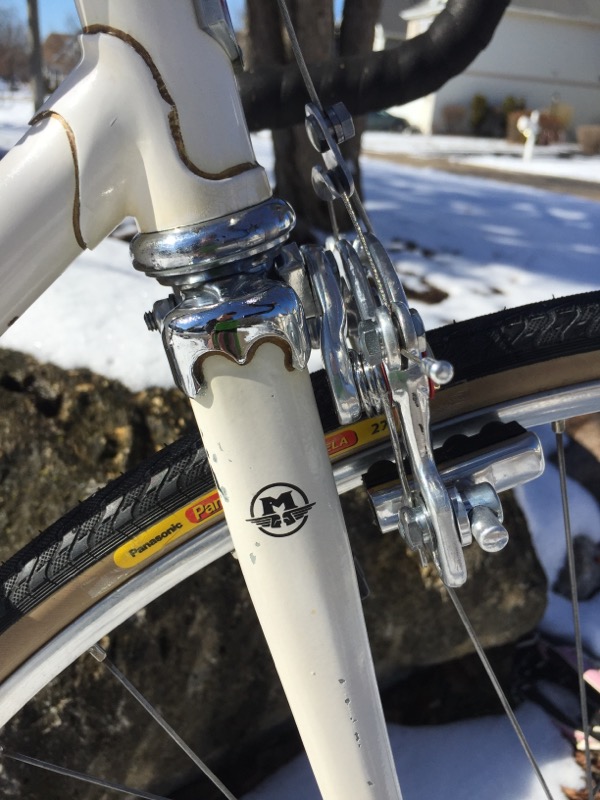
I like the headset a lot. It is a Stronglight headset and is just nicely made and looks great. The bottom bracket is also a Stronglight and is very nice also. The front brake cable hanger was bent, I straightened that out no problem.
I cleaned all the pieces through he crock pot and did all the polishing. The headset and bottom bracket polished beautifully. Installed the headset and bottom bracket looks fantastic and with the bearings packed in new grease they spin great too.
 |
| 1975 Motobecane Grand Touring Restoration Headset Before |
 |
| 1975 Motobecane Grand Touring Restoration Front Cable Hanger - Before |
 |
| 1975 Motobecane Grand Touring Restoration Bottom Bracket - Before |
 |
| 1975 Motobecane Grand Touring Restoration Headset & Bottom Bracket - Polished |
 |
| 1975 Motobecane Grand Touring Restoration Cable Hanger - Polished |
 |
| 1975 Motobecane Grand Touring Restoration Pressing Headset Cups |
 |
| 1975 Motobecane Grand Touring Restoration Headset Bearings - Packed |
 |
| 1975 Motobecane Grand Touring Restoration Headset Bearings - Packed |
 |
| 1975 Motobecane Grand Touring Restoration Headset Complete |
 |
| 1975 Motobecane Grand Touring Restoration Headset Complete |
 |
| 1975 Motobecane Grand Touring Restoration Bottom Bracket Bearings Packed |
 |
| 1975 Motobecane Grand Touring Restoration Bottom Bracket - Complete |
 |
| 1975 Motobecane Grand Touring Restoration Headset & Bottom Bracket - Complete |
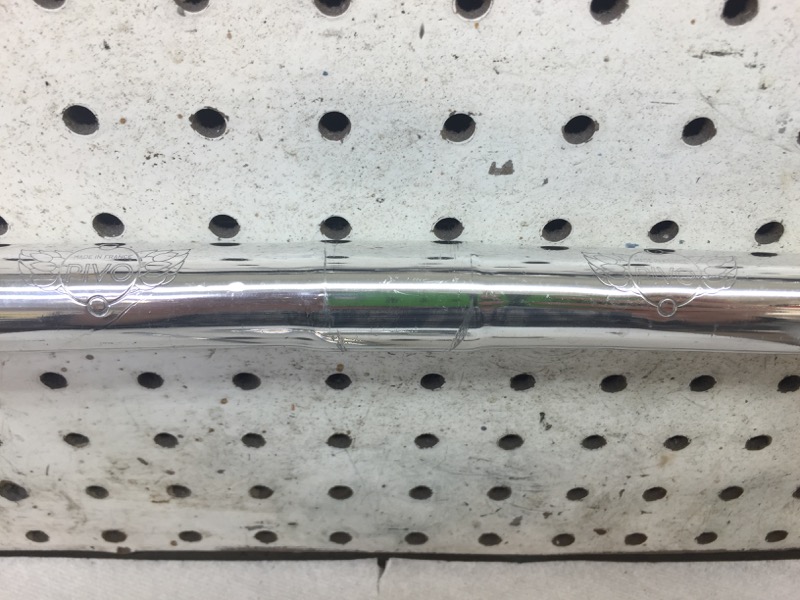
I think the handlebars, stem and brake levers are very cool. I love the logos on the handlebars and the stem has a lot of character. I broke everything down and worked through the polishing wheels. The handlebars polished very nice along with the brake levers. The stem also polished very nice considering the stem doesn't have the smoothest finish from the original forging or casting.
 |
| 1975 Motobecane Grand Touring Restoration Handlebars - Stem & Brake Levers - Before |
 |
| 1975 Motobecane Grand Touring Restoration Handlebars & Stem - Before |
 |
| 1975 Motobecane Grand Touring Restoration Handlebars - Before |
 |
| 1975 Motobecane Grand Touring Restoration Stem - Before |
 |
| 1975 Motobecane Grand Touring Restoration Stem - Exploded |
 |
| 1975 Motobecane Grand Touring Restoration Stem - Before |
 |
| 1975 Motobecane Grand Touring Restoration Brake Levers - Before |
 |
| 1975 Motobecane Grand Touring Restoration Stem & Handlebars - Polished |
 |
| 1975 Motobecane Grand Touring Restoration Handlebars - Polished |
 |
| 1975 Motobecane Grand Touring Restoration Stem Polished |
 |
| 1975 Motobecane Grand Touring Restoration Stem - Complete |
 |
| 1975 Motobecane Grand Touring Restoration Stem & Handlebars - Complete |
 |
| 1975 Motobecane Grand Touring Restoration Stem & Handlebars - Complete |
 |
| 1975 Motobecane Grand Touring Restoration Brake Levers - Polished |
 |
| 1975 Motobecane Grand Touring Restoration Brake Levers - Installed |
 |
| 1975 Motobecane Grand Touring Restoration Brake Levers - Installed |
 |
| 1975 Motobecane Grand Touring Restoration Handlebars Assembly - Installed |
 |
| 1975 Motobecane Grand Touring Restoration Handlebars Assembly - Installed |
 |
| 1975 Motobecane Grand Touring Restoration Handlebars Assembly - Installed |
 |
| 1975 Motobecane Grand Touring Restoration Handlebars Assembly - Installed |
The brake calipers are the classic Mafac Racer calipers. I will have to replace the yoke cables with new shift cables. These cables are jut to far gone. I broke the calipers down and did all the cleaning and polishing. The pieces polished very nice. Assembled the brake calipers look great and installed they look even better.
 |
| 1975 Motobecane Grand Touring Restoration Brake Calipers - Before |
 |
| 1975 Motobecane Grand Touring Restoration Brake Calipers - Exploded |
 |
| 1975 Motobecane Grand Touring Restoration Brake Calipers - Polished |
 |
| 1975 Motobecane Grand Touring Restoration Brake Calipers - Complete |
 |
| 1975 Motobecane Grand Touring Restoration Front Brake Caliper - Installed |
 |
| 1975 Motobecane Grand Touring Restoration Rear Brake Caliper - Installed |
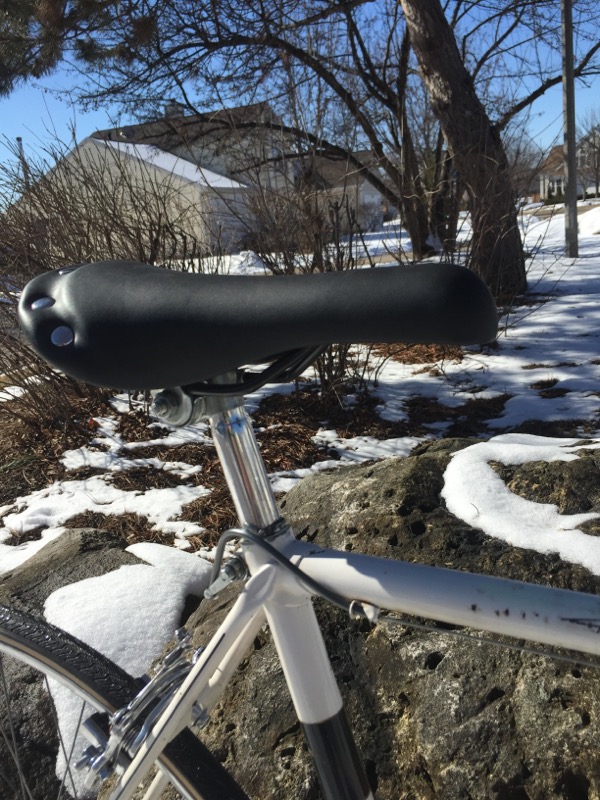
At this time installed the seat post and rear cable hanger. The seat post is a very nice post, alloy and very very light. Polished it looks good and installed even better. The new saddle will be installed later.
 |
| 1975 Motobecane Grand Touring Restoration Seat Post - Before |
 |
| 1975 Motobecane Grand Touring Restoration Seat Post - Before |
 |
| 1975 Motobecane Grand Touring Restoration Seat Post - Polished |
 |
| 1975 Motobecane Grand Touring Restoration Seat Post - Installed |
This Stronglight crank is my favorite of all cranks. It is just a beautiful crank. However it is not my favorite to restore, a lot of parts and a lot of polishing but it is worth it in the end. I broke the crank down and started working through the polishing grit. The pieces polished very nice especially the crank arms. Assembled the crank is just fantastic and installed even better. I love this stuff.
 |
| 1975 Motobecane Grand Touring Restoration Crank - Before |
 |
| 1975 Motobecane Grand Touring Restoration Crank - Exploded |
 |
| 1975 Motobecane Grand Touring Restoration Crank - Polished |
 |
| 1975 Motobecane Grand Touring Restoration Crank Complete |
 |
| 1975 Motobecane Grand Touring Restoration Crank - Installed |
 |
| 1975 Motobecane Grand Touring Restoration Crank - Installed |
The shift levers are Suntour Power Shifters. They are not the prettiest levers but they work so well, one of my favorites ever. Polished up and lubricated they look pretty good and function great.
 |
| 1975 Motobecane Grand Touring Restoration Suntour Power Shift Levers - Before |
 |
| 1975 Motobecane Grand Touring Restoration Shift Levers - Before |
 |
| 1975 Motobecane Grand Touring Restoration Shift Levers - Polished |
 |
| 1975 Motobecane Grand Touring Restoration Shift Levers - Installed |
The derailleurs are are Suntour, nice functioning and bullet proof. I broke down the derailleurs and worked through the polishing wheels. The derailleurs polished and function great with everything properly lubricated. The front derailleur looks amazing next to the crank and the rear derailleur isn't to shabby either.
 |
| 1975 Motobecane Grand Touring Restoration Front Derailleur - Before |
 |
| 1975 Motobecane Grand Touring Restoration Front Derailleur - Exploded |
 |
| 1975 Motobecane Grand Touring Restoration Front Derailleur - Polished |
 |
| 1975 Motobecane Grand Touring Restoration Front Derailleur - Complete |
 |
| 1975 Motobecane Grand Touring Restoration Front Derailleur - Installed |
 |
| 1975 Motobecane Grand Touring Restoration Front Derailleur - Installed |
 |
| 1975 Motobecane Grand Touring Restoration Rear Derailleur - Before |
 |
| 1975 Motobecane Grand Touring Restoration Rear Derailleur - Before |
 |
| 1975 Motobecane Grand Touring Restoration Rear Derailleur - Exploded |
 |
| 1975 Motobecane Grand Touring Restoration Rear Derailleur - Polished |
 |
| 1975 Motobecane Grand Touring Restoration Rear Derailleur - Complete |
 |
| 1975 Motobecane Grand Touring Restoration Rear Derailleur - Complete |
 |
| 1975 Motobecane Grand Touring Restoration Rear Derailleur - Installed |
 |
| 1975 Motobecane Grand Touring Restoration Bicycle so far. |
I like the wheels a lot, they are Normandy hubs with some very nice alloy rims. I broke the wheel hubs down and polished the hubs and rims. The hubs polished very nice. The rims polished nice, the rims had a few rough spots but came back very nice overall. I installed Panaracer tires, the Panaracers look fantastic with the overall look of the Motobecane. Overall I am very happy with the wheels and they spin forever.
 |
| 1975 Motobecane Grand Touring Restoration Rear Wheel - Before |
 |
| 1975 Motobecane Grand Touring Restoration Rear Wheel Hub - Before |
 |
| 1975 Motobecane Grand Touring Restoration Rear Wheel Hub - Before |
 |
| 1975 Motobecane Grand Touring Restoration Rear Wheel Rim - Before |
 |
| 1975 Motobecane Grand Touring Restoration Rear Wheel Hub - Old Grease |
 |
| 1975 Motobecane Grand Touring Restoration Rear Wheel Hub - Polihed |
 |
| 1975 Motobecane Grand Touring Restoration Rear Wheel Rim - Polished |
 |
| 1975 Motobecane Grand Touring Restoration Rear Wheel Bearings - Packed |
 |
| 1975 Motobecane Grand Touring Restoration Axle Pieces Ready |
 |
| 1975 Motobecane Grand Touring Restoration New Panaracer Tires |
 |
| 1975 Motobecane Grand Touring Restoration Rear Wheel - Complete |
 |
| 1975 Motobecane Grand Touring Restoration Front Wheel Before |
 |
| 1975 Motobecane Grand Touring Restoration Front Wheel Hub - Before |
 |
| 1975 Motobecane Grand Touring Restoration Front Wheel Rim - Before |
 |
| 1975 Motobecane Grand Touring Restoration Front Wheel Hub - Old Grease |
 |
| 1975 Motobecane Grand Touring Restoration Front Wheel Hub - Polished |
 |
| 1975 Motobecane Grand Touring Restoration Front Wheel Bearings - Packed |
 |
| 1975 Motobecane Grand Touring Restoration Front Wheel Rim - Polished |
 |
| 1975 Motobecane Grand Touring Restoration Front Wheel Complete |
 |
| 1975 Motobecane Grand Touring Restoration Wheels - Complete |
At this point I installed the new brake lever hoods. The hoods where not made for these levers specifically but they fit very nice. Installed the brake lever hoods make a huge difference and fit the Motobecane's look very well.
 |
| 1975 Motobecane Grand Touring Restoration New Brake Lever Hoods |
 |
| 1975 Motobecane Grand Touring Restoration New Brake Lever Hoods |
 |
| 1975 Motobecane Grand Touring Restoration Brake Levers Hoods - Complete |
Time to wire the Motobecane. The best color for cable housings is of course the Dark Ice Gray. I also used two new shift cables to make new brake caliper yoke cables. I also installed the new black handlebar tape. Man the Motobecane looks great with the cables and tape complete! I love this stuff!
 |
| 1975 Motobecane Grand Touring Restoration New Cables & Cable Housings |
 |
| 1975 Motobecane Grand Touring Restoration Making New Yoke Cables |
 |
| 1975 Motobecane Grand Touring Restoration New Handlebar Tape |
 |
| 1975 Motobecane Grand Touring Restoration Cables & Handlebar Tape - Complete |
 |
| 1975 Motobecane Grand Touring Restoration New Front Yoke Cable |
 |
| 1975 Motobecane Grand Touring Restoration New Rear Caliper Yoke Cable |
 |
| 1975 Motobecane Grand Touring Restoration Rear Derailleur - Wired |
 |
| 1975 Motobecane Grand Touring Restoration Bicycle Wired |
Just a few things to go, I installed the new saddle and completed the pedals. The pedals looked very rough to me but after removing the old and damaged reflectors the pedals turned out great.
 |
| 1975 Motobecane Grand Touring Restoration New Saddle |
 |
| 1975 Motobecane Grand Touring Restoration Pedals - Before |
 |
| 1975 Motobecane Grand Touring Restoration Pedals After |
 |
| 1975 Motobecane Grand Touring Restoration Pedals - Complete |
 |
| 1975 Motobecane Grand Touring Restoration Pedals - Complete |
 |
| 1975 Motobecane Grand Touring Restoration Pedals Installed |
 |
| 1975 Motobecane Grand Touring Restoration Bicycle Complete |
I got to test ride the Motobecane today. It is a beautiful day for once. The rear derailleur took a good deal of work to get tuned correctly but now it works well. I really like the ride of the Motobecane, the bike is very smooth and has a very tight responsive feel. I wish it was bigger though, after a winter of not riding very often the knees did not like the small bike. I like the feel of the Motobecane very much though, the ride is very smooth, it glides over road bumps and handles very nice. The components area great mix. The brake levers and calipers have a very crisp feel to them and that is the way I like them.
I think the looks of the Motobecane are fantastic, it will get a lot of attention out on the roads, paths and crushed limestone. The white paint and all the classic accents are beautiful, how a bike was meant to look. That crank is beautiful!
 |
| 1975 Motobecane Grand Touring Restoration Bicycle Complete |
 |
| 1975 Motobecane Grand Touring Restoration Bicycle Complete |
 |
| 1975 Motobecane Grand Touring Restoration Bicycle Complete - Handlebars |
 |
| 1975 Motobecane Grand Touring Restoration Bicycle Complete - Brake Levers |
 |
| 1975 Motobecane Grand Touring Restoration Bicycle Complete - Head Tube |
 |
| 1975 Motobecane Grand Touring Restoration Bicycle Complete - Front Mafac Caliper |
 |
| 1975 Motobecane Grand Touring Restoration Bicycle Complete - Front Wheel Hub |
 |
| 1975 Motobecane Grand Touring Restoration Bicycle Complete - Front Wheel Hub |
 |
| 1975 Motobecane Grand Touring Restoration Bicycle Complete - Front Wheel Rim |
 |
| 1975 Motobecane Grand Touring Restoration Bicycle Complete - Stem |
 |
| 1975 Motobecane Grand Touring Restoration Bicycle Complete - Head Tube |
 |
| 1975 Motobecane Grand Touring Restoration Bicycle Complete - Fork Crown |
 |
| 1975 Motobecane Grand Touring Restoration Bicycle Complete - Front Half |
 |
| 1975 Motobecane Grand Touring Restoration Bicycle Complete - Shift Levers |
 |
| 1975 Motobecane Grand Touring Restoration Bicycle Complete - Saddle |
 |
| 1975 Motobecane Grand Touring Restoration Bicycle Complete - Seat Tube |
 |
| 1975 Motobecane Grand Touring Restoration Bicycle Complete - Drive Train |
 |
| 1975 Motobecane Grand Touring Restoration Bicycle Complete - Crank |
 |
| 1975 Motobecane Grand Touring Restoration Bicycle Complete - Front Derailleur |
 |
| 1975 Motobecane Grand Touring Restoration Bicycle Complete - Chain Stays |
 |
| 1975 Motobecane Grand Touring Restoration Bicycle Complete - Rear Brake Caliper |
 |
| 1975 Motobecane Grand Touring Restoration Bicycle Complete - Rear Derailleur |
 |
| 1975 Motobecane Grand Touring Restoration Bicycle Complete - Rear Wheel Hub |
 |
| 1975 Motobecane Grand Touring Restoration Bicycle Complete - Rear Wheel Rim |
 |
| 1975 Motobecane Grand Touring Restoration Bicycle Complete |
Thank You for the interest!!
John Z.
John Z.
Beautiful work as always. I really like how you brought the paint back rather than going the repaint and apply route and all the chrome just shines someone is getting a jewel of a rebuilt. I have a 78 Motobecane GT in the queue and though its not starting as rough I hope it turns out half as well when finished as your 75
ReplyDeleteThank you for this article. I have an identical (by the looks of it) bike to this one. I bought it from a farmer's barn in northwest Washington about 12 years ago. I am not a bike mechanic at all, but the pics and descriptions here have given me a wealth of information on my bike. I will be 60 this year and originally bought the motobecane because I wanted a road bike but didn't want a modern one. It fit me perfectly the moment I got on it, never even adjusted the seat. My bike is in pretty good shape but I keep thinking I may want to restore it some day as you have with yours. Anyway, thank you for the information and inspiration. Mark Fountain, Soap Lake Washington.
ReplyDeleteI have the same bike. Your refurbishing was amazing. I went a similar route with mine: repacked the bearings, new cable and housing, new bar tape, new tires and tubes, new seat, new pedals, new brake levers, new chain, new brake pads. I had to do a whole lot of other stuff like re-true the rear wheel readjust the rear mech etc. I just didn't pull everything apart and re-polish everything just re-polished some stuff here and there. My paint is in a little better condition though.
ReplyDelete