 |
| Jesus's Family's Free Spirit Tricycle Restoration - Tricycle Complete Bicycle After Restoration |
A few weeks ago I started work on Jesus's Family's Tricycle Restoration. The Tricycle is a Free Spirit Tricycle. Its been a very long time since I restored a tricycle so I am very excited to work on it.
The Tricycle is very cool, it has a three speed hub and from the three speed hub it has a double chain going back to the axles, one chain for each rear wheel. Its a bit complicated but also very simple and works like a differential in a car.
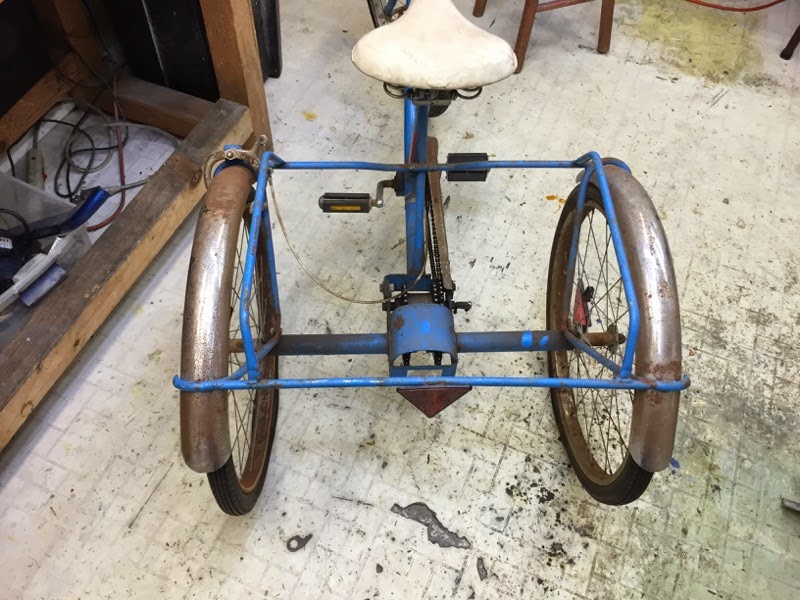
Starting out the Free Spirit Tricycle is in pretty rough condition but I think the blue paint is in nice shape. The Free Spirit will receive a total restoration as best that some of the chrome will come back. There is some heavy rust but I think most of it will remove and hen I will protect the chrome that is still there.
It is a challenge to work on the Free Spirit Tricycle, it is very hard to move around in the basement shop, it does not fit through doors with out standing it up and moving it side ways. Also it does not work with the bike stand. I am not exactly sure how I am going to handle it so if I miss a photo here and there I apologize.
I am very excited to see the results of the Free Spirit Tricycle, its going to be a challenge and I love a challenge and I think the Tricycle will come back a long ways!
 |
| Jesus's Family's Free Spirit Tricycle Restoration - Bicycle Before |
 |
| Jesus's Family's Free Spirit Tricycle Restoration - Bicycle Before |
 |
| Jesus's Family's Free Spirit Tricycle Restoration - Bicycle Before Handlebars |
 |
| Jesus's Family's Free Spirit Tricycle Restoration - Bicycle Before Brake Levers |
 |
| Jesus's Family's Free Spirit Tricycle Restoration - Bicycle Before Shift Grip |
 |
| Jesus's Family's Free Spirit Tricycle Restoration - Bicycle Before Head Tube |
 |
| Jesus's Family's Free Spirit Tricycle Restoration - Bicycle Before Front Fender |
 |
| Jesus's Family's Free Spirit Tricycle Restoration - Bicycle Before Front Brake |
 |
| Jesus's Family's Free Spirit Tricycle Restoration - Bicycle Before Front Wheel Hub |
 |
| Jesus's Family's Free Spirit Tricycle Restoration - Bicycle Before Front Wheel Rim |
 |
| Jesus's Family's Free Spirit Tricycle Restoration - Bicycle Before Free Spirit Down Tube Decal |
 |
| Jesus's Family's Free Spirit Tricycle Restoration - Bicycle Before Front Fender |
 |
| Jesus's Family's Free Spirit Tricycle Restoration - Bicycle Before Saddle |
 |
| Jesus's Family's Free Spirit Tricycle Restoration - Bicycle Before Crank |
 |
| Jesus's Family's Free Spirit Tricycle Restoration - Bicycle Before Chain Guard |
 |
| Jesus's Family's Free Spirit Tricycle Restoration - Bicycle Before Three Speed Hub |
 |
| Jesus's Family's Free Spirit Tricycle Restoration - Bicycle Before Three Speed Hub Area |
 |
| Jesus's Family's Free Spirit Tricycle Restoration - Bicycle Before Rear Wheels & Basket |
 |
| Jesus's Family's Free Spirit Tricycle Restoration - Bicycle Before Rear Wheel Fender |
 |
| Jesus's Family's Free Spirit Tricycle Restoration - Bicycle Before Rear Wheel Hub |
 |
| Jesus's Family's Free Spirit Tricycle Restoration - Bicycle Before Rear Wheel Rim |
 |
| Jesus's Family's Free Spirit Tricycle Restoration - Bicycle Before Rear Wheel Brake & Fender |
 |
| Jesus's Family's Free Spirit Tricycle Restoration - Bicycle Before Rear Wheel Fender |
 |
| Jesus's Family's Free Spirit Tricycle Restoration - Bicycle Before Rear Wheel Hub |
 |
| Jesus's Family's Free Spirit Tricycle Restoration - Bicycle Before Rear Wheel Rim |
 |
| Jesus's Family's Free Spirit Tricycle Restoration - Bicycle Before Rear Differential |
 |
| Jesus's Family's Free Spirit Tricycle Restoration - Bicycle Before All The Chains |
 |
| Jesus's Family's Free Spirit Tricycle Restoration - Bicycle Before Rear Wheel Axles |
 |
| Jesus's Family's Free Spirit Tricycle Restoration - Bicycle Before Rear Axle Cogs |
 |
| Jesus's Family's Free Spirit Tricycle Restoration - Bicycle Before Three Speed hub |
 |
| Jesus's Family's Free Spirit Tricycle Restoration - Bicycle Before Rear |
 |
| Jesus's Family's Free Spirit Tricycle Restoration - Bicycle Before |
 |
| Jesus's Family's Free Spirit Tricycle Restoration - Bicycle Before Basket Removed. |
I came up with a big tub about 30 gallons and rectangle shape to experiment with rust removal solutions. I eventually came up with something that removes a good amount of the rust over a few day soak.
Tomorrow I will post photos as I take the pieces out of the solution for the last time.
Here was the beginning of the experiments with the fenders. This is what the fenders looked like before.
 |
| Jesus's Family's Free Spirit Tricycle Restoration - Fenders - Before |
 |
| Jesus's Family's Free Spirit Tricycle Restoration - Fenders - Before |
 |
| Jesus's Family's Free Spirit Tricycle Restoration - Rear Fenders Before |
 |
| Jesus's Family's Free Spirit Tricycle Restoration - Rear Fenders Before |
I will post more photos tomorrow. The Tricycle has been fighting the disassemble for a couple weeks with stuck seat posts, frozen spokes, frozen stems and frozen nuts and bolts. Things have broken free a little at a time. When things break free I start the restoration process on those and wait on the penetrating oils, heat and the like to do there job slowly. Most the parts go right into the rust removal solution.
Today the rear fenders where the first to come out of the rust soaking solution. They have been in there for near ten days. I am very pleased with the results of the rear fenders, there is some chrome damage but over all they look many many times better then they where.
This post of the Tricycle is going to be kind of all over the place, not the usual order I do things.
 |
| Jesus's Family's Free Spirit Tricycle Restoration - Rear Fenders Polished |
 |
| Jesus's Family's Free Spirit Tricycle Restoration - Rear Fenders Polished |
 |
| Jesus's Family's Free Spirit Tricycle Restoration - Rear Fenders Polished |
Below are photos of the handlebars, headset and stem, they took a lot to get apart but they are apart and have been soaking in the rust removal. Tomorrow I will do the polishing.
 |
| Jesus's Family's Free Spirit Tricycle Restoration - Handlebars Stem, Brake Levers, Shift Lever - Before |
 |
| Jesus's Family's Free Spirit Tricycle Restoration - Handlebars & Stem Before |
 |
| Jesus's Family's Free Spirit Tricycle Restoration - Brake Levers Before |
 |
| Jesus's Family's Free Spirit Tricycle Restoration - Brake Levers Before |
 |
| Jesus's Family's Free Spirit Tricycle Restoration - Stem Before |
 |
| Jesus's Family's Free Spirit Tricycle Restoration - Stem Exploded |
 |
| Jesus's Family's Free Spirit Tricycle Restoration - Handlebars Before |
 |
| Jesus's Family's Free Spirit Tricycle Restoration - Handlebars Before |
 |
| Jesus's Family's Free Spirit Tricycle Restoration - Brake Levers Before |
 |
| Jesus's Family's Free Spirit Tricycle Restoration - Brake Levers Exploded |
 |
| Jesus's Family's Free Spirit Tricycle Restoration - Shift Lever Before |
The front was a little hard to get apart. When the headset finally came of the fork threads I was able to remove the whole assembly.
With it of I was able to put it in my big vise and heat the front axle nuts to get them to remove.
The front fender went into the rust removal solution and is still soaking, it has been soaking maybe five days, I will give it a polishing attempt tomorrow.
The headset was put into the crock pot and then cleaned. Its in the next polishing batch.
The front wheel rim is very rough in a few places and okay in others. the wheel has been soaking for a couple days, I will give it a good brushing tomorrow morning and see if it needs more soaking.
The front brake caliper looks rough but I think it will polish pretty good.
The best part of it all is the paint on the fork, under all the dirt and dullness I think is some pretty nice blue paint and will really start to make the bike look good.
 |
| Jesus's Family's Free Spirit Tricycle Restoration Front Fork Assembly - Before |
 |
| Jesus's Family's Free Spirit Tricycle Restoration - Headset Before |
 |
| Jesus's Family's Free Spirit Tricycle Restoration - Front Fender Before |
 |
| Jesus's Family's Free Spirit Tricycle Restoration - Front Fender Before |
 |
| Jesus's Family's Free Spirit Tricycle Restoration - Front Fender Before |
 |
| Jesus's Family's Free Spirit Tricycle Restoration - Front Fender Exploded |
 |
| Jesus's Family's Free Spirit Tricycle Restoration Fork - Before |
 |
| Jesus's Family's Free Spirit Tricycle Restoration - Front Brake Before |
 |
| Jesus's Family's Free Spirit Tricycle Restoration Fork - Before |
 |
| Jesus's Family's Free Spirit Tricycle Restoration - Fork Crown Before |
 |
| Jesus's Family's Free Spirit Tricycle Restoration Front Fork Blades - Before |
 |
| Jesus's Family's Free Spirit Tricycle Restoration - Front Fork Drop Outs - Before |
 |
| Jesus's Family's Free Spirit Tricycle Restoration Front Wheel - Before |
 |
| Jesus's Family's Free Spirit Tricycle Restoration - Front Wheel Hub Before |
 |
| Jesus's Family's Free Spirit Tricycle Restoration - Front Wheel Rim Before |
 |
| Jesus's Family's Free Spirit Tricycle Restoration - Front Wheel Rim Before - Bad Part |
More to come as things break free and pieces come out of my rust removal solution.
It has been a very slow process removing the rust but it is starting to come around. Some of the parts have been soaking in the rust removal solution for days now. I do finally feel I am getting somewhere and making a difference in the Free Spirit Tricycle.
I will start with the stem. It was a little rough as can be seen in the photos above and the photo below. It was frozen i place to start and can be seen by the rust at the bottom of the stem. The stem soaked for quite a while and then I cleaned it up with brass wool and then did the polishing. I am very happy with the results of the stem, it looks pretty darn good.
|
| Jesus's Family's Free Spirit Tricycle Restoration - Stem - Before |
 |
| Jesus's Family's Free Spirit Tricycle Restoration - Stem - Polished |
 |
| Jesus's Family's Free Spirit Tricycle Restoration - Stem - Complete |
 |
| Jesus's Family's Free Spirit Tricycle Restoration - Stem - Complete |
I am sorry for the all over style of this post but it is kind of the way the restoration is going. I am included some photos below that are doubles from above to try to keep some continuity.
Next is the handlebars. I am very pleasantly surprised that the handlebars look as good as they do after all the rust removal. I am very happy with the results, they even polished up fairly nice with one little rough spot that will be hard to see on the underside.
|
| Jesus's Family's Free Spirit Tricycle Restoration - Handlebars Before |
 |
| Jesus's Family's Free Spirit Tricycle Restoration - Handlebars Complete |
The brake levers where in the solution for about three days and then I cleaned the brake levers with brass wool. One brake lever polished just fantastic the other one polished pretty good. One does have a little bit of damaged chrome that is not in the after photo and will be pointed to the inside when installed.
|
| Jesus's Family's Free Spirit Tricycle Restoration - Brake Levers Before |
|
| Jesus's Family's Free Spirit Tricycle Restoration - Brake Levers Exploded |
 |
| Jesus's Family's Free Spirit Tricycle Restoration - Brake Levers Polished |
So far I am most proud of the front fender, it had some heavy rust and the fender soaked for a week with a little brass wool scrubbing each day. After some polishing the front fender looks very good and I can't wait to see it next to the polished blue paint. There is some chrome pitting on the front fender and i will attempt to protect the fender to slow the rust down from happening again.
|
| Jesus's Family's Free Spirit Tricycle Restoration - Front Fender Before |
|
| Jesus's Family's Free Spirit Tricycle Restoration - Front Fender Before |
|
| Jesus's Family's Free Spirit Tricycle Restoration - Front Fender Before |
 |
| Jesus's Family's Free Spirit Tricycle Restoration - Front Fender Polished |
 |
| Jesus's Family's Free Spirit Tricycle Restoration Front Fender - Polished |
 |
| Jesus's Family's Free Spirit Tricycle Restoration Front Fender - Polished |
While waiting on other parts to break free and other to soak I cleaned and polished the fork. The blue paint on the fork polished extremely nice, I had a feeling the blue paint was nice under the grime and dullness. I could not be happier with the results of the fork.
|
| Jesus's Family's Free Spirit Tricycle Restoration Fork - Before |
|
| Jesus's Family's Free Spirit Tricycle Restoration - Fork Crown Before |
|
| Jesus's Family's Free Spirit Tricycle Restoration Fork Blades - Before |
|
| Jesus's Family's Free Spirit Tricycle Restoration - Fork Drop Outs Before |
 |
| Jesus's Family's Free Spirit Tricycle Restoration Fork - Polished |
 |
| Jesus's Family's Free Spirit Tricycle Restoration - Fork Polished Fork Crown |
 |
| Jesus's Family's Free Spirit Tricycle Restoration Fork Polished - Fork Blades |
 |
| Jesus's Family's Free Spirit Tricycle Restoration - Fork Polished Fork Drop Outs |
One bolt on the chain guard would not break free and I really did not want to break it off in the frame bracket. I use a few different methods to remove the bot but it would not break free. It finally broke free but I will have to replace the bolts, they are just not in usable shape.
It the before photo of the chain guard you can see the front part is a little beat up and out of shape. I used my metal mallets and a anvil to pound it back in shape, the second before photo shows the results, I m very happy that it reshaped nicely. The chain guard is in the rust removal solution now.
 |
| Jesus's Family's Free Spirit Tricycle Restoration - Chain Guard Before |
 |
| Jesus's Family's Free Spirit Tricycle Restoration - Chain Guard Repaired |
It was a momentous afternoon yesterday as the lock nuts and pins for the rear wheels broke free. I was really starting to worry that they would not break free ever. The wheels went right into the rust solution and I am hoping with soaking and scrubbing they will be rust free in a couple of days.
The wheels actually lock to the axles, they wheels where frozen to axles but I think with cleaning and greasing they won't freeze to the axles again. The axles are where the rear wheel bearings are located, they are actually press fit bearing cartridges, the axles spin very smooth so I think I will leave the press fit bearings alone, for one it would probably would do more damage to them just trying to remove them to rebuild them and two I don't know if I can even find replacements for them, they are kind of a specialized pieces and being 40+ years old I don't want to run the risk they are not available.
 |
| Jesus's Family's Free Spirit Tricycle Restoration - Rear Wheel Lock Nuts Before |
 |
| Jesus's Family's Free Spirit Tricycle Restoration - Rear Wheel Axle Pins |
 |
| Jesus's Family's Free Spirit Tricycle Restoration One Rear Wheel - Before |
 |
| Jesus's Family's Free Spirit Tricycle Restoration - Rear Wheel Hub Before |
 |
| Jesus's Family's Free Spirit Tricycle Restoration - Rear Wheel Rim Before |
 |
| Jesus's Family's Free Spirit Tricycle Restoration Second Rear Wheel - Before |
 |
| Jesus's Family's Free Spirit Tricycle Restoration - Rear Wheel Hub Before |
 |
| Jesus's Family's Free Spirit Tricycle Restoration - Rear Wheel Hub Before |
 |
| Jesus's Family's Free Spirit Tricycle Restoration - Rear Wheel Rim Before |
With the rear wheels removed I am able to put the tricycle frame into the bike stand. It has taken a while but the frame is almost broken down. Here you can see the drive train is still place. Also you can see the blue paint, dirty and dull now but I think it will polish as nice as the fork did.
 |
| Jesus's Family's Free Spirit Tricycle Restoration - Frame In Stand |
 |
| Jesus's Family's Free Spirit Tricycle Restoration Frame Before - Head Tube |
 |
| Jesus's Family's Free Spirit Tricycle Restoration - Frame Before Down Tube |
 |
| Jesus's Family's Free Spirit Tricycle Restoration Pedals |
 |
| Jesus's Family's Free Spirit Tricycle Restoration Crank - Before |
 |
| Jesus's Family's Free Spirit Tricycle Restoration - Three Speed Hub |
 |
| Jesus's Family's Free Spirit Tricycle Restoration - Axle Before |
The drive side pedal proved to be another very difficult item to break free. After some soaking and then a little heat it finally broke free. In one of the before photos you can see how rusty the threads where. What was nice however is the other pedal easily broke free.
 |
| Jesus's Family's Free Spirit Tricycle Restoration - Pedals Before |
 |
| Jesus's Family's Free Spirit Tricycle Restoration - Pedal Threads |
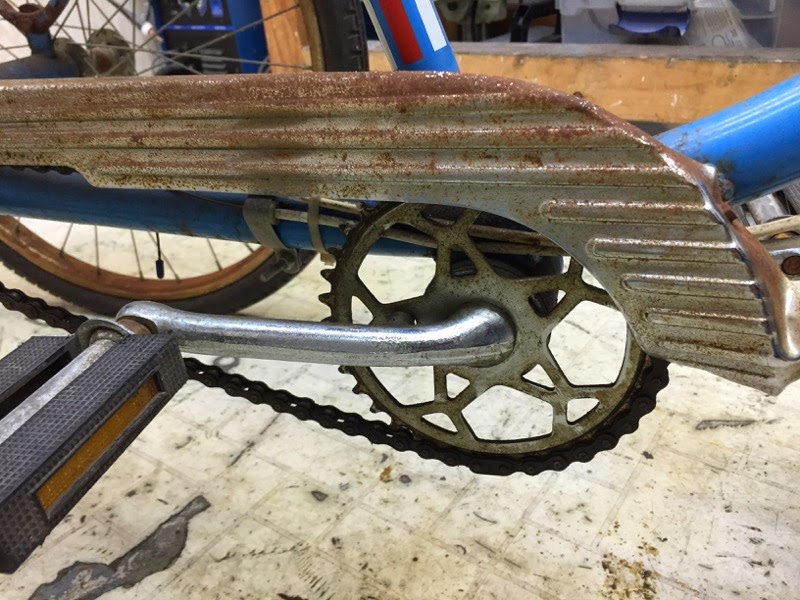
I started final disassemble by removing the crank and bearings. The crank went right into the rust removal solution and the bottom bracket pieces went into the crock pot. I think the bottom bracket pieces will polish very nicely and the crank should come back pretty nice. I like the pattern of the crank chain rim very much!
 |
| Jesus's Family's Free Spirit Tricycle Restoration - Bottom Bracket |
 |
| Jesus's Family's Free Spirit Tricycle Restoration - Crank |
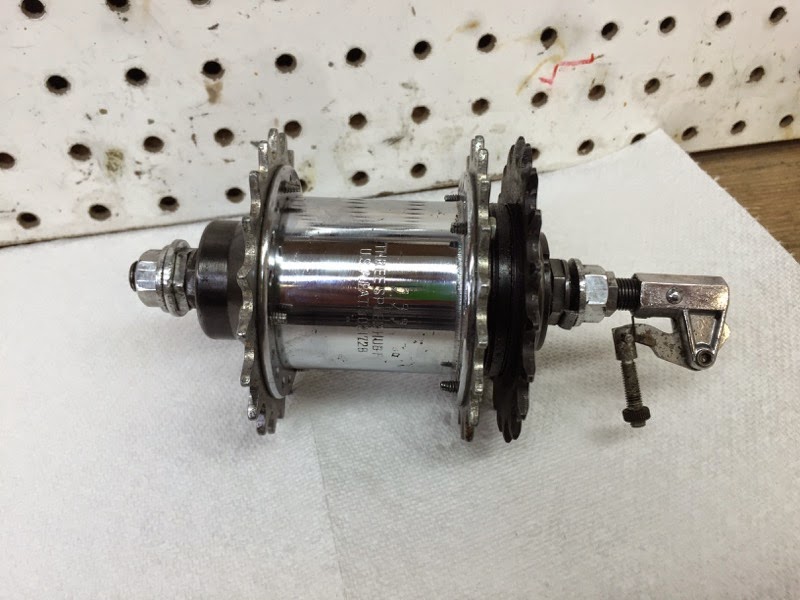
I removed the 3 speed hub and its soaking in a little oil to loosen the hard grease. The 3 speed hub is working very well just dirty and greasy, I am not going to totally tear down the hub but rather replace a few bearings and a good cleaning and lubricating, at least that is the plan we will see how it goes.
 |
| Jesus's Family's Free Spirit Tricycle Restoration - Three Speed Hub Before |
 |
| Jesus's Family's Free Spirit Tricycle Restoration - Three Speed Hub Area |
The frame was sprayed a few times with WD-40 to help loosen the hard dirt and grime and then cleaned very well with soapy water. The frame paint has a few rough spots but none of them are to bad that they affect the structure they are just mainly not great looking.
With the frame cleaned it was time to polish, I started with a very course grit of polish and worked my way to a finer polish. The blue paint really polished very nice and a some of the rust and scratches went away. Overall I am pretty happy with the results of the frame, the blue really shines nice and the rough spots do not look so bad when cleaned and polished.
The double freewheels spin really really well however the pins that hold them on the axle are frozen in place. Since the axles and freewheels work smooth and quite well as is I will not try to break the pins free anymore as I will just probably do damage to the freewheels and blue paint for parts that might not be available anymore. I cleaned the freewheels really well and then heavily lubricated everything, the freewheels and axles spin even better now and actually look pretty darn good inside the gear box.
As I wait for a few more things to finish soaking in the rust removal solution I gave the saddle a good cleaning and treating. The saddle really cleaned very nice and with a little treatment should stay soft and flexible. Its hard for me to believe that is the same saddle before and after, I am very happy with the saddle!
Below is a photo of a chain tension wheel, I currently have a few of the small pieces soaking and should be ready to polish the metal pieces tomorrow.
Tomorrow is a very big day, it will be the beginning of components starting to go back on the tricycle!
The last couple of days components have been going back on the tricycle frame, now things are becoming fun on the Free Spirit restoration!!
First was the headset, the headset polished a lot nicer then I was expecting and installed with new grease and bearings the headset spins great. I am extremely happy with the results of the headset!
The before and after photos of the stem are somewhere above but now its time to install the stem. The stem looks great installed!
Handlebars are next to go on the Free Spirit Tricycle. You can see one pretty bad spot in the chrome on the handlebars near the stem, I will treat that to protect that but otherwise I think the difference in handlebars are night and day from before.
 |
| Jesus's Family's Free Spirit Tricycle Restoration - Frame - Before |
 |
| Jesus's Family's Free Spirit Tricycle Restoration - Frame Polished |
 |
| Jesus's Family's Free Spirit Tricycle Restoration Frame Polished - Head Tube |
 |
| Jesus's Family's Free Spirit Tricycle Restoration - Frame Polished |
 |
| Jesus's Family's Free Spirit Tricycle Restoration - Frame Polished Down Tube |
 |
| Jesus's Family's Free Spirit Tricycle Restoration Frame Polished - Seat Tube |
 |
| Jesus's Family's Free Spirit Tricycle Restoration - Frame Polished I am not sure what part of a Tricycle this is called. |
 |
| Jesus's Family's Free Spirit Tricycle Restoration Frame Polished - Gear Box |
The double freewheels spin really really well however the pins that hold them on the axle are frozen in place. Since the axles and freewheels work smooth and quite well as is I will not try to break the pins free anymore as I will just probably do damage to the freewheels and blue paint for parts that might not be available anymore. I cleaned the freewheels really well and then heavily lubricated everything, the freewheels and axles spin even better now and actually look pretty darn good inside the gear box.
 |
| Jesus's Family's Free Spirit Tricycle Restoration - Free Wheels Cleaned & Lubricated |
 |
| Jesus's Family's Free Spirit Tricycle Restoration - Frame Polished Rear |
As I wait for a few more things to finish soaking in the rust removal solution I gave the saddle a good cleaning and treating. The saddle really cleaned very nice and with a little treatment should stay soft and flexible. Its hard for me to believe that is the same saddle before and after, I am very happy with the saddle!
 |
| Jesus's Family's Free Spirit Tricycle Restoration - Saddle Before |
 |
| Jesus's Family's Free Spirit Tricycle Restoration - Saddle After |
Below is a photo of a chain tension wheel, I currently have a few of the small pieces soaking and should be ready to polish the metal pieces tomorrow.
 |
| Jesus's Family's Free Spirit Tricycle Restoration - Tension Wheel |
The last couple of days components have been going back on the tricycle frame, now things are becoming fun on the Free Spirit restoration!!
First was the headset, the headset polished a lot nicer then I was expecting and installed with new grease and bearings the headset spins great. I am extremely happy with the results of the headset!
 |
| Jesus's Family's Free Spirit Tricycle Restoration - Headset Polished |
 |
| Jesus's Family's Free Spirit Tricycle Restoration Pressing Headset Cups |
 |
| Jesus's Family's Free Spirit Tricycle Restoration Headset Cups - Pressed |
 |
| Jesus's Family's Free Spirit Tricycle Restoration Headset Bearings - Packed |
 |
| Jesus's Family's Free Spirit Tricycle Restoration Headset - Complete |
 |
| Jesus's Family's Free Spirit Tricycle Restoration - Headset - Complete |
The before and after photos of the stem are somewhere above but now its time to install the stem. The stem looks great installed!
 |
| Jesus's Family's Free Spirit Tricycle Restoration Stem - Installed |
Handlebars are next to go on the Free Spirit Tricycle. You can see one pretty bad spot in the chrome on the handlebars near the stem, I will treat that to protect that but otherwise I think the difference in handlebars are night and day from before.
 |
| Jesus's Family's Free Spirit Tricycle Restoration - Handlebars Installed |
 |
| Jesus's Family's Free Spirit Tricycle Restoration - Handlebars Installed |
 |
| Jesus's Family's Free Spirit Tricycle Restoration - Handlebars Installed |
With the handlebars installed its time for the brake levers. I am pretty happy with the brake levers, they started out pretty rough and now look pretty good. Polishing the hardware also makes a big difference. Its starting to look like a Tricycle again!
 |
| Jesus's Family's Free Spirit Tricycle Restoration - Brake Levers Installed |
 |
| Jesus's Family's Free Spirit Tricycle Restoration - Brake Levers Installed |
 |
| Jesus's Family's Free Spirit Tricycle Restoration - Brake Levers Installed |
The seat post polished pretty nice and the seat binder collar polished beautifully, both look great installed. The icing on top of the cake is the saddle installed, it looks great all cleaned up and really makes the restoration come along installed!
 |
| Jesus's Family's Free Spirit Tricycle Restoration - Seat Post Polished |
 |
| Jesus's Family's Free Spirit Tricycle Restoration Seat Post - Installed |
 |
| Jesus's Family's Free Spirit Tricycle Restoration Saddle - Installed |
 |
| Jesus's Family's Free Spirit Tricycle Restoration - Saddle - Installed |
I am really starting to have fun with the tricycle and I am really getting excited about the results of the restoration. Its finally getting to the point where I get to see results from all the hard work and battles with the rust.
The bottom bracket and crank are next, the crank polished just amazing, I love it! I really love the design in the crank chain ring too! The bottom bracket polished way better then I was expecting and with new bearings and grease the bottom bracket spins fantastic too! Installed the crank looks amazing, I can't wait to see how the chain guard looks around it!
 |
| Jesus's Family's Free Spirit Tricycle Restoration - Bottom Bracket & Crank - Polished |
 |
| Jesus's Family's Free Spirit Tricycle Restoration - Bottom Bracket Polished |
 |
| Jesus's Family's Free Spirit Tricycle Restoration - Crank - Polished |
 |
| Jesus's Family's Free Spirit Tricycle Restoration - Pressing Bottom Bracket Cups |
 |
| Jesus's Family's Free Spirit Tricycle Restoration - Bottom Bracket Cups - Pressed |
 |
| Jesus's Family's Free Spirit Tricycle Restoration - Bottom Bracket Bearings - Packed |
 |
| Jesus's Family's Free Spirit Tricycle Restoration Crank - Complete |
 |
| Jesus's Family's Free Spirit Tricycle Restoration - Crank Complete |
 |
| Jesus's Family's Free Spirit Tricycle Restoration - Crank Complete |
Holding the drive train assembly to the frame are to bolts, very big bolts for a bike. The bolts need to be polished badly so I removed one at a time, polished the bolts and installed the bolt before removing the second. I polished the bolts one at a time because I did not want to loose the location the drive train assembly has been at since the Free Spirit was new. The bolts look great now!!
 |
| Jesus's Family's Free Spirit Tricycle Restoration - Drive Train Assembly Bolts - Before |
 |
| Jesus's Family's Free Spirit Tricycle Restoration - Bolts Polished |
 |
| Jesus's Family's Free Spirit Tricycle Restoration - Polished Bolt Installed |
 |
| Jesus's Family's Free Spirit Tricycle Restoration - Second Bolt Before |
 |
| Jesus's Family's Free Spirit Tricycle Restoration - Second Bolt Polished |
I am thrilled with the results of the chain guard, it was in very rough shape before and after over a week of soaking in the rust removal solution and a lot of polishing the chain guard looks amazing! I few of the spots where the chrome is damaged I will have to treat. Once I finish the drive train the chain guard will go back on.
 |
| Jesus's Family's Free Spirit Tricycle Restoration - Chain Guard Polished |
 |
| Jesus's Family's Free Spirit Tricycle Restoration - Chain Guard Polished |
 |
| Jesus's Family's Free Spirit Tricycle Restoration - Chain Guard Polished |
A project for today is the front fender strut, it is a little rough and has some major rust spots. I removed all the rust and cleaned the surface. Right now it is in the process of being primed and painted silver.
 |
| Jesus's Family's Free Spirit Tricycle Restoration - Front Fender Strut Before |
It took all morning and a good part of the afternoon but the front wheel is ready and about as good as it can be. The wheel has soaked in the rust removal solution for over a week with a good scrubbing each day. The wheel has some pretty rough chrome damage that I will have to seal. The spokes cleaned up okay and the wheel trued nicely. I wish the front wheel would have restored a little better but overall its mechanically sound and at least is a lot better looking then when I started. The bearings where replaced and new grease packed and the front will spins great!
I also finished the painting of the front fender strut and it looks fantastic, like new or maybe even better! I could not be happier with the strut. The painted strut is something that won't be noticed but will be noticed if it wasn't painted.
Installed i think the fender and strut look fantastic! The wheel looks pretty good considering, overall not bad!
 |
| Jesus's Family's Free Spirit Tricycle Restoration Front Fender Strut - Painted |
 |
| Jesus's Family's Free Spirit Tricycle Restoration Front Fender Strut - Painted |
 |
| Jesus's Family's Free Spirit Tricycle Restoration - Front Wheel Hub Before |
 |
| Jesus's Family's Free Spirit Tricycle Restoration - Front Wheel Hub Polished the best it will. |
 |
| Jesus's Family's Free Spirit Tricycle Restoration - Front Wheel Rim Chrome Damage |
 |
| Jesus's Family's Free Spirit Tricycle Restoration - Front Wheel Rim Polished - A better section. |
 |
| Jesus's Family's Free Spirit Tricycle Restoration - Front Wheel Rim Polished - Best Chrome |
 |
| Jesus's Family's Free Spirit Tricycle Restoration - Front Axle Pieces Polished |
 |
| Jesus's Family's Free Spirit Tricycle Restoration - Front Wheel Hub Bearings Packed |
 |
| Jesus's Family's Free Spirit Tricycle Restoration - Front Wheel Complete |
 |
| Jesus's Family's Free Spirit Tricycle Restoration - Front Wheel Complete - Fender Installed |
 |
| Jesus's Family's Free Spirit Tricycle Restoration - Front Fender Strut - Complete |
 |
| Jesus's Family's Free Spirit Tricycle Restoration - Front Wheel Complete |
Hopefully the rear wheels will be ready tomorrow.
The rear wheels are not like normal wheels to put in the wheel truing stand, I am going to need to find away set up a marker so I can true the rear wheels.
Installed the rear wheels look pretty good and spin pretty very good. I wish they looked better but they at least look a lot better then before.
 |
| Jesus's Family's Free Spirit Tricycle Restoration - Rear Wheels Hardware |
 |
| Jesus's Family's Free Spirit Tricycle Restoration Rear Wheel - Polished |
 |
| Jesus's Family's Free Spirit Tricycle Restoration - Rear Wheel Hub Polished |
 |
| Jesus's Family's Free Spirit Tricycle Restoration - Rear Wheel Hub Polished |
 |
| Jesus's Family's Free Spirit Tricycle Restoration - Rear Wheel Rim Rough Chrome |
 |
| Jesus's Family's Free Spirit Tricycle Restoration - Rear Wheel Rim Better Chrome |
 |
| Jesus's Family's Free Spirit Tricycle Restoration - Rear Wheel Rim Better Chrome |
 |
| Jesus's Family's Free Spirit Tricycle Restoration - Rear Wheel Rim Better Chrome |
 |
| Jesus's Family's Free Spirit Tricycle Restoration Rear Wheel - Complete |
 |
| Jesus's Family's Free Spirit Tricycle Restoration - Rear Wheel Hub Polished |
 |
| Jesus's Family's Free Spirit Tricycle Restoration - Rear Wheel Hub Polished Best It Would |
 |
| Jesus's Family's Free Spirit Tricycle Restoration - Rear Wheel Hub Best It Would Polish |
 |
| Jesus's Family's Free Spirit Tricycle Restoration - Rear Wheel Rim Rough Chrome |
 |
| Jesus's Family's Free Spirit Tricycle Restoration - Rear Wheel Rim Better Chrome |
 |
| Jesus's Family's Free Spirit Tricycle Restoration - Rear Wheel Rim Better Chrome |
 |
| Jesus's Family's Free Spirit Tricycle Restoration - Rear Wheel Rim Rough Chrome |
 |
| Jesus's Family's Free Spirit Tricycle Restoration - Rear Wheels Installed |
 |
| Jesus's Family's Free Spirit Tricycle Restoration - Rear Wheels Installed |
 |
| Jesus's Family's Free Spirit Tricycle Restoration - Rear Wheels Installed |
Tomorrow I will be finishing hub the three speed hub and installing chains. I also need to figure out away to attach a shift cable to the three speed hub as they do not make the size attachment coupling four this brand of hub anymore and its bigger then a Sturmey Archer and the Tricycle is missing the coupling piece.
I rebuilt the three speed hub. The hub turned out very nice, it is missing the oil port plastic cap so I will have to figure out something for that. I am pleased with the results of the three speed hub. It looks great installed and even better with the chains cleaned and lubricated and installed.
 |
| Jesus's Family's Free Spirit Tricycle Restoration - Three Speed Hub Complete |
 |
| Jesus's Family's Free Spirit Tricycle Restoration - Three Speed Hub Complete |
 |
| Jesus's Family's Free Spirit Tricycle Restoration Three Speed Hub - Oil Port Missing |
 |
| Jesus's Family's Free Spirit Tricycle Restoration Before Three Speed Hub Installed |
 |
| Jesus's Family's Free Spirit Tricycle Restoration Three Speed Hub - Installed |
 |
| Jesus's Family's Free Spirit Tricycle Restoration Chains - Installed |
 |
| Jesus's Family's Free Spirit Tricycle Restoration - Three Speed Hub Complete |
 |
| Jesus's Family's Free Spirit Tricycle Restoration - Chain Installed |
I installed the basket bracket with new hardware. The original nuts and bolts where just to far gone to be able to polish out nicely. I replaced them with new stainless steel hardware and installed the new hardware looks great. There is a photo below of the old hardware and new hardware.
 |
| Jesus's Family's Free Spirit Tricycle Restoration - Basket Bracket Before |
 |
| Jesus's Family's Free Spirit Tricycle Restoration - Basket Bracket Before |
 |
| Jesus's Family's Free Spirit Tricycle Restoration - Old Hardware |
 |
| Jesus's Family's Free Spirit Tricycle Restoration - Basket Bracket Before |
 |
| Jesus's Family's Free Spirit Tricycle Restoration - Basket Bracket Before |
 |
| Jesus's Family's Free Spirit Tricycle Restoration - Basket Bracket Before |
 |
| Jesus's Family's Free Spirit Tricycle Restoration - Basket Bracket Polished |
 |
| Jesus's Family's Free Spirit Tricycle Restoration - Old Hardware on Left New Hardware on Right |
 |
| Jesus's Family's Free Spirit Tricycle Restoration - New Hardware Installed |
 |
| Jesus's Family's Free Spirit Tricycle Restoration - New Stainless Steel Hardware Installed |
 |
| Jesus's Family's Free Spirit Tricycle Restoration - New Stainless Steel Hardware Installed |
 |
| Jesus's Family's Free Spirit Tricycle Restoration Basket Bracket - Installed |
Next was the basket. The basket started out looking very rough, it was covered in a very hard and very sticky coating of grime. I soaked the basket for a while and then applied a lot of elbow grease. I am thrilled with the results of the basket, it cleaned beautifully and the white color is very bright and over all there are hardly and scrapes or chips in the white paint. The basket looks great against the polished light blue.
 |
| Jesus's Family's Free Spirit Tricycle Restoration - Basket Before |
 |
| Jesus's Family's Free Spirit Tricycle Restoration - Basket - Before |
 |
| Jesus's Family's Free Spirit Tricycle Restoration - Basket - Before |
 |
| Jesus's Family's Free Spirit Tricycle Restoration - Basket - Before |
 |
| Jesus's Family's Free Spirit Tricycle Restoration - Basket After |
 |
| Jesus's Family's Free Spirit Tricycle Restoration - Basket After |
 |
| Jesus's Family's Free Spirit Tricycle Restoration - Basket Complete |
With the basket bracket installed I could now install the rear fenders, with all the fenders installed the Tricycle is really looking good!
 |
| Jesus's Family's Free Spirit Tricycle Restoration - Fenders Installed |
I now installed the chain tension wheel and the chain guard. I love this chain guard, it has an art deco look to it and it came back a long way considering how rough it started. Looks great!! I did install the chain guard with new hardware.
 |
| Jesus's Family's Free Spirit Tricycle Restoration - Chain Guard Complete |
 |
| Jesus's Family's Free Spirit Tricycle Restoration - Chain Tension Wheel Installed |
 |
| Jesus's Family's Free Spirit Tricycle Restoration Chain Guard - Complete |
I did install the tires before the tension wheel and chain guard. I cleaned the tires and treated the tires that where on the tricycle as they where in descent condition. The tires make a huge difference.
 |
| Jesus's Family's Free Spirit Tricycle Restoration - Tires - Installed |
I have been having trouble with fabricating a way to connect the three speed shift cable. I tried making a couple and they failed. However, yesterday I found new cable pieces on the internet and they will be here in a couple of days, I am very very happy I was able to find the cable pieces.
The new shift cable came and I was able to install the cable and run the brake cables. With the Tricycle wired I was able to start the test riding and fine tuning.
First thing I noticed was I am not a good tricycle rider, I never know where to have my weight ad I tend to be to far over to one of the rear wheels, but that is my lack of ability.
The tricycle need a lot of fine tuning on the road but i eventually got it tuned in. The ride is actually pretty smooth when everything is tuned in, the brakes work great and the rear hub shifts well. The 3 speed hub as a pretty narrow range in the gears but they shift nicely.
I am very proud of the work on the tricycle, I wish some parts of it turned out a little better but the rust had already did its damage. In the final photos below there really is quite a difference from before and after and mechanically the tricycle is great. The fenders and chain guard look great considering where they started and the handlebars and stem are amazing. I hope Jesus and his family will be pleased with it.
|
| Jesus's Family's Free Spirit Tricycle Restoration - Tricycle Complete |
 |
| Jesus's Family's Free Spirit Tricycle Restoration - Tricycle Complete Front |
 |
| Jesus's Family's Free Spirit Tricycle Restoration - Tricycle Complete Handlebars |
 |
| Jesus's Family's Free Spirit Tricycle Restoration - Tricycle Complete Front Brake |
 |
| Jesus's Family's Free Spirit Tricycle Restoration - Tricycle Complete Front Fender |
 |
| Jesus's Family's Free Spirit Tricycle Restoration - Tricycle Complete Front Wheel Hub |
 |
| Jesus's Family's Free Spirit Tricycle Restoration - Tricycle Complete Front Fender & Painted Fender Strut |
 |
| Jesus's Family's Free Spirit Tricycle Restoration - Tricycle Complete Stem |
 |
| Jesus's Family's Free Spirit Tricycle Restoration - Tricycle Complete Front Half |
 |
| Jesus's Family's Free Spirit Tricycle Restoration - Tricycle Complete Saddle |
 |
| Jesus's Family's Free Spirit Tricycle Restoration - Tricycle Complete Crank & Chain Guard |
 |
| Jesus's Family's Free Spirit Tricycle Restoration - Tricycle Complete Pedal |
 |
| Jesus's Family's Free Spirit Tricycle Restoration - Tricycle Complete Drive Train |
 |
| Jesus's Family's Free Spirit Tricycle Restoration - Tricycle Complete Drive Train |
 |
| Jesus's Family's Free Spirit Tricycle Restoration - Tricycle Complete Rear Wheel |
 |
| Jesus's Family's Free Spirit Tricycle Restoration - Tricycle Complete Rear Fender |
I wanted to replace the rear brake, it is rough, I went through every caliper I had which is thousands and good not find one to fit. It has a crazy long reach, the long reach Raleigh calipers didn't even come close. The caliper works great I just wish it looked better.
 |
| Jesus's Family's Free Spirit Tricycle Restoration - Tricycle Complete Rear Brake |
 |
| Jesus's Family's Free Spirit Tricycle Restoration - Tricycle Complete Rear Wheel Hub |
 |
| Jesus's Family's Free Spirit Tricycle Restoration - Tricycle Complete |
 |
| Jesus's Family's Free Spirit Tricycle Restoration - Tricycle Complete Drive Train |
 |
| Jesus's Family's Free Spirit Tricycle Restoration - Tricycle Complete Rear |
John, you will be a miracle worker if you can get that tricycle looking good. Good Luck.
ReplyDeleteBill Kopec
Hi... I have the same bike up here in Canada that I will be attempting to restore. I was just wondering what rust remover solution you used on this bike?
ReplyDeleteThe text within the mysterious Emerald Tablet, authored by Hermes Trismegistus, states, "That which is below is like that which is above and that which is above is like that is below." According to hermetic tradition, the quote references the little world, or circumstances on planet Earth, symbolized by cosmic patterns or cycles seen within the visible skies, and beyond, throughout the universe. The operative word is "symbolize." The patterns don't make things happen, but do represent the orderliness of the universe. adult tricycle for sale
ReplyDeleteRight away this website will probably unquestionably usually become well known with regards to most of website customers, as a result of meticulous accounts and in addition tests. kids tricycle
ReplyDeleteThis is known as a tricycle. Children use a small-sized tricycle and adults use adult tricycles for many reasons such as shopping, recreation, and exercise.
ReplyDeleteIt looks like I have the exact same bike you restored. It is pretty much original from when it was purchased new. It has been stored in a garage but has a little surface rust. I was going to post it on Facebook marketplace but could not find much information about its value. I am not sure what to do with it now. I can provide pictures if interested. The bike is located in Minneapolis MN, USA.
ReplyDelete