 |
| Ray's Mid 1970's Teledyne Titan Restoration - Bicycle After |
This Teledyne Titan is just an amazingly cool bicycle, it was the first bicycle to be built with titanium and only about 2000 where made. The weight is fantastically light for today's standards for the mid 1970's it must have been unfathomably light!!
Beyond just the titanium frame that is so cool is the components, a early Dura Ace headset sits in the head tube, a Zeus bottom bracket that is so light that it actually stuns you picking it up after picking up other bottom brackets all my life. The crank is also such a cool Zues crank that has been drilled and just looks amazing, a curious thing about the crank is the Chain rings are 48/40 which is pretty compact. The handlebars are beautiful Cinelli and have the amazing Cinelli logos stamped in them. The brakes are Campagnolo calipers and the derailleurs are Campagnolo Nuovo Record. What may be the coolest part of the who bike is the Paul wheel hubs and the Paul pedals.
Stuff like this Teledyne are about as cool as they get in my book, this Titan will get a complete restoration and new cables and cable housings, new tires and tire tubes, new handlebar tape, new brake pads and new bearings.
 |
| Ray's Mid 1970's Teledyne Titan Restoration - Bicycle Before |
 |
| Ray's Mid 1970's Teledyne Titan Restoration - Bicycle Before Stem & Handlebars |
 |
| Ray's Mid 1970's Teledyne Titan Restoration - Bicycle Before Handlebars & Brake Lever |
 |
| Ray's Mid 1970's Teledyne Titan Restoration - Bicycle Before Brake Lever |
 |
| Ray's Mid 1970's Teledyne Titan Restoration - Bicycle Before Brake Lever |
 |
| Ray's Mid 1970's Teledyne Titan Restoration - Bicycle Before Stem |
 |
| Ray's Mid 1970's Teledyne Titan Restoration - Bicycle Before Dura Ace Headset |
 |
| Ray's Mid 1970's Teledyne Titan Restoration - Bicycle Before Head Tube |
 |
| Ray's Mid 1970's Teledyne Titan Restoration - Bicycle Before Front Brake |
 |
| Ray's Mid 1970's Teledyne Titan Restoration - Bicycle Before Phil Front Hub |
 |
| Ray's Mid 1970's Teledyne Titan Restoration - Bicycle Before Rigida Front Wheel Rim |
 |
| Ray's Mid 1970's Teledyne Titan Restoration - Bicycle Before Top Tube |
 |
| Ray's Mid 1970's Teledyne Titan Restoration - Bicycle Before Down Tube |
 |
| Ray's Mid 1970's Teledyne Titan Restoration - Bicycle Before Saddle |
 |
| Ray's Mid 1970's Teledyne Titan Restoration - Bicycle Before Seat Lug |
 |
| Ray's Mid 1970's Teledyne Titan Restoration - Bicycle Before Seat Lug |
 |
| Ray's Mid 1970's Teledyne Titan Restoration - Bicycle Before Zeus Crank |
 |
| Ray's Mid 1970's Teledyne Titan Restoration - Bicycle Before Campagnolo Front Deraileur |
 |
| Ray's Mid 1970's Teledyne Titan Restoration - Bicycle Before Bottom Bracket |
 |
| Ray's Mid 1970's Teledyne Titan Restoration - Bicycle Before Rear Brake |
 |
| Ray's Mid 1970's Teledyne Titan Restoration - Bicycle Before Campagnolo Rear Derailleur |
 |
| Ray's Mid 1970's Teledyne Titan Restoration - Bicycle Before Rear derailleur |
 |
| Ray's Mid 1970's Teledyne Titan Restoration - Bicycle Before Phil Rear Wheel Hub |
 |
| Ray's Mid 1970's Teledyne Titan Restoration - Bicycle Before Phil Pedals |
 |
| Ray's Mid 1970's Teledyne Titan Restoration - Bicycle Before Phil Pedals |
The frame other then being dirty is in fantastic shape, I am not quite sure of the coating on the frame, is it paint, chemical, just the titanium over years? What ever it is I like it.
The frame cleaned very nice and after a little light polishing looks fantastic.
I weighed the frame and it came in at exactly 3 pounds, amazing!!
 |
| Ray's Mid 1970's Teledyne Titan Restoration - Frame - Before |
 |
| Ray's Mid 1970's Teledyne Titan Restoration Frame Before - Head Tube |
 |
| Ray's Mid 1970's Teledyne Titan Restoration - Frame Before Top Tube |
 |
| Ray's Mid 1970's Teledyne Titan Restoration - Frame Before Down Tube |
 |
| Ray's Mid 1970's Teledyne Titan Restoration Frame Before - Seat Tube |
 |
| Ray's Mid 1970's Teledyne Titan Restoration - Frame Before Bottom Bracket |
 |
| Ray's Mid 1970's Teledyne Titan Restoration Frame Before - Seat Lug |
 |
| Ray's Mid 1970's Teledyne Titan Restoration - Frame Before Brake Bridge |
 |
| Ray's Mid 1970's Teledyne Titan Restoration - Frame Before Bottom Bracket |
 |
| Ray's Mid 1970's Teledyne Titan Restoration Frame Before - Drop Outs |
 |
| Ray's Mid 1970's Teledyne Titan Restoration Frame Before - Fork |
 |
| Ray's Mid 1970's Teledyne Titan Restoration - Frame Before Fork Crown |
 |
| Ray's Mid 1970's Teledyne Titan Restoration Frame Before - Fork |
 |
| Ray's Mid 1970's Teledyne Titan Restoration - Frame Polished Head Tube |
 |
| Ray's Mid 1970's Teledyne Titan Restoration - Frame Polished Bottom Bracket |
 |
| Ray's Mid 1970's Teledyne Titan Restoration Frame Polished - Rear |
 |
| Ray's Mid 1970's Teledyne Titan Restoration Frame Polished - Fork |
 |
| Ray's Mid 1970's Teledyne Titan Restoration - Frame Polished Fork Crown |
 |
| Ray's Mid 1970's Teledyne Titan Restoration Frame Polished - 3 Lbs!!! |
The bottom bracket cups where frozen in place, I think the two types of metal together corroded. I applied a lot of penetrating oil and then carefully applied heat. The non-drive side broke free easier then the non-drive the side. The drive side cup broke free with a three foot wrench and a contraption I put together,
I put both the headset and bottom bracket components in the crock pot and then polished them, they polished fantastic. I do not think I have ever seen a bottom bracket spindle so light before, amazing!!
Installed the headset and bottom bracket look fantastic and spin like butter! I love the Dura Ace headset!
 |
| Ray's Mid 1970's Teledyne Titan Restoration Headset & Bottom Bracket - Before |
 |
| Ray's Mid 1970's Teledyne Titan Restoration Headset & Bottom Bracket - Polished |
 |
| Ray's Mid 1970's Teledyne Titan Restoration Headset Cups - Pressed |
 |
| Ray's Mid 1970's Teledyne Titan Restoration Headset Cups - Pressed |
 |
| Ray's Mid 1970's Teledyne Titan Restoration - New Headset Bearings Packed |
 |
| Ray's Mid 1970's Teledyne Titan Restoration Dura Ace Headset - Complete |
 |
| Ray's Mid 1970's Teledyne Titan Restoration - New Bottom Bracket Bearings Packed |
 |
| Ray's Mid 1970's Teledyne Titan Restoration - Bottom Bracket Complete |
The handlebars are also Cinelli and cleaned and polished very nice. I love the Cinelli stamps on the handlebars.
 |
| Ray's Mid 1970's Teledyne Titan Restoration - Stem & Handlebars Before |
 |
| Ray's Mid 1970's Teledyne Titan Restoration - Stem - Before |
 |
| Ray's Mid 1970's Teledyne Titan Restoration - Stem - Exploded |
 |
| Ray's Mid 1970's Teledyne Titan Restoration - Stem - Polished |
 |
| Ray's Mid 1970's Teledyne Titan Restoration - Stem & Handlebars - Polished |
 |
| Ray's Mid 1970's Teledyne Titan Restoration - Stem & Handlebars Complete |
 |
| Ray's Mid 1970's Teledyne Titan Restoration - Stem & Handlebars Compelte |
 |
| Ray's Mid 1970's Teledyne Titan Restoration - Stem & Handlebars Complete |
 |
| Ray's Mid 1970's Teledyne Titan Restoration - Stem & Handlebars Complete |
I did install new crank bolt dust cover caps as the originals where not with the bike.
 |
| Ray's Mid 1970's Teledyne Titan Restoration - Zeus Crank - Before |
 |
| Ray's Mid 1970's Teledyne Titan Restoration - Zeus Crank Exploded |
 |
| Ray's Mid 1970's Teledyne Titan Restoration - Zeus Crank Polished |
 |
| Ray's Mid 1970's Teledyne Titan Restoration - Zeus Crank Complete |
 |
| Ray's Mid 1970's Teledyne Titan Restoration Zeus Crank - Installed |
 |
| Ray's Mid 1970's Teledyne Titan Restoration - Brake Calipers Before |
 |
| Ray's Mid 1970's Teledyne Titan Restoration - Campagnolo Calipers - Exploded |
 |
| Ray's Mid 1970's Teledyne Titan Restoration - Campagnolo Calipers - Polished |
 |
| Ray's Mid 1970's Teledyne Titan Restoration - Campagnolo Calipers - Complete |
 |
| Ray's Mid 1970's Teledyne Titan Restoration - Front Caliper Installed |
 |
| Ray's Mid 1970's Teledyne Titan Restoration - Rear Campagnolo Caliper - Installed |
 |
| Ray's Mid 1970's Teledyne Titan Restoration - Cable Brackets Before |
 |
| Ray's Mid 1970's Teledyne Titan Restoration - Brackets Before |
 |
| Ray's Mid 1970's Teledyne Titan Restoration - Brake Cable Brackets - Before |
 |
| Ray's Mid 1970's Teledyne Titan Restoration - Cable Brackets Polished |
 |
| Ray's Mid 1970's Teledyne Titan Restoration - Down Tube Cable Bracket - Installed |
 |
| Ray's Mid 1970's Teledyne Titan Restoration - Brake Cable Bracket Polished |
 |
| Ray's Mid 1970's Teledyne Titan Restoration - Bottom Bracket Cable Bracket - Installed |
 |
| Ray's Mid 1970's Teledyne Titan Restoration - Derailleur Cable Bracket - Installed |
 |
| Ray's Mid 1970's Teledyne Titan Restoration - Seat Post Polished Saddle Cleaned |
 |
| Ray's Mid 1970's Teledyne Titan Restoration Seat Post and Saddle - Installed |
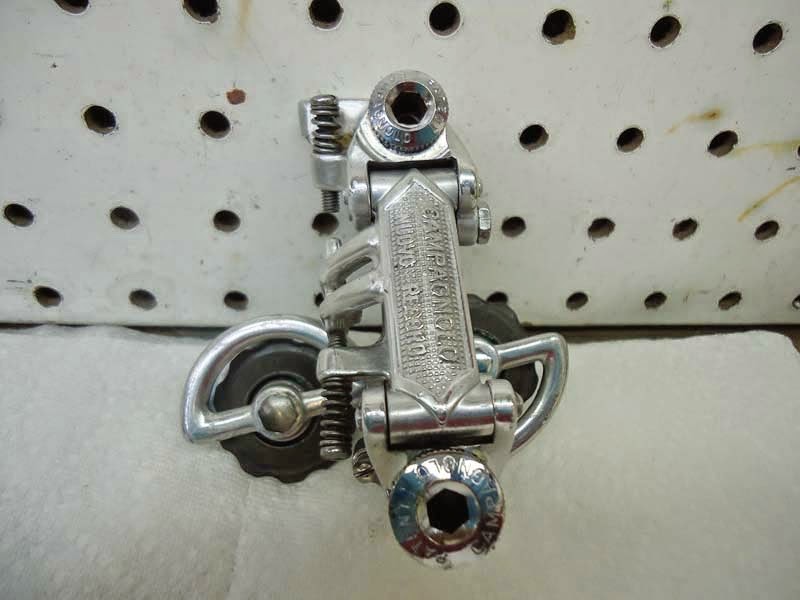
I cleaned both derailleurs and polished both. The front derailleur polished great and I am so happy the adjustment screws came back. It actually looks even better in person, the high polished mirror finish does not photograph well.
The rear derailleur was actually pretty rough, maybe the roughest part of the whole bike. I also let it soak for a week so remove all the hardened grease and to loosen up the adjustment screws. The rear derailleur polished pretty nice considering all and looks great installed. It really is hard to beat the Campagnolo rear derailleur, Beautiful!!
If you have frozen or rusted adjustment screws on a derailleur it is best to soak them as long as you possible can, these types of screws are very delicate and can snap off with very little force and then the derailleur is garbage.
 |
| Ray's Mid 1970's Teledyne Titan Restoration - Derailleurs Before |
 |
| Ray's Mid 1970's Teledyne Titan Restoration - Front Derailleur Before |
 |
| Ray's Mid 1970's Teledyne Titan Restoration - Front Derailleur Before |
 |
| Ray's Mid 1970's Teledyne Titan Restoration - Front Derailleur Complete |
 |
| Ray's Mid 1970's Teledyne Titan Restoration - Front Derailleur Installed |
 |
| Ray's Mid 1970's Teledyne Titan Restoration - Rear Derailleur Exploded |
 |
| Ray's Mid 1970's Teledyne Titan Restoration - Rear Derailleur Before |
 |
| Ray's Mid 1970's Teledyne Titan Restoration - Rear Derailleur Polished |
 |
| Ray's Mid 1970's Teledyne Titan Restoration - Rear Derailleur Complete |
 |
| Ray's Mid 1970's Teledyne Titan Restoration - Rear Derailleur Installed |
I have been looking for original style Campagnolo brake lever hoods for the levers, still searching.
 |
| Ray's Mid 1970's Teledyne Titan Restoration - Brake Levers Before |
 |
| Ray's Mid 1970's Teledyne Titan Restoration - Brake Levers Polished |
 |
| Ray's Mid 1970's Teledyne Titan Restoration - Brake Levers Installed |
I then greased all the areas that need it and installed the levers, they are going to look fantastic against the new handlebar tape.
 |
| Ray's Mid 1970's Teledyne Titan Restoration - Campagnolo Shift Levers - Before |
 |
| Ray's Mid 1970's Teledyne Titan Restoration - Campagnolo Shift Levers - Polished |
 |
| Ray's Mid 1970's Teledyne Titan Restoration - Campagnolo Shift Levers Compelte |
 |
| Ray's Mid 1970's Teledyne Titan Restoration - Main Body Components Complete |
The wheels are just fantastic from the time, the wheel hubs are Phil Wood cartridge bearing hubs and the wheel rims are Rigida.
The wheel bearings are not meant to be rebuilt as cartridge bearings are meant to be rode on till they pretty much explode and then replaced. These bearings are still as smooth as silk and I would just do more harm removing them.
The wheels spokes are very loose in place and still tight in others. It is just easier and quicker to remove all the spokes and relace the wheel then trying to ham and egg the wheel back into true, this will also give me chance to polish the hub and rims on the power polisher instead of by hand.
Its rare but I actually had to cut the tires and tubes off as they where so rotted.
 |
| Ray's Mid 1970's Teledyne Titan Restoration Front Wheel - Before |
 |
| Ray's Mid 1970's Teledyne Titan Restoration - Phil Wood Cartridge Bearing Hub |
 |
| Ray's Mid 1970's Teledyne Titan Restoration - Front Wheel Rim Before |
 |
| Ray's Mid 1970's Teledyne Titan Restoration Rear Wheel - Before |
 |
| Ray's Mid 1970's Teledyne Titan Restoration - Rear Wheel Phil Wood Cartridge Bearing Hub |
 |
| Ray's Mid 1970's Teledyne Titan Restoration - Rear Wheel Rim Before |
 |
| Ray's Mid 1970's Teledyne Titan Restoration - Rear Wheel Freewheel Removed |
 |
| Ray's Mid 1970's Teledyne Titan Restoration - Tires & Tubes Cut Off |
Today I completed the wheels. I removed all of the spokes and soaked the spokes and spoke nipples in my secret weapon for galvanized spokes, white vinegar!! A couple of hours in white vinegar galvanized spokes come out beautiful.
I polished the hubs, it took time but they turned out fantastic. I did not polish a small square on the front hub because I did not want to loose the Phil decal.
The rims where in pretty rough shape, there are a lot of minor curb hopping dents, I was able to pound out a few of the bigger curb dents. With the power polisher I was able to really make the rims shine.
I then laced the wheels back together, they turned out very nice and with everything polished the way it is I think amazing is the word!
The wheels spins like silk and the Titan is really coming along.
 |
| Ray's Mid 1970's Teledyne Titan Restoration - Phil Wood Wheel Hubs - Before |
 |
| Ray's Mid 1970's Teledyne Titan Restoration - Phil Wood Wheel Hubs - Before |
 |
| Ray's Mid 1970's Teledyne Titan Restoration Rigida Wheel Rims - Before |
 |
| Ray's Mid 1970's Teledyne Titan Restoration - Rigida Wheel Rims Before |
 |
| Ray's Mid 1970's Teledyne Titan Restoration - Phil Wood Wheel Hubs - Polished |
 |
| Ray's Mid 1970's Teledyne Titan Restoration Rigida Wheel Rims - Polished |
 |
| Ray's Mid 1970's Teledyne Titan Restoration - Rigida Wheel Rims Polished |
 |
| Ray's Mid 1970's Teledyne Titan Restoration Rear Wheel - Newly Laced |
 |
| Ray's Mid 1970's Teledyne Titan Restoration Front Wheel - Newly Laced |
 |
| Ray's Mid 1970's Teledyne Titan Restoration - Wheel Clamps Polished |
 |
| Ray's Mid 1970's Teledyne Titan Restoration - Wheels Complete Installed |
 |
| Ray's Mid 1970's Teledyne Titan Restoration - Front Wheel Complete |
 |
| Ray's Mid 1970's Teledyne Titan Restoration - Rear Wheel Complete |
Ray ordered decals from Velocals,com matching the original decals. They are very nice quality, I will say Velocals quality has really improved from a little time back.
So far I have used the Dawn water solution and measured and placed the decals in place, I then squeegee the decals and will let them sit for most of the day before removing the masking tape backing.
You can see the top tube decal has green tape spiraled around the decal. Sometimes if the decal is thick it, especially wrap around decals, it will have a spring to it. The spring after a little time will pop the decal up so after squeegeeing the decal in place I will wrap a small line of masking tape in a spiral shape, this will hold the decal in the perfect spot and counter act the spring.
I did not have and could not find exact measurements for the decals so by looking at photos on the internet I came up with the best position I could, I think they are pretty close.
 |
| Ray's Mid 1970's Teledyne Titan Restoration - New Velocals.com Decal Set |
 |
| Ray's Mid 1970's Teledyne Titan Restoration Head Tube Decal Placed |
 |
| Ray's Mid 1970's Teledyne Titan Restoration - Top Tube Decal Placed & Masking Tape Wrap to Hold in Place |
 |
| Ray's Mid 1970's Teledyne Titan Restoration Seat Tube Decal - Placed |
 |
| Ray's Mid 1970's Teledyne Titan Restoration Seat Tube Titanium Decal - Placed |
The Decals turned out pretty good and I really like the blue in the decals against the gray frame.
 |
| Ray's Mid 1970's Teledyne Titan Restoration - Top Tube Decal Complete |
 |
| Ray's Mid 1970's Teledyne Titan Restoration Seat Tube Decals - Complete |
I cut all the new cable housings and ran the derailleur cables. I also cut the brake cable housings but did not run the cables until some original brake lever hoods arrive that Ray has. No need to remove the cables to install the hoods and then re-install the cables.
 |
| Ray's Mid 1970's Teledyne Titan Restoration - New Cables & Housings |
 |
| Ray's Mid 1970's Teledyne Titan Restoration - New Cables & Housings Installed - Original Derailleur Cables Have White Protector |
 |
| Ray's Mid 1970's Teledyne Titan Restoration - New Cables & Housings Installed - Original Derailleur Cables Have White Protector |
 |
| Ray's Mid 1970's Teledyne Titan Restoration Cables - Installed |
 |
| Ray's Mid 1970's Teledyne Titan Restoration - Derailleur Cables Installed |
 |
| Ray's Mid 1970's Teledyne Titan Restoration - Rear Brake Cable Installed |
 |
| Ray's Mid 1970's Teledyne Titan Restoration - Freewheel - Before |
 |
| Ray's Mid 1970's Teledyne Titan Restoration - Freewheel - After |
 |
| Ray's Mid 1970's Teledyne Titan Restoration - Freewheel & Chain Installed |
 |
| Ray's Mid 1970's Teledyne Titan Restoration Continental Era Correct Tires |
 |
| Ray's Mid 1970's Teledyne Titan Restoration - Tires - Installed |
Ray was able to find nice Campagnolo gum replacement brake lever hoods. It is nice on Campagnolo brake levers because you can easily remove the brake levers while leaving the mounting bracket in place. Lots of soapy water and very very careful stretching and the hoods slid into place.
With the hoods in place I am now able to install the handlebar tape. A slightly lighter blue cloth tape was chosen, this will highlight the blue in the decals and i chose to add a darker yellow twine to catch the yellow seat. I stretched the cloth tape very tight and then installed the twine, I love the look!! Because of this blue and yellow look I have deiced to do the same to my personal fixed gear bicycle I ride all the time, I think I will also shellac mine because I ride in a lot of bud and dust.
 |
| Ray's Mid 1970's Teledyne Titan Restoration - Replacement Campagnolo Gum Brake Hoods |
 |
| Ray's Mid 1970's Teledyne Titan Restoration - Brake Levers Removed - Mounting Bracket In Place |
 |
| Ray's Mid 1970's Teledyne Titan Restoration - Brake Lever Hoods - Installed |
 |
| Ray's Mid 1970's Teledyne Titan Restoration - Brake Lever Hoods - Installed |
 |
| Ray's Mid 1970's Teledyne Titan Restoration - Handlebar Tape Complete |
 |
| Ray's Mid 1970's Teledyne Titan Restoration - Handlebar Tape & Twine - Complete |
 |
| Ray's Mid 1970's Teledyne Titan Restoration - Handlebar Tape & Twine Complete |
 |
| Ray's Mid 1970's Teledyne Titan Restoration - Bicycle Complete |
I rode the Titan this afternoon and did the tuning, it road fast and feels light, I am still not sure on the titanium feel, it does not exactly feel like steel and does not feel like anything else either. It feels kind of cool in its lightness though. The components are so nice, they shift very nice and the brakes hold well.
The looks are amazing, the crank is crazy with all the drilled holes, the brake calipers are the most beautiful out there, the blue handlebar tape and yellow twine and saddle are so classic. The decals are so nice and brings everything together. I could not be happier with the Titan!!! Such a cool bicycle and such a nice piece of cycling history witch I just love!!
|
| Ray's Mid 1970's Teledyne Titan Restoration - Bicycle Complete |
 |
| Ray's Mid 1970's Teledyne Titan Restoration - Bicycle Complete |
 |
| Ray's Mid 1970's Teledyne Titan Restoration Bicycle Complete - Front |
 |
| Ray's Mid 1970's Teledyne Titan Restoration - Bicycle Complete Handlebars |
 |
| Ray's Mid 1970's Teledyne Titan Restoration - Bicycle Complete Handlebar Logos & Twine - Love It! |
 |
| Ray's Mid 1970's Teledyne Titan Restoration Bicycle Complete - Head Tube |
 |
| Ray's Mid 1970's Teledyne Titan Restoration - Bicycle Complete Campagnolo Front Brake |
 |
| Ray's Mid 1970's Teledyne Titan Restoration - Bicycle Complete Front Wheel Hub |
 |
| Ray's Mid 1970's Teledyne Titan Restoration - Bicycle Complete Stem - Very Cool |
 |
| Ray's Mid 1970's Teledyne Titan Restoration Bicycle Complete - Front Half - Sooo Cool!! |
 |
| Ray's Mid 1970's Teledyne Titan Restoration Bicycle Complete - Strange Photo Angle Seat is Not at that Angle |
 |
| Ray's Mid 1970's Teledyne Titan Restoration - Bicycle Complete Drive Train |
 |
| Ray's Mid 1970's Teledyne Titan Restoration Bicycle Complete - Crank Set |
 |
| Ray's Mid 1970's Teledyne Titan Restoration - Bicycle Complete Front Derailleur |
 |
| Ray's Mid 1970's Teledyne Titan Restoration Bicycle Complete - Rear Derailleur |
 |
| Ray's Mid 1970's Teledyne Titan Restoration - Bicycle Complete Rear Campagnolo Brake Caliper |
 |
| Ray's Mid 1970's Teledyne Titan Restoration - Bicycle Complete Rear Wheel |
John Z.
Great drillium crankset! Hard to believe they were building titanium back then..
ReplyDeleteThe titanium just amazes me, titanium for 1974-75 in a bike frame!! I thought it was so expensive they only used it for national defense like in the SR-71 spy planes.
DeleteThe crank is just insane, so light and the alloy polishes just beautiful, the 47/40 chain ring set up is interesting though.
Hi,
ReplyDeleteI must said this is an awesome restoration. But may I know what did you use to clean the old parts? I have Shimano RX100 parts which badly corroded. I would want to clean them up. Appreciate your help. Thx
Ive got the almost exact bike #107 it is for sale if anyone is looking. Ernie 8053240123
ReplyDeleteHi John, awesome restoration. Two questions: 1) what did you use (i.e. the product) to clean up the frame? 2) For those putting on these decals, recommend removing the adhesive backing after getting wet for 60 seconds **and** remove the front "mask" too -- it allows them to go on with NO effort and works great. Trying to remove the masking after the decal is on the frame sucks big time. The decal seller (Velocals) recommend this approach after I mentioned the issues I had trying to remove the masking after they were on the frame... Thank you, Bruce
ReplyDelete