Hello everyone.
Today I am starting a restoration of a Raleigh Grand Prix for Craig of Illinois. This was his fathers bike and he would like to get it up on the road again. To keep things less confusing I am going to start this post today and then continually update this single post with each days new work. That way there won't be 10 posts connected to this one bike.
I am going to look up the serial #s a little later to date it, but at first look it appears to be a 1977 or 1978. The chrome and metal has a lot of surface rust but should clean up very nicely. The frame is dirty but has very few scratches and chips so that should polish out very well. All cables and housing will be replaced, also the tires & tubes, brake pads and bar tape will be replaced. I will also replace the brake levers to new ergonomic levers. The center pull brake calipers from the 70s work very well with new brake pads and an overhaul. They also look great when polished. The wheels will be polished, bearings overhauled and wheels trued. Bottom Bracket will be overhauled and the crank will be polished. I am probably forgetting stuff, but that will be updated as things progress. When done, this will be a really sharp looking nice riding bike.
I started the tear down of the bike. Everything went well except for the handlebar stem. It did not want to budge. It took a lot of PB blaster and muscle. After quite awhile it came loose. I do not know why it was stuck, because there is little corrosion at all. After bike tear down, I labeled and sorted the parts.
With all the components off the frame, I could see that there was a lot more dirt then I thought. There where also areas of the paint that where in rougher shape then I thought, not to bad, but rougher then I thought. After cleaning and a lot of cleaning, I moved on to polishing. The photos do not show it well because the dark paint does not photograph well in my light, but the frame polished up pretty nice. The dark paint also makes it harder to see the rougher areas of the paint. Over all I am happy with the shine on the frame. Below are some before and after photos. Tomorrow morning I will be starting with the headset and handle bars. Until then, good night.
 |
| Frame Stripped of Components & Dirty |
 |
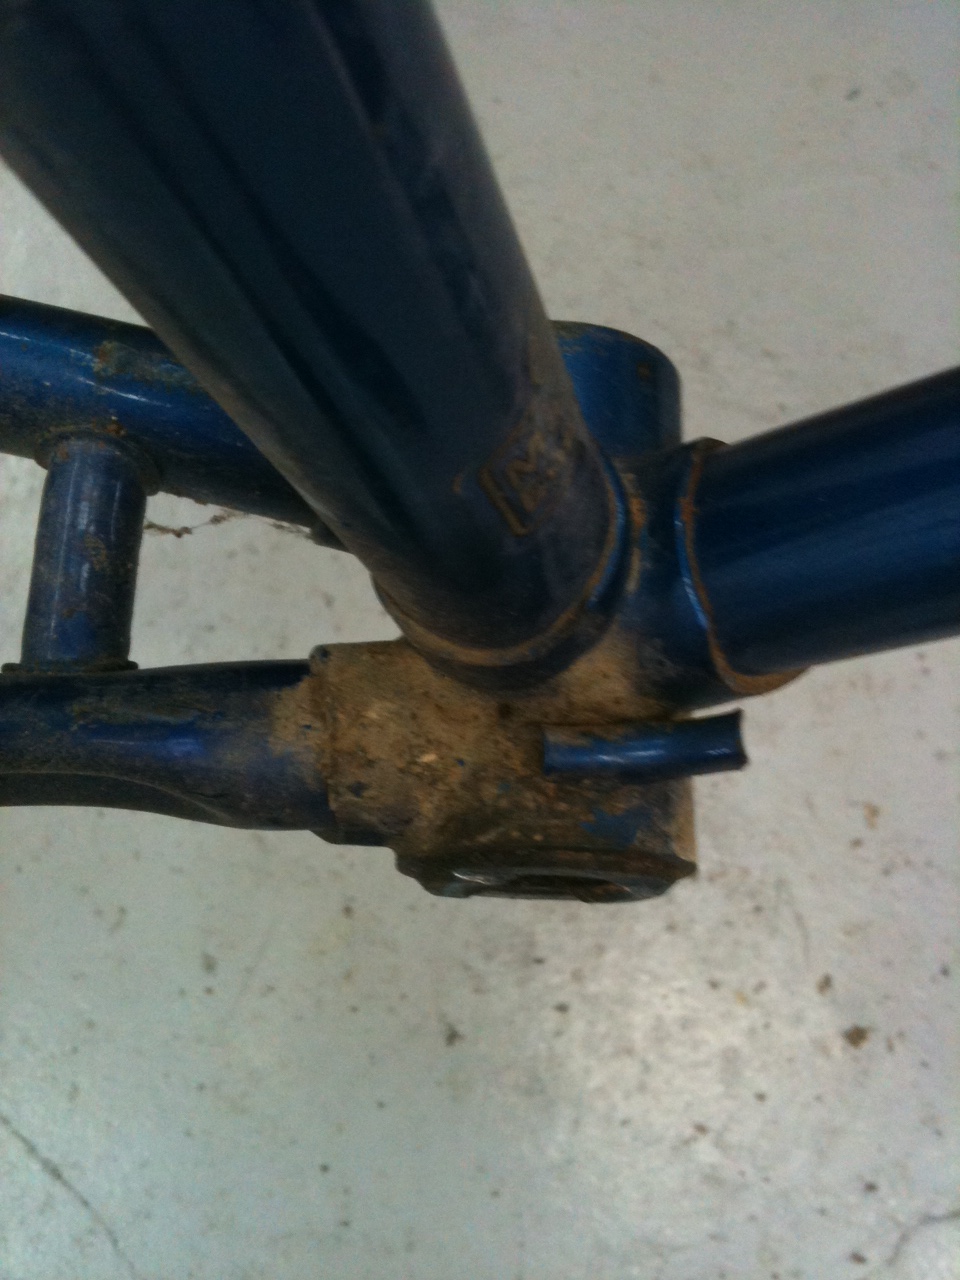
| Dirty Bottom Bracket |
 |
| Components Laid Out |
 |
| Crank Puller Tool - Removing Crankset |
 |
| Bottom Bracket - Pretty Nasty |
 |
| Frame Polished |
 |
| Polished Bottom Bracket- Very Nice Considering Before Photo |
 |
| Polished Head Badge |
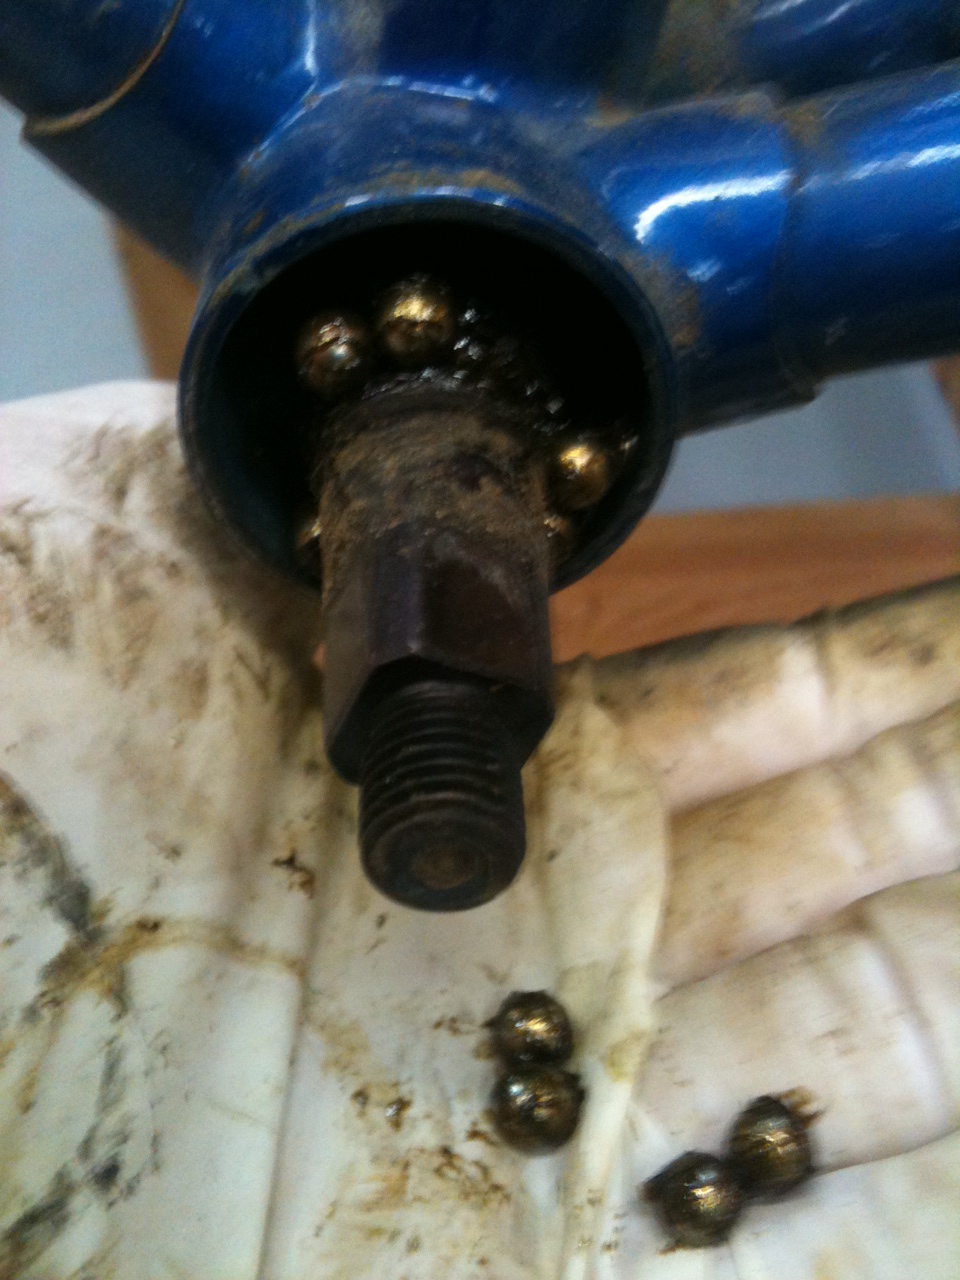
I got started on the Headset this morning. It is a loose bearing headset. Most headsets have caged bearings. A loose bearing headset is a little harder to reassemble for the bearings are loose and easy to get away, but going slow and taking time it goes fairly well. The advantage of loose bearings is that with out the cage you can fit more bearings in the bearing race. With more bearings the forces are spread out over a greater area and there for perform better then caged bearings.
The headset components where very dirty and the grease was dried and sticky. I cleaned the components with soapy water, I then polished the components on the bench top buffer. All the parts of the headset polished out nicely except for the brake cable hanger. That was badly pitted, it did clean up ok. I am going to look through my parts to see if I have one that fits, otherwise original one is going to be ok. At the same time I cleaned and polished the fork. It cleaned up nice and polished nicely. The fork chrome also polished well for the amount of rust it had. Just a few spots where pitting can be seen.
With all the parts polished, I greased the bearings races and then carefully placed the loose bearings in place. The grease helps hold the bearings in place. I also applied a layer of grease to the fork tube, this helps prevent corrosion over time. With everything greased I carefully slid the fork tube through the bearings cups and then installed the bearing cap and lock nuts. Overall the chrome looks pretty good. In the photos below you can see the brake cable hanger polished but still a little rough.
 |
| Dirty Fork & Headset |
 |
| Dirty & Rusted Headset |
 |
| Fork & Headset Polished - Poor Photo |
 |
| Pressing Bearing Cups with Press |
 |
| Top Bearings Packed and In Place |
 |
| Fork Race Bearings Packed |
 |
| Headset & Forked Installed - Hanger is the duller Chrome Piece Hanging From Top |
 |
| Polished Fork Chrome |
With the Fork and Headset complete I will move on to the bottom bracket. With the bottom bracket having loose bearings I want to work on it before the frame starts to get heavy. Will post as I complete more. Thank you.
I completed the bottom bracket this morning. It is also has loose bearings, which again is better performance over convenience. I left the drive side or fixed cup in place and cleaned and polished it from the inside. The drive side cup had little edges to attach the tool to and I did not want to do any damage to it. The old grease was very sticky and hard. I actually had to use a strong chemical de-greaser and a brass brush on it, which I try to avoid. When the grease was finally clean I used a Dremil tool and polishing compound to polish the inside of the bearing cups. I do not have any pictures of the assemble. It takes all of my hands to assemble a loose bearing bottom bracket and no one was around to take photos.
I started by putting grease in the drive side cup and then I greased and installed the bearing in the lock side cup. To install loose bearings in the drive side cup I must keep a finger pressed through the drive side cup and carefully drop the bearing into place at the same time pushing them into place with your finger. Next I installed the BB axle with the lock side cup in place and slowly dropped the axle through the drive side cup as I tighten the lock side cup. You must move very slowly and carefully not to knock the bearing out of place. I applied a thick coat of grease to the Bottom Bracket axle to help prevent corrosion. Over all it went very smoothly for a loose bearing bottom bracket.
Next I will work on cleaning the handlebars & stem and then move on to the wheels. I like to get the wheels on before I start on the drive train. That way I can take the bike out of the stand if I need to. Will post more as i go.
 |
| Dirty Bottom Bracket Components & Bearings |
 |
| Old Grease in Lock Side Bearing Cup |
 |
| Rusty out Side of Lock Side Bearing Cup |
 |
| Polished & Cleaned Bottom Bracket Components |
 |
| Completed Lock Side of Bottom Bracket - Cleaned up Nice |
 |
| Second View Completed Bottom Bracket |
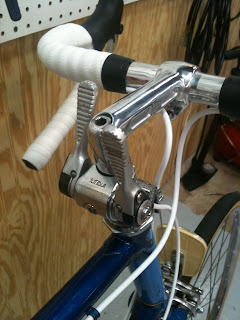
I started the cleaning and polishing of the Handle bars. It took a lot of Goo Gone and a brass brush to remove the old glue from the old fabric bar tape. After that I game the stem and bars a brushing with a Mag Polish and then went to the buffer. Just after the first buffing the bars and stem look beautiful. A wonderful glass polish look to them. I am thrilled. In the Morning I will give them a final pass on the buffer. Until then, Thank you.
 |
| Handle Bars before - Old Tape Glue |
 |
| Before Handle Bars - View 2 |
 |
| Before Handle Bars - Stem View |
 |
| Handle Bars - After 1st Buff -
Beautiful |
 |
| Handle Bars & Stem After 1st Buff |
Good Morning. I finished the buffing on the Handle Bars and Stem this morning. I am thrilled with the results. It shines like glass. To install the stem I added a coat of grease to the lock nut and to the stem. This helps prevent corrosion. There are some stains from the old glue on the aluminum, but that is ok because they will be cover by the bar tape. The are of the bars that will be seen is perfect.
 |
| Bars, Stem & Components Polished |
 |
| Bars & Stem with Stem Greased |
 |
| Bars Installed - Sorry Poor Photo |
 |
| Bars Installed - Very Nice Shine |
I am starting on the rear wheel now. I have a special tool to remove the free wheel. It was not an easy tool to find, they do not make it anymore, I found it a couple of years ago on Ebay. The freewheel tool fits into the freewheel. I then use a 24in wrench and add pressure in the reverse direction. It is a large wrench, and I need all the leverage I can get because most freewheel are stuck into place. Peddling forward actually tightens the freewheel. That is a lot of force over time tightening the freewheel. I will add more photos as I go.
 |
| Before Freewheel & Cassette |
 |
| Freewheel Remover Tool |
 |
| Large Wrench |
 |
| Freewheel Removed |
 |
| View of Rust and Dirt on Rear Rim |
Cleaned and polished the rear wheel hub and rim. There is some pretty bad rust. Most cleaned up nice but a second coat of polish will be needed. The grease in the hub was as hard as rock candy. I had to again break out the heavy duty cleaner. Considering the condition of the grease there is very little wear to the bearing cones and hubs. The spokes are the galvanized type everyone used in the 70s. The spokes will not polish, but they will clean up nice. The dull dark finish of the spokes will make the rims and hub stand out more.
I have the axle and bearings soaking, they may need to soak a while with the hard grease. Will give the hub and rims another coat of polish. Will post more picks soon.
 |
| Dirty Axle, Cones & Bearings |
 |
| Hard Grease in Rear Hub |
 |
| Hub Before |
 |
| Rear Hub after First Polish |
 |
| Rear Rim Before |
 |
| Rear Rim After First Polish |
I gave the rear wheel a second coat of polish. It turned out nice, it is not perfect because there is some rust pitting, but still turned out very nice. I then greased the hubs, bearing cones and bearings. I always add a coat of grease along the entire length of the wheel axle, this prevents corrosion. The quick release wheel skewer was in rough shape, it had lots of rust and grease. After buffing off the rust on the bench buffer and lubricating the skewer it turned out pretty nice. I then placed the wheel on the bike to get a good look. It looks very nice in place. I like the chrome against the darker blue. I spun the wheel on the bike and I am very happy with the smoothness of the spin. I still need to true the wheel on the truing stand, it is not to bad, but can be better. I do not put the new tires and tubes on the wheels until the bike is almost done. No need to get new wheels dirty and scuffed. Also it is better to work on wheel with the tire in place, it is easier to hang on to and does not slide all over the work bench. Next i will be starting the front wheel.
 |
| Rear Wheel Components Cleaned & Polished |
 |
| Rear Bearings Packed in Grease |
 |
| Skewer Before Polished - Sorry for Poor Photo |
 |
| Skewer Polished |
 |
| Wheel Polished & in Place - Nice Polished |
 |
| Wheel in Place Side View |
 |
| Bike To this Point - Will get Better Photo |
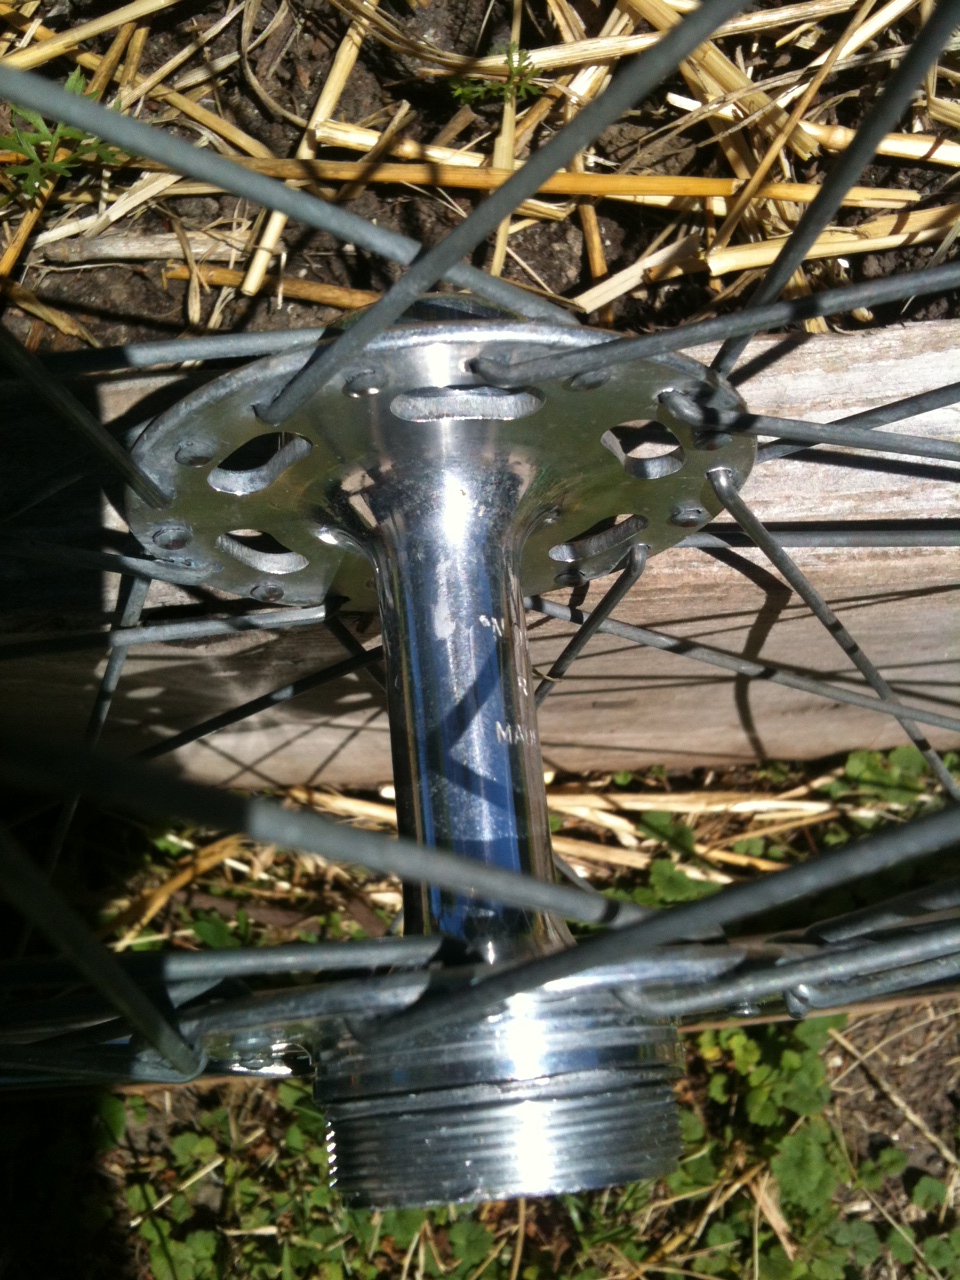
The last of yesterday afternoon and the first of this morning I finished the front wheel. I did not post photos last night, I did not have time for it was Tuesday night ride night with friends. I was worried the front wheel bearings and cones may have been damaged, they did not turn at all. After disassembling and inspecting I found that the grease was rock hard and the cones may have been tightened to much. After cleaning they show only a little wear.
The front wheel rim had a some rust, I cleaned and polished of all the rust but there is a little rust pitting left. The chrome on the rims is very thin, which is good for performance because it is lighter but also not as durable. Overall the rim shines pretty well, the pitting is not very noticeable. I polished the hub with two coats of polish and then assemble the wheel.
I applied the grease and bearings, coated the axle and installed the bearing cones and lock nuts. I then polished the Skewer. It was heavily rusted, but polished wonderfully, I also added a few drops of oil to the Skewer. I placed the wheel on the bike, and I am very pleased with the high polish against the polished chrome fork tips. Polished chrome fork tips and chain stays has always been my favorite look. This bike does not have the chrome chain stays. I am also very pleased with the smoothness the wheel turns considering the way it did not want to turn before overhaul.
I think I will move on to the drive train at this point. I will clean the crank set, rear cassette and the derailleurs. I do not know if the crank set should be polished, I think the finish is meant to be of a duller texture, but I will see after cleaning. At this point all the bearing systems (Headset, Wheel Hubs & Bottom Bracket) are overhauled & Completed.
More to come later.
 |
| Front Rim Polished & Unpolished |
 |
| Before Front Skewer & Hub |
 |
| Front Hub Before |
 |
| Front Hub Old Grease |
 |
| Front Bearings Greased & Packed |
 |
| Completed Front Wheel & Skewer |
 |
| Front Wheeled Polished & Installed |
 |
| Front Wheel Installed - Love the Classic Chrome Look |
 |
| Bike to This Point |
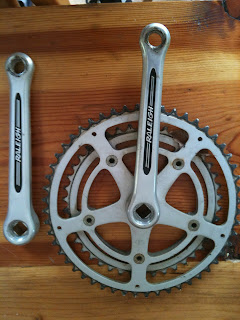
I finished work on the crank. I disassembled the crank, all 18 parts, polished each bolt, bushing and spacer. I did not polish the crank gears. I do not believe the finish on the crank gears and arms is meant to polished. I cleaned the cranks and they look really nice and are in very good condition. I then greased and installed the crank bolts, and then installed the crank set back on the bike. Its starting to look like a bike again. I am very happy with the way the crank turned out, it has a very nice design, I believe it is a Suguno crank.
I will be starting the derailleurs next. Watch for more posts.
 |
| Dirty Crank Set |
 |
| Dirty Crank & Bolts |
 |
| Crank Disassembled |
 |
| Crank Cleaned & Bolts Polished |
 |
| Crank Polished & Assembled |
 |
| Crank Bolt Polished |
 |
| Crank Polished & Assembled |
 |
| Looking Like a Bike Again |
I was going to start the derailleurs as the last thing this afternoon, but instead I cleaned the freewheel and gear cassette and also polished the pie plate. The pie plate is in bad condition, it was bent and had bad gouges from a derailed chain wedge between it and the cassette. I straightened it the best i could using my vise and a ball peen hammer, I then polished it on the bench top buffer. It came out pretty good, not perfect, but good. The cassette I had to use the heavy duty cleaner. It cleaned up nice. I then installed the pie plate and screwed the freewheel back into place. Always had a coat of grease to the freewheel threads. This helps prevent the freewheel from freezing onto the wheel hub. Tomorrow morning I will start with the derailleurs and chain, after that the brakes and then it will be time to start running cables and tuning the bike. More photos tomorrow, Good Day..
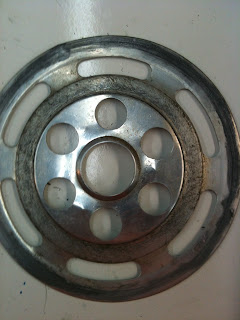 |
| Pie Plate Before - Bad Condition |
 |
| Freewheel & Cassette Cleaned |
 |
| Pie Plate Repaired & Polished |
 |
| Freewheel & Cassette Installed |
 |
| Bike View |
After this mornings trail ride on my 1990s Specialized Rock Hopper modified to single speed I started work on the derailleurs. The front derailleur went fast and turned out very nice. It shines nice and after overhaul and lubricating the pivot points move very smooth. The rear derailleur was a little more trouble some. On this Sun Tour derailleur, to get to the upper jockey wheel you must unscrew the entire jockey wheel cage, but the jockey wheel cage would not budge. I had to open the body and remove the tension spring, remove the rod and spray PB Blaster on it. Eventually the cage came loose.
Having to remove the cage this way took some time and assembly took time also. After polishing and lubricating it took a lot of tweaking to get the derailleur to function correctly. I then installed the derailleurs on to the bike. While installing the rear derailleur I found why the pie plate was damaged, When the rear derailleur is in the large gear position it rubs on the pie plate. I will have to correct this when I install the derailleur cables and tune the shifting. Next I will start on the brake calipers. More to come.
 |
| Derailleurs Before Dirty |
 |
| Front Derailleur Before |
 |
| Rear Derailleur Before |
 |
| Rear Derailleur Polished & Disassembled |
 |
| Derailleurs Completed |
 |
| Derailleurs Installed |
 |
| Rear Derailleur Installed |
 |
| Front Derailleur Installed |
I got to work on the front brake. It polished up nice, I always liked the look of these center pull brakes when polished to a high shine. When assembling the front brake I noticed that the caliper was not functioning smoothly. After inspection I found that the right caliper arm is bent. I am working on a way to bend it back to where it should be with out braking it. When I figure that out I will start on the rear brake.
 |
| Front Brake Before |
 |
| Front Brake Disassembled |
 |
| Front Brake Polished |
 |
| Front Brake Before & After |
One more post for today. I repaired the bend in the front brake caliper arm by wrapping the arm in a towel and clamping the arm in the vise. I then "gently" pried it back into place. The caliper now pivots smoothly. I then polished the rear brake and assembled it. The rear brake had some deep rust on the pivot bolts. The rust is polished away, but there is some pitting in the chrome. Until later.
 |
| Front & Rear Brakes Polished |
Got back to work on the Raleigh this morning. Spent the last three days in my home town in Upper Michigan. It was wonderful weather and did some trail riding. Got home at Midnight last night, so I had a little bit of a slow start this morning.
Started with truing the wheels this morning. The rear wheel had a pretty nasty curb jumping dent. I pounded it out gently with a ball peen hammer on a piece off rubber over my vise. It mostly hammered out. It is not perfect, but defiantly good. I then went on with truing the wheels. All the spokes need tension, after that I got the wheel to less then 1/16 of an inch true. Very straight for a wheel this age.
With the wheel true I put on the new Tires tubes. They are Kenda Gum wall tires. A good match for 27 x 1 1/4 inch wheels from the 70s. They look pretty nice on the polished out wheels.
With the tires in place I started work on the shifter and shifter band, (I forget the technical name, I have always called it the Shifter Band.) it is the chrome band that goes on the down tube to hold the brake cables and housings in place. I disassembled the shifters, cleaned and polished them and greased and assembled them. I was not happy with the way the parts where polishing on the bench top buffer, so I used a brass wheel in my Dremil tool and then a buffing wheel. This got the shifter and band polished nicely. I did not polish the shift levers, like the crank they have a finish that is not meant to be polished.
The only polishing left to do is the seat post and seat components. But I am going to start cutting the new shifter housing and running cables. I use Jag-wire cable housing. Jag-wire is a very high quality housing which helps with smooth shifting and braking. More photos to come.
 |
| New Kenda Gum Wall Tires |
 |
| Rear Wheel in Stand - Sorry Poor Photo |
 |
| New Tires on Bike |
 |
| Shifter & Band Before |
 |
| Shifter Exploded View & Polished |
 |
| Shifter Installed |
 |
| Shifter & Headset before |
 |
Shifter Band
Bad Spot on Frame Just Below Band |
Well our internet has been down all day with a few short power outages so I am just getting the rest of today's work up now. I started work on running the cable housing. I started by installing the brakes and new brake pads. I also use Jag-wire brake pads, they work nice and at a fraction of the cost of Grey Matter pads. I have to say I love the old look of the giant reflectors. (Yes, that makes me a dork.) At this time I also installed the new brake levers. I like these levers, they are very comfortable to ride on.
I then cut the housing for the shift cables and ran the cables. The derailleurs are running smoother then the day they where new. Except for the rear pie plate getting in the way of the rear derailleur. The only thing I can think of is this is the wrong pie plate for the bike. I have gone through everything and it still does not fit. I will have to come up with something to fix that.
I then cut the housing for the brake cables and ran the cable. I always grease the cables to help prevent corrosion down the road, you probably don't have to with these housing, but it can't hurt. Later after the photos where taken I decided to take some slack out of the brake cable housing so they currently look a little neater then the photos.
In the morning it will be time to finish tuning the brakes, clean the chain, polish out the seat components and take it for a test ride. After the test ride when I know all is good I will put the bar tape on. I am sure I am forgetting a few this that need to be done, but I will add those later. Good Night.
 |
| New Brake Levers Installed |
 |
| Cable Housing Front View - 1st Run |
 |
| Front Brake View |
 |
| Rear Brake View |
 |
| Brake Lever & Cable Housing Side View |
I finished off the bike this morning, except for the Pie Plate and Rear Derailleur rubbing in the high gear Problem. I am baffled by it, all I can think is the pie plate is the wrong plate for the bike or a spacer was lost sometime back by the amount of damage to the pie plate. I have a friend coming by in a couple of days, he is also going to take a look.
Besides the pie plate problem, the bike rides very smoothly. Everything shifts easy and smooth. The bike stops very well, there is a slight vibration on occasion in the rear brake. I think it will go away as the brakes are broken in. I will keep working on braking them in over the next couple of days.
I started the day by tuning the brakes, cleaning and installing the chain, polishing the peddles and polishing the seat components. The seat components polished nicely, I did not polish the seat rails, I did not want to get polishing compound on the leather or synthetic material. I then took it for a test ride, it is a very nice ride, the free wheel is a little louder then I like, but it is smooth. The low gears are very large, I found them to be almost to easy, they must be for some major mountain riding.
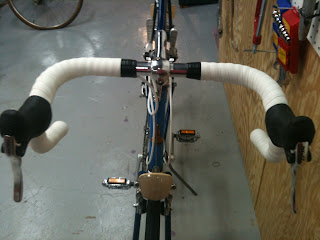
With the test ride complete and all running smooth I went on to the handle bar tape. In the pictures below you can see a layer of black tape. I run black tape the entire length of the cable housing to hold it secure and also improve braking. I then install the bar tape, this tape is synthetic gel tape, a very comfortable tape. With the tape complete I cut the cables to length and added cable ends.
I am very pleased besides the pie plate problem with the way this bike turned out. Extremely smooth and comfortable ride. Should have a lot of miles in it over the years. I will be adding more pictures later.
 |
| Peddles Polished |
 |
| Seat Components Polished & Installed |
 |
| Seat post Bolt Polished |
 |
| Black Tape & Bar Tape |
 |
| Bar Tape Complete |
 |
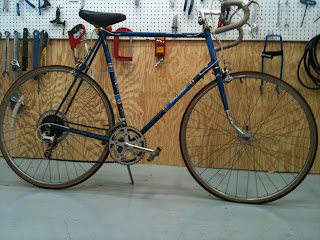
| Finished Bike Outside |
 |
| Finished Bike Outdoors Front View |
 |
| Finished Bike Drive Train View |
Here are photos of before and after. I really like this bike. I also like the much cleaner neater look of the areo brake levers. Hard to believe that the original color of the fabric bar tape was blue. Very pleased with the results. Thanks for looking! I am looking for a photo of the brake view before and after. Must be in the cloud somewhere.
 |
| Before Side View |
 |
| 1978 Raleigh Grand Prix Restored |
 |
| Before Front View |
 |
| 1978 Raleigh Grand Prix Restored |
 |
| Before Derailleur View |
 |
| 1978 Raleigh Grand Prix Restored |
 |
| Before Crank View |
 |
| 1978 Raleigh Grand Prix Restored |
|
| Before Headset View |
 |
| 1978 Raleigh Grand Prix Restored |


Looking better already. Can't wait to see your good work.
ReplyDeleteJohn, Absolutely amazing. If I didn't remember it when it was new it would be hard to believe it's the same bike. You should have your own TV show on one of the DIY networks.
ReplyDeleteThank you for the kind words. I enjoyed this bike greatly. I love the pre 80s lugged frames. Thanks again.
ReplyDeleteWhat do you do use to polish the chrome like that? I have a similar era Grand Prix that I am overhauling and want results like you achieved.
ReplyDeleteHello Karl,
ReplyDeleteI use a combination of polishing compounds on bench top buffing wheels. But if you do not have that, the best is Turtle Wax chrome polish an a lot of elbow grease and fine brass brushes on the rougher areas. Mother's makes chrome polish also but the Turtle Wax is better. It's in a green bottle. For alloy parts Mother's mag polish works well. Do not use either on the opposite metal, this will cause troubles.
Thanks for looking,
John Z.
John,
ReplyDeleteThanks, it's an amazing job. Mine is a 1980 Super Grand Prix with bar end shifters. I tried some Brasso, because I had it on hand, and was underwhelmed by the results. Just cleaning everything with some Simple Green did wonders, though. Don't have bench top buffers but maybe I need to look into it. I started this just to learn how bikes work, but now that I have all the pieces off, I want it to look pretty too!
Hello John,
ReplyDeleteI just found one of these bikes for $25, and I am excited to put it back together.
I've come to a stopping point with the freewheel though. Its currently frozen, so I need to get it off. Of course, this is not a simple fix, as you know.
Whats the name of the tool?
Everything on this bike is in such great shape (*except the paint). I would hate to resort to destructive methods.
-hugh
Hello Hugh,
DeleteThe tool is a freewheel remover tool. There are a lot of different possibilities of the size that your freewheel good need. The one on Craig's required a tool that fit old mallard freewheels that where on The cheaper Schwinns from the 1970's and early 1980's, but again Schwinn also used many different sizes even on the same model bike. The Mallard freewheel tool I got lucky a long time back and found one on eBay, they do not make new that fit it. Your best bet might be a local bike shop, they should have a large collection of freewheel remover sockets. They probably will remove it for you for free or just a few dollars. Also if
This comment has been removed by the author.
DeleteSorry on last post cutting out, iPad and blogger do not work together very well. If you already have the tool and the freewheel is frozen to the wheel hub, spray as much as you can with PB blaster and then maybe a bigger wrench, I have a 2 1/2 foot wrench for this and usually works. Another thing that can work is putting the freewheel tool in a vice and the wheel on the tool and turn the wheel as leverage. What also can help is locking the freewheel tool in place with the wheel squire and then connecting the wrench for better leverage.
DeleteHope this helps, thanks for the interest,
John Z.
Thanks for the great site. I pulled my old Japanese Super Grand Prix out of the cobwebs to put it back into service. I bought mine for about $40 about 15 or 20 years ago. It was a very dependable and fun bike, and I'm looking forward to riding it again. I'm not going to go to the same lengths that you did, but thanks for the amazing breakdown and rebuild photos. It inspired me to take a little extra care in restoring mine.
ReplyDeletegreat post thanks. I have a couple questions though about the crank and bottom bracket removal. I have heard that raleigh used non standard threading on the bottom bracket therefore If one wants to replace a worn crank with some modern shimano cheapie, one needs a special bottom bracket. did you use any special type of crank puller or bottom bracket removal tool for this job? if so, what did you use?
ReplyDeleteGreat Post John, My First Grand Prix back in about 1976 was a 25 1/2 inch Blue frame like yours, but with Cotter cranks, Downtube shifters and looping up and over brake cables. It bit the dust when i ran into the back of a parked car and bent the frame. I bought a new green frame which I rebuilt with the parts from the blue bike and rode until you guessed it, I rode into the back of a parked car. I bought a replacement black frame from ebay and had it shipped from Albuquerque to England and that is my main ride now. Over the years some things have changes such as the brake levers having hidden cables like the one that you have jsut done here, a Brooks Saddle and cotterless cranks from a bicycle rescued from the tip. The front Derailleur mech (and the back) are still the original simplex units though I have just replaced the front one because it is made of Delrin and was cracking.
ReplyDeleteThis bicycle is my main ride even though I keep saying that I am going to get a new one. I get out on it and cannot see a reason to replace it.
Keep up the good work.
John, further to my post, do you have the dimensions of the bottom axle for your bike? the one that I used is the wrong size in that the crank is too far out from the body. I sort of noticed this when I changed the front derailleur.
ReplyDeleteThanks for any help.
Further to that, the axle or spindle or whatever you call it has dimensions 35 55 40 and the stamp 5T on the body, This is not in sheldon brown's list of crank sizes, (sheldonbrown.com/bbsize) though I detect that the '5' implies a 70mm long bottom bracket.
DeletePS I need a reply. If it wasn't for your story here I would probably replace the whole bottom bracket assembly with one of these cheap shimano ones! Until I read the previous post.
Hello PMerchant,
DeleteI checked my notes on the restoration and did not write the bottom bracket size. The restoration was over two years ago for a customer, I do not have the bike to measure. Some where in the 1970's Raleigh went to standard threading but I would not know from your bike. If it is out to far I would say try a shorter so called "cheapo" Shimano cartridge bottom bracket, it would be in the $18 range on amazon and worth a shot.
Thanks for the interest,
John
Using http://sheldonbrown.com/images/spindle.jpg
DeleteD=~136mm, A=46mm, B=~55mm, C=~36mm (measurements not including domed end of BB)
Randomly found this recent post, thought I'd share since I have my 1968 Grand Prix disassembled right now!
Thanks for that Ian, My frame by the serial number is a 1979 model, built in Canada. Is there a code on the spindle? It will be 5x of some nature. My bike has the original simplex derailleur that is a rod that moves in and out, not a trapezoidal mechanism. The cage that goes around the chain is out to the very limit on the rod, that's why I am looking for a unit with shorter A and C dimensions. The chain alignment with the rear sprockets is also wrong.
DeleteI'll get there. I doubt that it will ever look as good as this one again, but as long as it keeps rolling as well as it does, that's fine.
Have a good day.
Hi Ian, Having looked at this again, and not had much luck finding a spindle of the right size for sale, I have decided just to swap my spindle around so that the long end is on the left side, like yours, and that will be fine I hope. Until I go around a left turn too steeply and scrape the pedal! It's too cold - about -1 deg C here a the moment- to work in the garage, so It will have to wait until it's a bit warmer to get out and work on the bike.
DeleteDone that and very pleased. I never expected that the long end of the spindle should be on the non-sprocket (left) side, but after having done it, I measured the length to the end of the spindle from the seatpost, and found it to be 6 cm on each side. The clearance from the frame by the back wheel is greater than a centimetre, and also the same on each side, so I am very happy. Many thanks to D Ian Robinson above for showing his A and C measurements.
DeleteAnd thanks to John for doing the Blog. PS. A friend has a collection of Bluemels fenders and I am going to get a set for my bike soon.
"... but the frame polished up pretty nice. ..." NICE Raleigh. I am embarking on fixing up the Republic of Ireland-made Raleigh Grand Prix I rode as a teenager for my teenagers.
ReplyDeleteCan you describe the process, tools and chemicals you use when you polish up a frame? I want to maintain the original patina, but polish it up to look as good as it should. Thank you!
How much is such a vintage bike worth? I was shipping one (mint conditions) and the shipping company lost it (to a truck on fire). How much shall ask for it?
ReplyDeleteGreat Work!!!!!
ReplyDeleteI owned this bike in college in 1977-78. I loved this bike....What a beautiful restoration....as good as Raleigh itself!!!!!!
ReplyDeleteThank you for the demonstration of first class restoration. I have gotten my '72 Raleigh Grand Prix out of the garage and it is now restored in ways similar to your own. It is up and running beautifully with all original original components(except cable replacement and Panaracer Pasela). I will be touching up the white enamel with either finger nail polish or appliance enamel, depending. The ride is lively and smooth in all respects. I do not know how it will fare on hills and in the presence of people on more modern bikes.
ReplyDeleteNice work! Even nicer (possible?) write-up. Thanks.
ReplyDeleteMine is a 1979, Raleigh-made (at their Waterloo Canada plant) for the Canadian Intersport sporting-goods chain. No Raleigh-marked components (Suntour "Compe V" FD and "V-GT" RD). Other parts, as well. It has a Raleigh serial number -- RP923112 where R=Canada, P=November; I don't know if the "23"=size (mine is 23"), with "112"=order of manufacture, or if "23112" is the order of manufacture). I know it's a "Grand Prix", because the color is Pearl Silver, which was only offered in the "Grand Prix" or "Competition G.S." (and this ain't the latter).
WRT the BB spindle. Mine (probably yours, too) is one of those Raleigh-(non)standard 71mm BB shells, with their 26TPI threading. Mine is a "5S" model (A=35mm, B=55mm, C=37mm, D=127mm).
(see "The Headbadge" for their 1979 catalog) --
http://www.kurtkaminer.com/TH_raleigh_cat_us79.html
It's been sitting... mid-restore... for the past five years. I'm finally getting it up-and-running: 700C wheels laced to high-flange Avocet hubs w/Conti 700x42 "SpeedRide" tires; a custom Suntour 7-speed freewheel (13/16/17/18/19/21/24); original FD and Suntour "V-Luxe" RD (no need for the long-cage "GT" model here in South Florida); wider bars, Nitto stem, original Shimano "Tourney" brakes, w/period-correct Dia-Compe non-aero levers.
I can't wait! (but I will).
Groan... I forgot to mention that the third character in the serial number indicates the year of manufacture -- in this case, "9" = 1979.
Deletehttp://www.bulgier.net/pics/bike/Catalogs/Retro-Raleighs/RaleighSerialNumbers.jpg
I have an identical Raleigh Grand Prix with dark blue paint. Can you identify the shade of paint that was used for touch up purposes?
ReplyDeleteI owned this bike in college in 1977-78. I loved this bike....What a beautiful restoration....as good as Raleigh itself!!!!!!
ReplyDeleteRaleigh home improvement
Most of the time I don’t make comments on websites, but I'd like to say that this article really forced me to do so. Really nice post! bike wheel
ReplyDeleteI admit, I have not been on this web page in a long time... however it was another joy to see It is such an important topic and ignored by so many, even professionals. I thank you to help making people more aware of possible issues. bicycle wheel
ReplyDeleteHello, this weekend is good for me, since this time i am reading this enormous informative article here at my home. best bikes for kids
ReplyDeleteHi, I had a 78 or 79 Raleigh Grand Prix that was very deep blue almost purple. I have a frame from a 77 here that is the same color. I also have a 76 and 81 frame and they are a slightly I mean slightly lighter blue. Most people would not even notice as it so slight but my old one and the 77 are ever so slightly darker and richer like you could fall into it. Any ideas on matching paint for touch up?? thanks Keith
ReplyDeleteI think this is a really good article.You make this information interesting and engaging.You give readers a lot to think about and I appreciate that kind of writing. avast cleanup premium key 2019
ReplyDeleteThanks for sharing this information. I really like your blog post very much. You have really shared a informative and interesting blog post with people. Private Placement
ReplyDeleteAwesome blog. I enjoyed reading your articles. This is truly a great read for me. I have bookmarked it and I am looking forward to reading new articles. Keep up the good work! tavor x95 for sale
ReplyDeleteGreat read I must say. You have beautifully portrayed your thoughts and ideas through this article. Great insight on the topic and value addition. movie maker indir Keep posting more articles like this!idm with crack
ReplyDeleteHey, this is a blogger I read your article, it’s so interested and also provide useful information also visit my website
ReplyDeleteidm crack
office 2016 full
camtasia crack
virtualbox indir
windows 8.1 indir
movie maker indir
rhinoceros indir
google earth indir
netflix indir
Awesome blog. I enjoyed reading your articles. This is truly a great read for me. I have bookmarked it and I am looking forward to reading new articles. Keep up the good work! Fine Lines
ReplyDeleteI really appreciate this wonderful post that you have provided for us. I assure this would be beneficial for most of the people. Wrinkle Reduction
ReplyDeleteI have perused your article, it is exceptionally enlightening and helpful for me.I respect the profitable information you offer in your articles. Thanks for posting it. Body Treatments
ReplyDeleteThis is a great inspiring article.I am pretty much pleased with your good work.You put really very helpful information. Keep it up. Keep blogging. Looking to reading your next post. Hair Removal Treatment Toronto
ReplyDeleteYou have a real ability for writing unique content.I like how you think and the way you represent your views in this article.I agree with your way of thinking.Thank you for sharing. eye & brow rejuvenation
ReplyDeleteThanks for this great post, i find it very interesting and very well thought out and put together. I look forward to reading your work in the future. Register at MyCCPay portal
ReplyDeleteIncredible tips and straightforward. This will be exceptionally helpful for me when I get an opportunity to begin my blog. A research paper rubric
ReplyDeleteInitial You got a awesome blog. I determination be involved in plus uniform minutes. I view you got truly very functional matters. I determination be always checking your blog blesss. Mega888 tumblr
ReplyDeleteI think this is a really good article.You make this information interesting and engaging.You give readers a lot to think about and I appreciate that kind of writing. ยูฟ่าเบท
ReplyDeleteHi, I find reading this article a joy. It is extremely helpful and interesting and very much looking forward to reading more of your work. freelancer
ReplyDeleteวันนี้ทางเรา betflix เครดิตฟรี100 เทคนิคจริงของเกมสล็อต เว็บไซด์ สมัคร สมาชิก betflix จะมาพูดถึงวิธีดารเอาชนะเกมสล็อตออนไลน์ อย่างง่ายๆ วิธี ดู สล็อตแตก เกมสล็อตออนไลน์ของค่าย pgslot ให้กับท่านดังนี้
ReplyDeleteเล่นสล็อต ไปกับระบบออโต้ที่รวดเร็ว และสะดวกที่สุดในตอนนี้ เว็บพนันออนไลน์ ที่ดีที่สุดในไทย เล่นได้ทุกเกม ความสนุก ความบันเทิงตื่นเต้นที่ให้คุณพร้อมเปิดประสบการณ์
ReplyDeleteเกมสล็อต ค่ายใหม่ เกมฮิต ล่าสุด 2022 โหมดสล็อตทดลองเล่น ปั่นสล็อตฟรี ไม่เสียค่าใช้จ่าย อัปเดตเกมสล็อตมาใหม่ให้ทดลองเล่นได้ฟรี ทุกค่าย
คาสิโนออนไลน์ รวมเกมสล็อต เกมคาสิโน สล็อตออนไลน์ รวมเกมทุกค่าย ทุกรูปแบบไว้ให้คุณได้เล่น 1 user เล่นได้ทุกเกม
Cool
ReplyDelete