Hello, again.
I started a new project in between customer work. I have been looking at this baby blue Schwinn Continental sitting in my shop for a long time. I have always liked the color, and there are some pretty descent components on it, but then I would look down and see that awful looking anchor of an American one piece crank. I have come up with a lot of ideas for it, but would never get around to it. Well I finally decided to set a restoration and upgrade budget for it and get to work between customer bikes. (which there has been a lot lately, and some very interesting bike.)
In the budget I decided to convert the one piece crank to euro style 3 piece crank. This will cut the weight and give more options. I original planned to use a crank set from a older Schwinn Le Tour, but I recently got a full 1973 Schwinn Le Tour with paint in wonderful condition for $5, only thing it has a cracked and damaged crank and arm, so I will be using the Le Tour crank on the $5 Le Tour. I will have to come up with a crank some where, maybe dig in to my stash of higher end vintage cranks.
 |
| 1973 Schwinn Continental |
 |
| Before Front View |
 |
| Before Drive Train |
 |
| Before Front Wheel |
 |
| Before Rear Brake |
The bike is in rough shape. Lots of grime and dried grease. All the brake cables, shift cables and cable housings need to be replaced. New tires and tubes will be needed. And a complete overhaul. On the bright side, the frame paint is in good shape. There will need to be some touch up areas where the paint is chipped. The drive side chain stay has a lot of chips, but what old bike doesn't in that area. I think I have come up with an idea for all the paint chips on the chain stay.
I have an idea to go with all white and baby blue theme for the bike. In the restoration budget I have planed for all new cables, all new white cable housing, a new white seat, new tire tubes, new white tires (maybe new black tires, will see when it gets to be to much white) new ergonomic areo brake levers and new brake pads, and a conversion kit for the American one piece crank. The crankset will be from my collection of cranksets. I might be forgetting something, but I will let you know as I get to it in the post.
I start by tearing down the bike and polishing out the frame. I try to lay everything out on a board so I know exactly what I have left to do.
 |
| Frame Stripped of Components & Dirty |
 |
| American Bottom Bracket Dirty |
 |
| Fork & Headset Before Cleaning & Polishing |
 |
| Parts Spread Out |
The frame cleaned and polished out very nicely. I really like the color, it is different from the generic colors you see now. I did not take a photo of just the frame polished, I don't know how I forgot that one, it is my favorite before and after photos. I then moved to the Headset, Shifters and Handlebars. I spent a lot of time standing at the buffer with all this chrome, but with the after results, every minute was worth it. I cleaned all the parts first with soapy water and soaked the bearings in the crock pot on low for a couple of hours. I then assembled the shifters, cleaned and polished the fork, and repacked the bearings in grease. There are photos below of the fork tube and Stem greased. I always heavily grease these areas, it prevents corrosion on the fork tube and also helps prevent the stem from rusting into place many years down the road. I also cleaned and polished the Handle Bars. I am always amazed that Schwinn put such a nice light stem and handle bars on this bike and them skimped on parts in other areas. I am thrilled with the way the headset and bars polished out. I love the classic look of all the polished metal. This is also the smoothest headset I think I have ever come across. They are heavy, but the Schwinn bearings are smooth.
 |
| Shifters & Headset Before Cleaning & Polishing |
 |
| Shifters - Exploded View & Polished |
 |
| Pressing Headset Cups |
 |
| Headset bearings Packed |
 |
| Fork Tube Greased |
 |
| Stem Greased |
 |
| Completed Headset Bars & Fork |
I really like all the polished chrome against the baby blue. Next I started on the brakes. The brakes are descent quality center pull brake calipers. They are Weinmann brakes made in Switzerland, which actually work very well when tuned properly. The brake pads where almost worn down to the metal, so those will be replaced. Which I always do on all my bikes anyways. I start by disassembling the calipers and cleaning the components with soapy water. Next I polish them out on my bench top buffer, which does speed work on polishing. When assembling the calipers I grease all the pivot points. The calipers polished out to a high shine and all the pivot points move very smooth. More polished chrome on the baby blue background. Very nice!!
 |
Brake Calipers Before - Very Dirty
|
 |
| Brake Caliper Before & After |
With the brakes polished I moved on to the bottom bracket conversion. I was originally going to use a Le Tour crankset, but i will be using that on a Le Tour. I do not want to go into my stash of high end vintage cranks, so I found a crank set and Bottom Bracket of an 80s Giant road bike that I scavenged. The Giant's frame was unusable. It must have had acid dripping on the head tube in someones garage, because it was eaten completely through.
I have seen conversions done on other websites. They usually grind out the bottom bracket of the frame to get the conversion brackets to fit corectly. I find that to be a lot of work, and you also may or may not weaken the frame. (I don't really know if that weakens the frame, but I would guess it does.) There is a small bevel on the back side of the conversion brackets. What I do is wrap the brackets in some cloth and clamp the brackets into my vise. I then take a file and file the bevel larger. This gives the 3/32" clearance you usually need to fit the brackets properly. I then use my cups press and press the conversion brackets into place. Conversion brackets come with a right and left side as you sit on the bike. Some companies mark the brackets left and right, others do not. Test this first by mocking up the bracket before actually installing into the bike. With the conversion brackets in place it is just like installing any other bottom bracket. As always I put a layer of grease on the axle to prevent corrosion and pack and grease the bearings. This bottom bracket also has a dust sleeve. (Dust sleeve not pictured.) The Giant crank is in good shape, just a little cleaning & polishing and in instillation. Over all, this conversion went very easy, and will reduce the overall weight of the bike.
 |
| Bottom Bracket Before |
 |
| Conversion Kit & BB before cleaning |
 |
| Before & After Bracket Bevel |
 |
| Cup Pressed |
 |
| Completed Conversion |
 |
| Installing Giant Bottom Bracket |
 |
| Photo With Crank Installed |
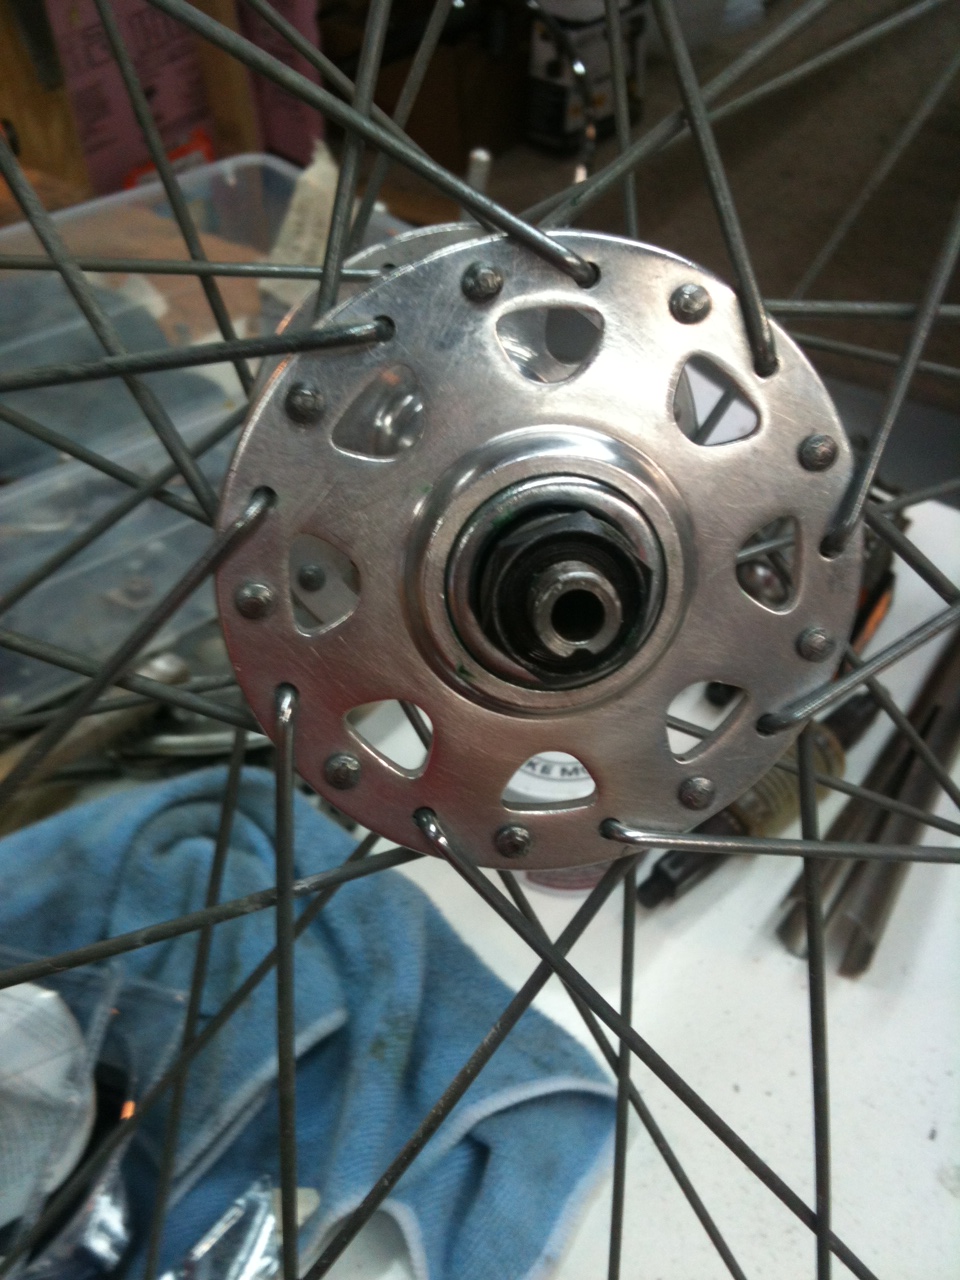
I now turned my attention to the wheels. I wish the tires where new, someone put on some really nice Specialized Commuter Tires, but they are rotted out. New tires and tubes will be installed. Schwinn Approved wheels get a bad rap because they are heavy, but they are also heavy and indestructible, which I find perfect for city riding. You can hit all the pot holes and bumps you want and the wheels will stay straight and true.
There was some surface rust on the rims that I cleaned up with chrome polish and a brass brush. The hubs where extremely dirty and sticky. It took quite a lot of elbow grease to get them clean. When every thing was clean I polished the hubs and bearing races, there are some signs of wear, but not to bad at all. The wheels did not need much truing, just a few loose spokes and a few tweaks. These wheels roll very smoothly. I am very happy with the way the wheels came out.
 |
| Wheel Hub Before |
 |
| Rim Before |
 |
| Rim After Polishing |
 |
| Bearings Packed |
 |
| Wheel Hub Complete |
 |
| Wheel in Stand |
I wanted to find a super light weight seat post in my collection. But I had none that fit this size. So I polished out the original seat post on the buffer. It came out very nice. This is often a neglected area on restored bikes. At the same time I also cleaned and polished the seat clamp, and other miscellaneous parts that needed polishing.
 |
| Misc. Polishing |
My planes for the next day was to get the derailleurs cleaned, polished and lubricated, and also the freewheel cleaned and lubricated. I started with the derailleurs. They where dirty and had some surface rust. I forgot to take photos of them before cleaning and polishing, but I think the can be seen in the drive train photo before the bike was torn down. Did not take to long to get them shining properly. The rear derailleur is a very nice Shimano product. Most Schwinn derailleurs I come across either say Schwinn approved or Le Tour or something like that, so maybe this was added later by someone. I then installed them on the frame. I am now awaiting for new white brake cable housing and derailleur housing to arrive. I used the last of my white on a customers bike last week.
I removed the freewheel when I dismantled the bike. It cleaned up pretty nice with soap and water. I then lubricated it and re installed it on to the rear wheel. When installing a freewheel, always add a little grease to the threads. This will make it easier to remove the freewheel in the future. Odds are you probably will not get it off with out the grease. I really like the way everything has polished up so far. I like the old classic chrome look of bikes in the past. In the rear Derailleur photo you can see an area that will need touch up paint.
|
| Derailleurs Before |
 |
| Pie Plate Polished |
 |
| Freewheel Installed |
 |
| Rear Derailleur Polished & Installed |
 |
| Front Derailleur Polished & Installed |
That is where I am at for now. I am just waiting for the new parts to arrive. With the new parts it should only take me an hour or so to finish it up, plus a few touch up paint areas. While I wait for parts and in between customer bikes I will be starting a Nishiki road bike. I have some ideas that will turn it into a nice bike for getting around town, or a campus bike, either way it will probably be another blue and white theme. Until then, Thanks for looking.
|
| Leaving Off Point |
Hello again, It has been a wile since I have worked on the Continental. Parts have come in, but I have been to busy with customer bikes to work on it. There is not much work to go. I added new all black tires, I also have a white set and a gum wall set, but I think the all black looks good.
I ordered a all white road bike seat. It looks really nice and is extremely comfortable. A new chain has been added, along with all new Jagwire white brake and shift cable housing and new Jagwire brake pads.
I lost my IPhone recently so I am taking photos with a camera I am not use to. And i lost a few photos in the process of learning, so I do not have the best documentation for the end.
 |
| Before Side View |
 |
| Finished Side View |
 |
| Before Front View |
 |
| Finished Front View |
 |
| Before Drive Train |
 |
| After Drive Train |
 |
| Before Front Wheel |
 |
| Before Rear View |
 |
| Before Stem |
I have to take a few more photos and I still have touch up paint and finding a descent set of peddles for it. I am very pleased with the way the bike turned out. A quick run down of new parts.
New Parts:
New Areo Brake LEvers
New 27" tires 3 styles to choose from
New Tubes
New White Saddle
New White Cable Housing
New Brake Cables
New Shift Cables
New American Bottom Bracket Conversion
couplings
Upgraded Bottom Bracket
Upgraded Crank Set
New
Peddles
I really like this bike. I love the baby blue color with all the white accent color. It is not light but it defiantly is solid and smooth. It is a very simple 10 speed setup. Not much can go wrong with this setup. Simple means reliable. I think this would make a great campus bike or around town bike, even a very nice path cruiser. It is so solid, someone could throw a rack on the back and it would be great for groceries or carrying other things. I test road it today, it is smooth and solid, and surprisingly fast for the weight. If I don't get the price I want for the bike I will have no problem keeping it in my collection, it looks great and rides nice.
Update 8-5-12
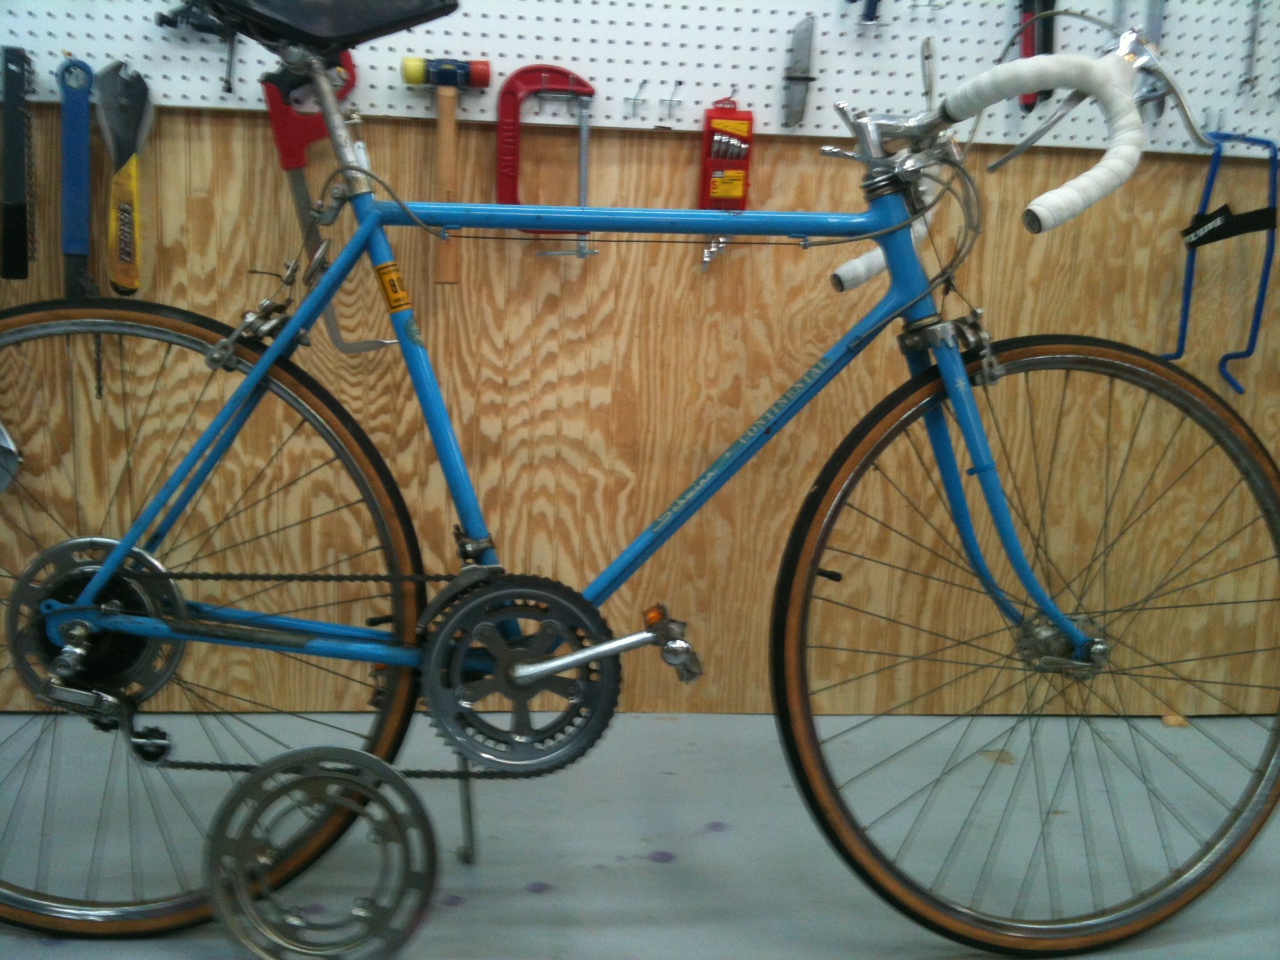
The baby blue Schwinn Continental is now officially finished. I mixed blue and sky blue Testor's model paint to get a some what close match to the blue. It is not a perfect match, but better then the primer that was showing in the chips. I also added Sun Lite platform peddles. I like these peddles, they are especially nice for around town where you are constantly stopping and starting and also bad weather.
Photos below:
 |
| Restored Schwinn Continental - Side View |
 |
| Restored Schwinn Continental - Front View |
 |
| Restored Schwinn Continental - Drive Train |


Nice job! Continentals are heavy, but they ride really smooth. I had a Continental in the late 70's - early 80's. I really like this bike, but I already have enough bikes for now (seven).
ReplyDeleteThank you retrodoug for the kind words. It is heavy but smooth as you say. With a little work and some upgrading can give new life to an old bike. Thanks again.
ReplyDeletei had one exactly like this when i was a kid. bought with money i earned from cutting grass and shoveling snow off driveways.i put over 600 miles on it one summer. this brings back found memories of polishing the chrome and waxing the paint.
DeleteJohn,
ReplyDeleteOutstanding job on that Bicycle! What polish do you use?
Exceptional restoration. You really spend the time.
ReplyDeleteI have a Question: I have a 1974 Le Tour, same baby blue, that has a rather sticky rear derailleur, looks very similar to your continental, but I don't have a diagram so I can reassemble it after I spring the tensioner, do you have or know where I can get a breakout diagram of that derailleur? Thanks and keep up the fine work.
Thanks for the kind words, I use just a basic polishing clay on a buffing wheel. I think it is brown or red rouge or something like that.
ReplyDeleteThanks for looking at the blog. I do not know where to get a diagram for the rear derailleur. I am not sure I have ever had to take a LeTour style apart. I have taken many Raleigh rear derailleurs apart and that is important to check the position of the spring before removing it, otherwise its a lot of trial and error to get right. If you are in the Gurnee area I can take a look at it, give the bike a tune up.
ReplyDeleteThanks,
John
I purchased the Continental tonight. The pictures clearly show the details and quality of John's work. It honestly rides like a brand new bike - tight as a drum! Exceptionally high quality work and a very fair price - Thanks again John. Looking forward to taking the bike out this weekend for a couple of long rides.
ReplyDeleteDave C.
This comment has been removed by the author.
ReplyDeleteGreat job. I'm currently restoring a Continental. By coincidence, I'm also going with white and that poppy blue but with black instead of chrome.
ReplyDeleteHow can you identify the year the bicycle was made?
Thanks. I can't wait to restore mine.
http://re-cycle.com/History/Schwinn/SwnB_Serial.aspx
Deletethis is the site is used to decode my 72' continental serial number (should have an imbedded date code in it). hope it helps
Thanks for the kind words Edgar.
ReplyDeleteIf you google search Schwinn Serial numbers they will tell you what year your frame comes from using the serial numbers.
Thanks John,
I would like to see a photo of the black when your done if wouldn't mind.
Thanks. I looked it up, but I couldn't find any info on it.
ReplyDeleteI have GD45103.
May I know what BB size you used?
I'm currently looking for parts. My frame did not come with a BB. I'm adding the conversion kit so I'm not limited to American standard parts. Any help is appreciated.
Thanks.
http://schwinncruisers.com/schwinn.php?serial=GD45103
DeleteHello Edgar,
ReplyDeleteI am sorry but I do not know the BB size. I looked through my notes, but did not right it down. I have since sold the bike so I can't measure it.
Is there another serial number on the rear drop outs, that number does not seem right.
Thanks,
John
Serial beginning GD = July 1968. See www.trfindley.com for the list of Schwinn serial numbers decoded.
ReplyDeleteI just restored my father's 1973 Schwinnn Continental in Yellow paint job. I didn't polish the aluminum components nor did I repaint any of the dings in the frame paint. Rides like a dream and I'm sure my dad could tell me how he got each of those scratches. My last piece of th epuzzle is the rear wheel which has a pretty good dent in it. I would like to find just an original true rear rim that I could polish up.
ReplyDeleteThank you for restoring another beautiful Schwinn for the bike community. Nice job on the story! I rode the exact baby blue Continental for several years and loved it. 1981 I purchased a new chrome Voyageur 11.8 at the Maplewood MN Schwinn dealer and eventually it needed restoring. See my pics -
ReplyDeletehttps://picasaweb.google.com/110504172566549674560/SchwinnVoyageur118MaidenVoyage
How do you get the hand brakes off of the handlebar? I just got a 70's continental and want to flip the bars up like I had them on my old bike. But I can't get the brakes to budge on the handlebar.
ReplyDeletecraig.polak@sbcglobal.net
Hello,
DeleteDo remove the brake levers start by removing the brake cable then pull the brake lever all the way in. Look inside the gap that is created when the lever is pulled, there is a flat head screw in there. Loosen the screw slowly and test if the lever is loose enough to remove. Go slow and o not loosen the screw to far or the lever and bracket will come apart, which is fine, it's just a pain to get them back together later.
Thanks for looking,
John Z.
This is awesome! I just scored a 74 brown Continental and am hoping to make her my first project bike. Absolutely love what your end result looked like, especially the polished look!
ReplyDeleteAs I'm completely new to refurbishing, would you mind sharing how your polished the parts so well? They look amazing and looking at my Continental, it could use a similar touch as it sat in a garage for the last few years collecting dust/grime.
Again, very cool work! Bike looks great!
Hi Brandon,
ReplyDeleteThat's great on starting a Continental for yourself. I use a buffing wheel and different polishing compounds to polish the chrome and alloys. But to start you can use a soft brass brush for chrome and turtle wax chrome polish. For the alloy aluminum use Mothers Mag and aluminum polish and a cloth. It will take some time and elbow grease but you will get good results. D not interchange the two polishes or you could do some damage to the metals surface.
Thanks for the interest,
John Z.
Good Day John,
ReplyDeleteI just came across your post, and Great Job on the resto!
I to have a 70’s Schwinn Contential. It hung on my shop wall for maybe 15 years? It was mine as a kid, and received some scoffing from my bike snob friends on why I still have it. Last year year was the time. It needed too many replacements, (esp. the wheels) so I made it into a flip-flop hub SS.
What do you think?
http://velospace.org/node/43902
~Scott M.
Hi Scott,
ReplyDeleteGreat job on the Continental!
Just shows there is still life in all bikes.!
John,
ReplyDeleteI really like this restoration you've done. I'm in the process of restoring a 70s Schwinn Varsity and I believe it has the same shifters as this Continental. It uses a disc-like shift cable fitting. I was looking at the Jagwire Road Pro Complete Kit (brake cables & housing, shift cables & housing) but it does not seem to have the disc fitting. I noticed you used Jagwire housings, what cables did you use?
Thanks for any help!
I got new cables for my '75 Continental on Velo Orange... http://store.velo-orange.com/index.php/components/shifting-freewheels-cassettes/cables/vo-colored-deraileur-cable-kit.html
DeleteGreat job - what tires did you use? Do they need to be specific for the S6 rims? I have a 66 Continental for my first restoration...
ReplyDeleteHi John,
ReplyDeleteYou never did say how much you wanted for your restored bike. I am quite curious!
Thank you.
Hello Hayes,
DeleteI sold the continental a long time ago. My restoration work averages between $125 and $250 sometimes more and sometimes less. Price of parts not included. For bikes I find on my own when restored average between $250 and $600 all depend on brand and type, again sometimes more sometimes less. If you would like a general idea the I of can be found at the link below.
Thanks for the interest,
John Z.
http://www.johns-recycled-bicycle.com/
I have a '75 with the large frame and a '72 with the standard size frame I'm doing a bit at a time - and riding. I love these bikes. ( http://1975continental.blogspot.com ) You have done a beautiful job here. It's a joy to see.
ReplyDeleteDan
I have schwinn varsity for sale 80.00
ReplyDeleteI have schwinn varsity for sale 80.00
ReplyDeleteQuestion;
ReplyDeleteI'm fixing up a 1973 Continental but have been having issues with the tubes blowing out every time I ride. The tire (that I replaced) seems to be slipping off the rim... no matter how well I seat it and how much time I take to blow it up.
Any ideas or specific models of tires you used?
Schwinn wheels are different size then standard. This link to a tire will help. Also Schwinn Continental rims are not hooked and can't take high pressure. Tires will say high pressure 90 psi but the rim can only talk about 55-60 psi. Here is a link to a Schwinn tire. https://www.amazon.com/gp/aw/d/B0088X3Z0I/ref=mp_s_a_1_1?qid=1465769370&sr=8-1&pi=SX200_QL40&keywords=schwinn+27+inch+tire&dpPl=1&dpID=41q2u47f0KL&ref=plSrch
DeleteHi there. Where did you get your parts from?
ReplyDeleteHi John great job on your SAchwinn - it looks real sweet!
ReplyDeleteI am rebuilding a 1974 Continental. I am having a difficult time installing the shifter housing for the front Derailleur by the bottom bracket. The Schwinn housing uses a coiled wire inside but the Jagwire has Horizontal wires making it much more stiff. The housing by the bottom bracket is short and I can not get the Jagwire housing in place without getting a crimp in it. I gave up and put the Schwinn housing back.
Did you have this problem or have any ideas for me
Thanks PJ