 |
| 1983 Miyata Gran Touring 210 - Bicycle After |
 |
| 1983 Miyata Gran Touring 210 - Bicycle Before |
I am starting a restoration and upgrade for Emmett. I am excited for this project, I am always excited for all projects but this is a touring bike, touring bikes are special to me. There is something that screams independents, adventure and self resilience about a touring bike! I love all forms of biking but touring is my number one love. Riding for days on end with the freedom to ride as hard as you want or as easy as you want, to decide that road looks interesting, I'm going down it. To stop and stair at the beauty of nature for as long as you want.
Touring bikes are very well designed and usually have a nice balance between speed and comfort. There is a lot of thought that goes into a touring bike. There is a lot of thought that goes into touring.
Miyata has had a nice history of building fantastic bicycles. They are well designed and high quality! I am going to maybe put a post together with more information on Miyata Bicycles if I get time, but we are entering the busy season now.
I like the idea for the theme Emmett came up with. The paint is pretty shot on the Miyata, the idea is to strip the paint, buff out the steel and then clear coat the steel. From there leather bar tape and a brooks leather seat with all black tires and cable housings, a bare bones look. I think it is going to be really nice. Streamlined and raw.
 |
1983 Miyata Gran Touring 210 - Bicycle Before
Handlebar View |
 |
1983 Miyata Gran Touring 210
Bicycle Before - Drive Train |
 |
| 1983 Miyata Gran Touring 210 - Bicycle Before - Crank |
 |
1983 Miyata Gran Touring 210 - Bicycle Before
Paint Condition |
 |
1983 Miyata Gran Touring 210 - Bicycle Before
Front Brake |
 |
1983 Miyata Gran Touring 210 - Bicycle Before
Bottom Bracket |
I stripped the frame of all of the components, there was a few frozen areas, the crank bolts and peddles needed a lot of work to remove, after that everything removed fine. I would like to get to the paint stripping point of the project, but this rain has slowed things down. The paint stripper has very strong fumes and I will only apply it outside and try to contain the chemicals as much as I can. Looks like tomorrow is going to be another rainy day, hoping it clears soon. The endless winter continues!
 |
1983 Miyata Gran Touring 210 - Frame Stripped of
Components - Frame View |
 |
1983 Miyata Gran Touring 210 - Frame Stripped of
Components - BB View |
 |
1983 Miyata Gran Touring 210 -
Fork Before Paint Removal |
I got started on stripping the frame and fork today. I hung the frame and fork from the ceiling in the garage and applied a coat of foaming spray paint stripper. Different paints react different way to the stripper, I am sure its the type of paint, some flake of in big chunks, some kind of just wipes off and some is very difficult to remove. Luckily the Miyata has paint that removes in large flakes, this makes it much easier. I have gone through one coat and one scraping with a wire brush. I apply the foaming stripper and allow it to sit for about two hours, the can says 30 minutes, but I find two hours works much better. After sitting I brush the paint off with a wire brush.
 |
1983 Miyata Gran Touring 210 - Frame
Before Stripping |
 |
1983 Miyata Gran Touring 210 -
Down Tube - Paint Peeling |
 |
1983 Miyata Gran Touring 210 -
Fork - Paint Stripper |
 |
1983 Miyata Gran Touring 210 - Frame - Bottom Bracket
Paint Peeling |
 |
1983 Miyata Gran Touring 210 - Head Tube
After First Strip Coat |
 |
1983 Miyata Gran Touring 210 -
Frame After First Strip Coat |
 |
1983 Miyata Gran Touring 210 - Bottom Bracket
After First Strip Coat |
The last couple of days I have gone through two more coats of stripper and still have stubborn areas of paint. I have wiped the frame down with mineral spirits to remove old stripper, dirt and paint chips and moved the frame into the shop. I will now apply a different form of stripper with a brush and work it into the stubborn paint with a wire brush, this also allows me to get into tight places. When the stripper has sat for a while I will brush it with the wire brush again. I am trying to avoid sanding, I want the unsanded look to the metal, I may not be able to avoid it and will have to polish the metal out, but I will try.
 |
1983 Miyata Gran Touring 210 - Frame - After Three Coats
Paint Stripper |
 |
1983 Miyata Gran Touring 210 -
Stubborn Paint - Down Tube |
 |
1983 Miyata Gran Touring 210 -
Head Tube Stripped |
 |
| 1983 Miyata Grand Touring 210 - Paint Stripper Brushed On |
Going has been slow removing the suborn paint from the frame and tight areas. If I was just repainting this frame I would have used a course grit sand paper and sanded it off quickly but the frame is going to stay raw metal with a clear coat, I do not want sand paper marks on the frame. So in the end paint removal has been time consuming and we are in the busiest tune-up season so its been busy.
I am thinking this bike should have a name, something like "Miyata in the Raw" or "Naked Miyata" or just "Raw". The frame is completely free of paint and cleaned, tomorrow will get the first coat of clear, it will need to dry and harden for a few days before sanding and then a second coat will be applied and then as many coats as needed.
 |
| 1983 Miyata Gran Touring 210 - Frame Ready for Clear |
 |
1983 Miyata Gran Touring 210 - Frame Ready for Clear
Seat Tube Lug |
 |
1983 Miyata Gran Touring 210 - Frame Ready for Clear
Bottom Bracket |
 |
1983 Miyata Gran Touring 210 - Frame Ready for Clear
Head Tube |
This restoration/build will progress a little different then most. Since there is a lot of wait time on clear drying I am cleaning, polishing and restoring components and then wrapping them and putting them in storage until needed.
I started with the bottom bracket and headset. The bicycle overall has a about the thickest layer of old grease and grime that I have ever seen, and maybe the hardest. The bottom bracket and headset components went in the crock pot on low for two days and two water changes. In the end the grease came off and the components polished very nice. The bottom bracket bearings are shot and will be replaced but the bearings cups are perfect.
 |
| 1983 Miyata Gran Touring 210 - All Components |
 |
1983 Miyata Gran Touring 210 - Bottom Bracket
Before |
 |
| 1983 Miyata Gran Touring 210 - Headset - Before |
 |
1983 Miyata Gran Touring 210 - Bottom Bracket
Cleaned & Polished |
 |
| 1983 Miyata Gran Touring 210 - Headset - Cleaned & Polished |
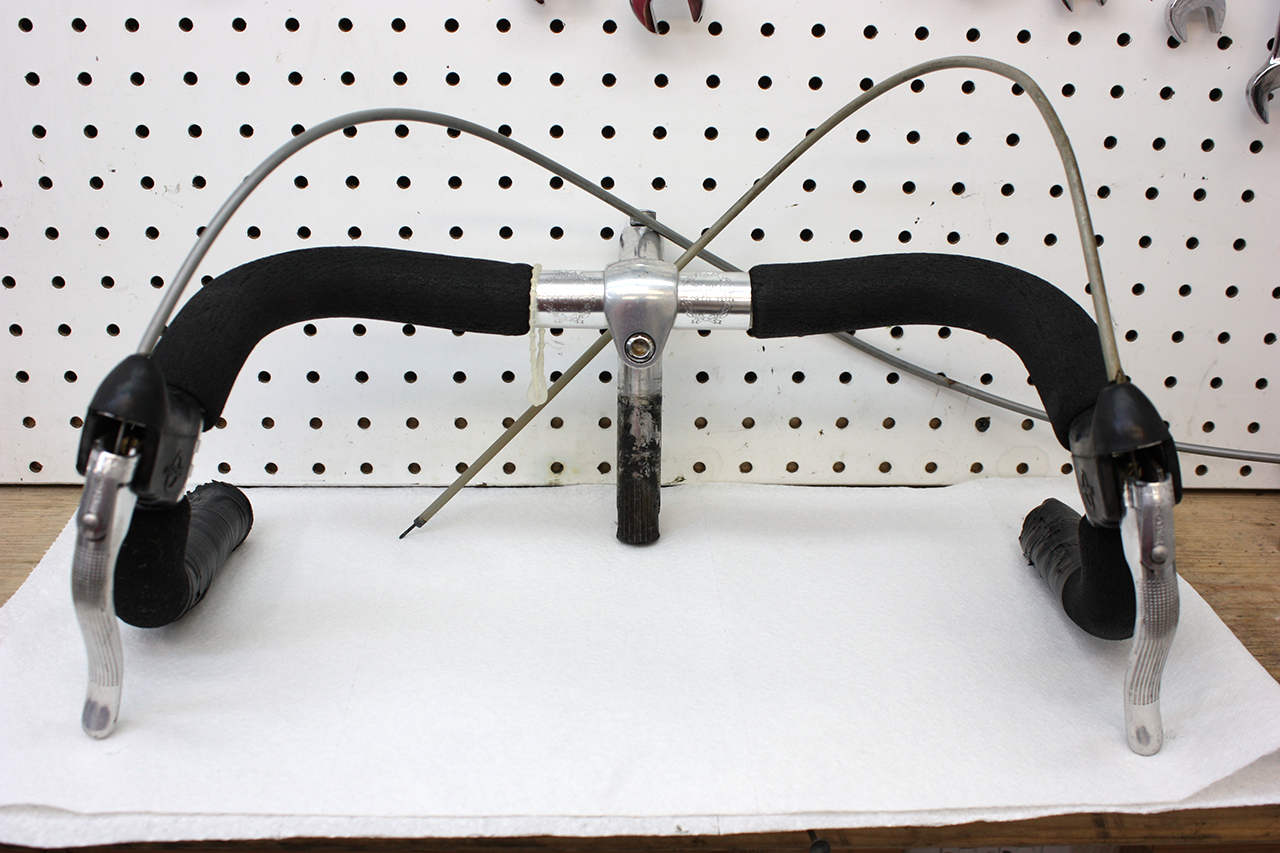
Next I started work on the handle bars and the stem or quill. The handle bars had the old foam tubes bar grips from the late 80's and early 90's that everyone had. The foam tubes grips is awful to get off, it is usually rotted to the handle bars and takes some cutting and cleaning, this was no exception. The handle bars are in really nice shape and being a touring bike they are randonneuring bars, the bars polished very nice, i like the handlebars a lot. The stem has some scrapping but cleaned up and polished nice.
 |
1983 Miyata Gran Touring 210 - Handlebars & Stem
Before |
 |
1983 Miyata Gran Touring 210 - Handlebars & Stem
Foam Grips Removed & Cleaned |
 |
1983 Miyata Gran Touring 210
Handlebars & Stem
Polished |
Next working on the crank. After cleaning of all the hard grease and grime I am a little worried about the wear on the chain rings. The large 52 tooth ring has a lot of wear and the teeth are worn way down in some spots. I am hoping there is some life left in it. The middle chain ring is fine as it is thick and chromed, the small chain ring shows some wear but not as much as the large, hoping there is life left there.
There are some gouges on the crank arms and thick deep grease on the backs of the crank arms. It took a lot of elbow grease and some dental tools to remove all the grease. The crank arms look good polished, the gouges are still there but overall look good.
I reassembled the crank, we will see if there is still life in the chain rings when the bike is assembled, I would put it at 40% that the large is still usable.
 |
| 1983 Miyata Gran Touring 210 - Crank Before |
 |
| 1983 Miyata Gran Touring 210 - Crank Disassembled |
 |
1983 Miyata Gran Touring 210 - Large Chain Ring
Bottom Right Quarter Worn |
 |
1983 Miyata Gran Touring 210 - Crank Components
Polished |
 |
1983 Miyata Gran Touring 210 -
Crank Polished & Assembled |
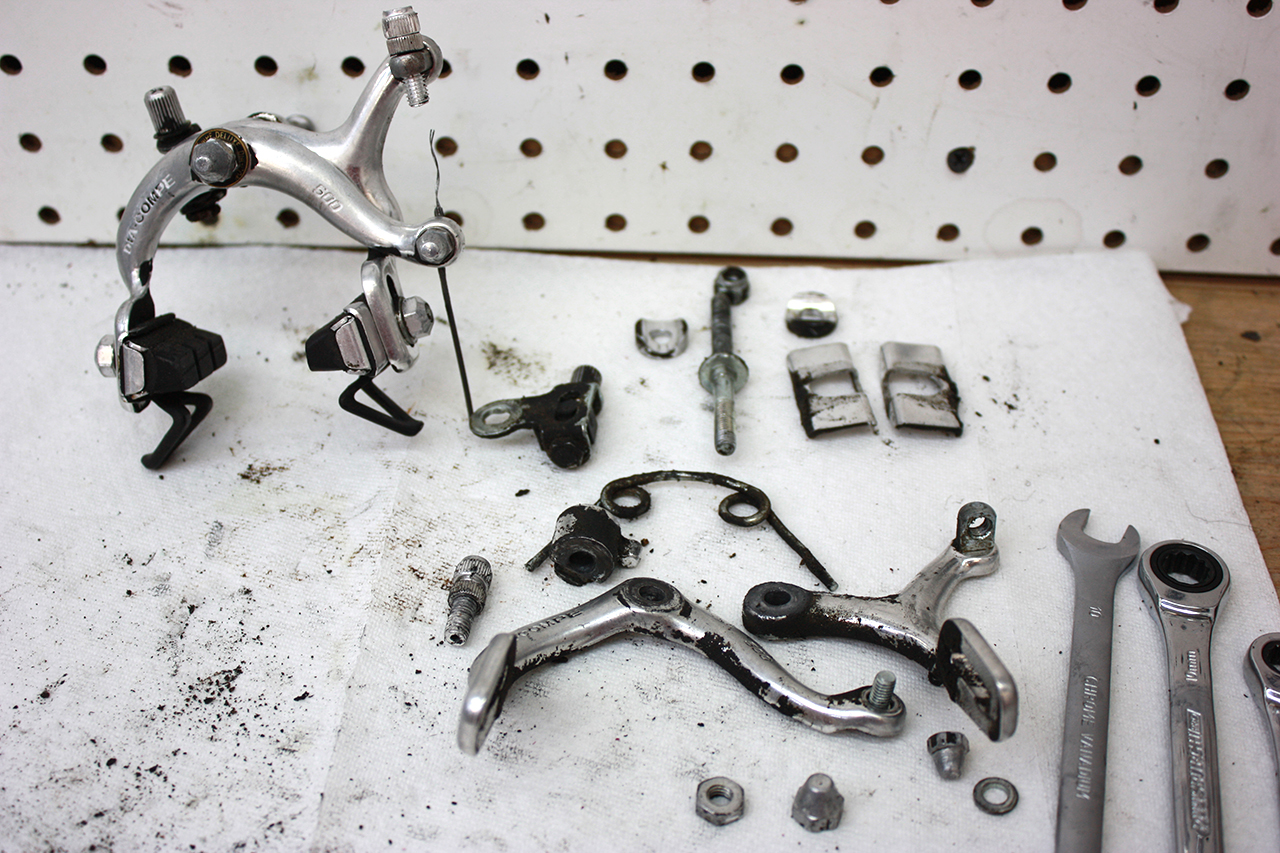
With the crank complete I have started work on the brake calipers, this is where the old thick dried hard grease is the worst. I did not even try to scrape it off its so hard, I just disassembled the caliper one at a time and put it right into the crock pot. By one at a time I man that with brake calipers you should also start with one caliper and restore it all the way through before starting the second. This way you always have a reference in an assembled caliper to work by so you know ware all the very small components and the many washers and spacer go.
 |
| 1983 Miyata Gran Touring 210 - Brake Calipers - Before |
 |
1983 Miyata Gran Touring 210 - Brake Calipers - Before
Rear View |
 |
1983 Miyata Gran Touring 210 - Brake Caliper - Before
Exploded View |
That is where things stand now, the brake caliper components are still soaking after about 8 hours, hoping to be able to polish them soon. Tomorrow I start clear coating and continue to work on components. Hoping to have the brake calipers and derailleurs done and hopefully the brake levers and starting work on the wheels.
Today:
Today has been a bit of a frustrating day with the Miyata and the rear wheel but first the brake caliper. The first brake caliper is finished and looks incredible. For where these brake calipers are starting from I am extremely proud of the results and well, my work. In the photo you can see two of my new tools, these are brake caliper wrenches, basically 8-11 mm cone wrenches. This allows a flat wrench to fit on one of the nuts and locks them against each other. Works so much better then a wrench I modified to work, but niot work well.
 |
1983 Miyata Gran d Touring 210 - Brake Caliper - Before & After
New Brake Caliper Wrenches |
The rear wheel is where I lost a lot of time today. The original rear wheel is badly damaged so we are going to use a pretty close match replacement set. The problem is the freewheel. I will state that I do not like the two notch freewheels to start, there just isn't good leverage to remove these freewheels. First attempt to remove the freewheel the notches, which are not only the two notch variety, but the raised two notch variety, broke or pretty much shattered. Two very weak metal ridges define the notches, the inset variety work much better, but these raised ridges shattered with hardly any force.
With some creative use of a Dremil tool and grinding wheel I was able to create some areas to get leverage. Using an old wheel skewer I very tightly held the freewheel remover tool in place. After a lot of tries and a few alterations the freewheel finally broke loose. Good thing this freewheel is not being used again, its shot!
Now with the freewheel off the next problem is the grease in the rear wheel. It may be the worst I have ever come across. Even with vinyl gloves on the old grease was like super glue, everything i touched it was like I was glued to. It resembled a bad sitcom and a glue gag. So that is where I am after today, a lot of time not a lot accomplished, unless you look at all the problems over come as accomplishments, maybe I do?
 |
| 1983 Miyata Gran Touring 210 - Replacement Rear Wheel |
 |
1983 Miyata Gran Touring 210 - Old Freewheel
Click for larger photo to see the small ridges creating
the notches before they shattered. |
 |
| 1983 Miyata Gran Touring 210 - Rear Wheel Hub - Before |
 |
| 1983 Miyata Gran Touring 210 - Rear Wheel Rim - Before |
 |
1983 Miyata Gran Touring 210 - Rear Wheel
Super Glue Grease |
First an update on the front brake caliper, and the update is beautiful!
 |
| 1983 Miyata Gran Touring 210 - Brake Calipers - Complete |
The rear wheel took a lot of polishing, there is still a few spots that are not perfect because of corroding, but over all the wheel is very nice. The wheel needed a lot of truing and just about every spoke was very loose. The old super glue crease also took a lot of work to clean up. In the end the wheel looks very good.
 |
1983 Miyata Gran Touring 210 - Rear Wheel Hub
Polished |
 |
1983 Miyata Gran Touring 210 - Rear Wheel Rim
Polished |
The final coat of clear has been applied to the frame today, in a couple of days I will be able to polish out the clear coat and start the build up. Looking forward to seeing it.
The clear coat on the frame was dry enough to polish and start build up today. The frame looks good, it has that raw steel look.
 |
| 1983 Miyata Gran Touring 210 - Frame Clear Coat |
 |
1983 Miyata Gran Touring 210 - Frame Clear Coat
Bottom Bracket |
 |
1983 Miyata Gran Touring 210
Frame Clear Coat - Seat Stays |
With the frame ready I started work on the headset. I pressed the cups and packed the bearings. I like the polished chrome of the headset against the raw steel of the frame.
 |
1983 Miyata Gran Touring 210
Headset Cups Pressed |
 |
| 1983 Miyata Gran Touring 210 - Headset Bearings Packed |
 |
1983 Miyata Gran Touring 210
Headset Complete |
After the headset I got to work on the bottom bracket. I replaced the bottom bracket bearings, they where way beyond saving. I also installed the crank at this time. I like all the metal and chrome look.
 |
1983 Miyata Gran Touring 210 - Bottom Bracket
New Bearings on left |
 |
1983 Miyata Gran Touring 210\
Bottom Bracket Bearings
Packed |
 |
1983 Miyata Gran Touring 210
Bottom Bracket Complete |
 |
1983 Miyata Gran Touring 210
Crank Installed |
At this point the bike is really starting to look good and only looks better with the quill or stem installed and the handle bars. I can't wait to see the leather bar tape on the handlebars. I really like the randonneur handlebars.
 |
1983 Miyata Gran Touring 210
Stem & Handlebars Installed |
Next I attached the brake calipers to the frame. I said it before but the brake calipers are stunningly beautiful My best work ever considering where they started.
 |
1983 Miyata Gran Touring 210
Front Brake Installed |
 |
1983 Miyata Gran Touring 210
Rear Brake Caliper Installed |
Just to see how it looks I installed the rear wheel. The freewheel still needs to be overhauled, but I had to see.
 |
| 1983 Miyata Gran Touring 210 - Rear Wheel Installed |
 |
| 1983 Miyata Gran Touring 210 - Bike as of Now |
So at this point I have the freewheel, derailleurs, brake levers, front wheel and chain to overhaul and restore. Tomorrow should go a long way to getting those things done.
Below are photos of the front wheel. The wheel had some pretty nasty grease, but cleaned up pretty good. Polishing too some time as both the front and rear wheel have some corrosion and bad spots. Also making polishing the rim a little tricky is the rim is concave, it was tricky getting into the concave to polish it. The bearings and hub components had old dried grease but where in good shape. The wheel looks good installed and turns nicely.
 |
1983 Miyata Gran Touring 210
Front Wheel Before |
 |
1983 Miyata Gran Touring 210 - Front Wheel
Old Grease |
 |
1983 Miyata Gran Touring 210 - Front Wheel Installed
Hub Polished |
 |
1983 Miyata Gran Touring 210
Front Wheel Installed
Old Tire |
 |
| 1983 Miyata Gran Touring 210 - Bicycle Now |
I started work on the brake levers. I removed the brake lever hoods and cleaned and polished the metal components. The levers polished beautifully on the bench top buffer, I am very pleased. I also cleaned and treated the rubber hoods and re-installed them. I am happy with the brake levers.
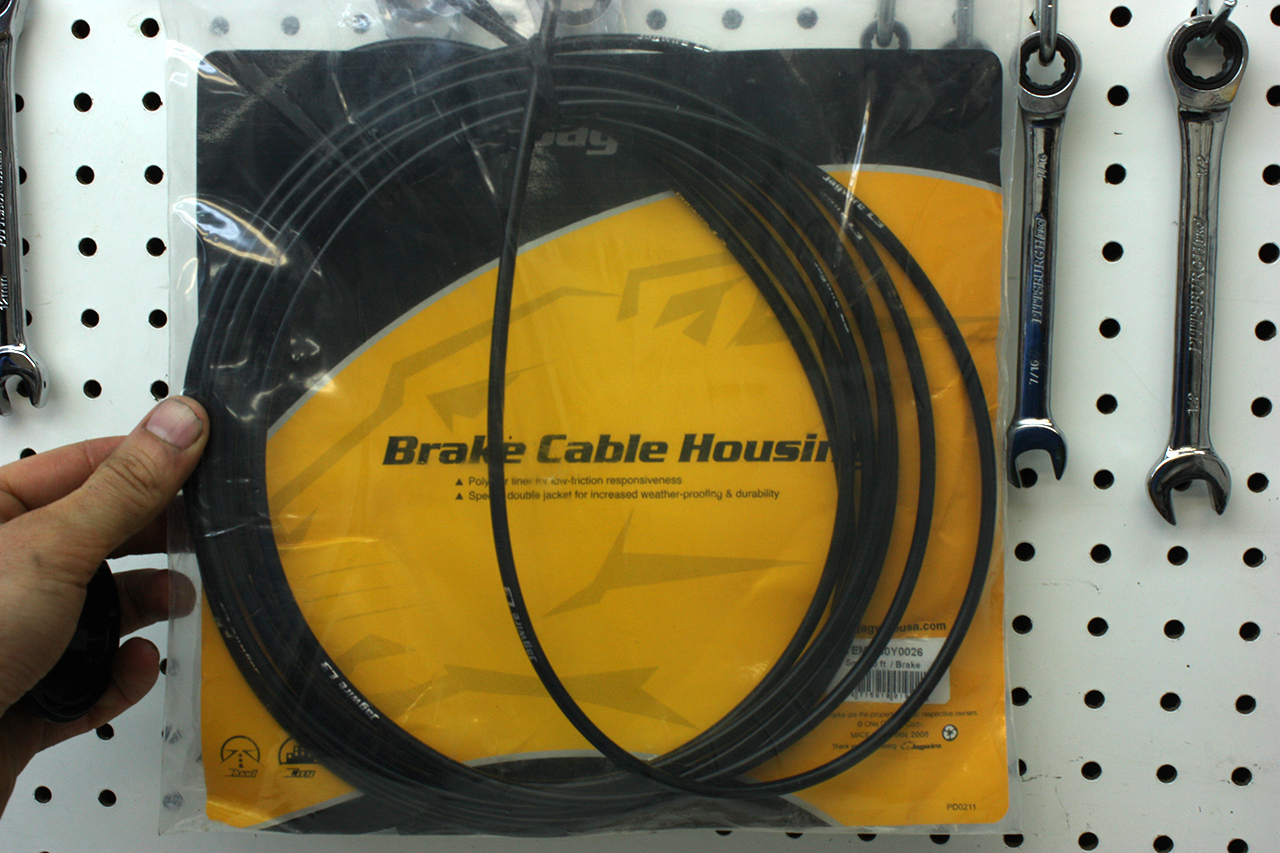
With the brake levers installed on the handlebars I started running cable housing and brake cables. The black housings look great against the metal frame. The rear brake took a lot of fine tuning to get right, but now both brakes function nicely.
 |
| 1983 Miyata Gran Touring 210 - Brake Levers - Before |
 |
1983 Miyata Gran Touring 210 - Brake Levers Before
Hoods Removed |
 |
| 1983 Miyata Gran Touring 210 - Brake Levers Polished |
 |
1983 Miyata Gran Touring 210 - Brake Levers
Complete |
 |
| 1983 Miyata Gran Touring 210 - Brake Levers Installed |
 |
| 1983 Miyata Gran Touring 210 - Brake Cable Housing |
 |
1983 Miyata Gran Touring 210
Brake Cables Complete |
Yesterday Emmett brought over some really nice tires. I can not find a name on them but they look nice and look mean. You can see the front tire in the photo above and both tires in the photo below.
 |
| 1983 Miyata Gran Touring 210 - Tires Installed |
Last of the major parts do be restored are the derailleurs and shift levers. The awful grease is hard caked on the derailleurs and shift levers, they have been soaking in cleaner for days. The front derailleur is polished and completed. It took a lot of flushing of the pivot points and lubrication but now works well.
 |
| 1983 Miyata Gran Touring 210 - Front Derailleur after Cleaning |
 |
1983 Miyata Gran Touring 210 - Front Derailleur
Complete & Installed |
I also installed the freewheel but must have forgotten the photos. The freewheel was also caked in the awful grease and took days of soaking and a lot of flushing out of the bearings. After a lot of oil and spinning of the freewheel the freewheel spins very smooth, I am pleased with it, a little loud, but smooth.
Whats left is the chain and the rear derailleur. The rear derailleur is an odd one, it took me some time to figure out how to remove the jockey wheels and cage. The rear derailleur is still soaking in cleaner.
I have also polished the seat post but I am pretty sure the seat bolt may be unusable. It is bent and the threads are shot.
Things are moving along well, the rear derailleur has been a bit of a pain. I do not like the rear derailleur at all, it is a Suntour XCM rear derailleur, it functions fine, its just way over designed. Its way to complicated to do a simple thing. There is a lot of plastic and paint, chrome and aluminum polish many times over look like new, plastic and paint does not. However it does its function well.
 |
1983 Miyata Gran Touring 210
Rear Derailleur Installed |
 |
1983 Miyata Gran Touring 210
Chain Installed |
With the chain installed and the derailleurs tuned the drive train seems to be okay, on the stand at least, that can chain in a test ride with force being applied. We will have to see. The drive train is a little loud which can be a sign of wear and looseness. I am hoping for the best.
Emmett picked up a Brooks B-17 Champion Narrow saddle in dark tan. The brooks really look great against the raw frame. Emmett also purchased Brooks leather handlebar tape.
 |
| 1983 Miyata Gran Touring 210 - Brooks B-17 - Installed |
Brooks are fantastic saddles. There is a wearing in period that the saddle can be quite uncomfortable, but with proper care and riding the leather will form to you and be extremely comfortable. I have been riding an old reconditioned Brooks saddle for quite a while and recently I ordered a new Brooks B-17 non narrow aged leather saddle, I am really looking forward to it. Below left is a link to Emmett's saddle and a link to the right for my saddle also search Amazon for Brooks saddles with the link in the upper right hand corner of the blog to see the wide range of bicycle saddles Brooks offers.
Below is a photo of the bicycle as of now. The Brooks leather handlebar tape needs to be installed and the rear rack, I am sure I am not remembering a few last minute things but the bicycle is almost complete.
 |
| 1983 Miyata Gran Touring 210 - Bicycle as of Now |


Mindsets & Lifestyles have to change....or it will keep passing on to all generations...Praying that change will come.... Leather Repairs Bolton
ReplyDeleteA man after my own heart. I came across this site searching out Miyata Gran Touring. I've been refurbishing/rebuilding vintage frames for over 20 years mainly as a hobby. As you know very difficult to do this and make much of a profit. Great job on the Gran Touring,I'm in the process of building up one myself while trying to turn other folks into re-cycling cycles. http://forums.thepaceline.net/showthread.php?t=143315
ReplyDeleteVery nice work. The detailed photos are helpful as I begin to restore a 1989 Miyata that was recently given to me. Question on the cleaning process - do you add a solution to the crock pot, or does plain water do the trick? Also, are there any components or pieces that should kept out of the bath? Thanks for your help.
ReplyDelete